Vera Olkhovskaya
"I sew myself!" - one of the most popular mottos of good housewives and fashionistas.
In this article, we will analyze the eternal trend “under the bones” - a dress with a cutout on the back.
And those who are eager to find women's patterns will receive links to skirt patterns and dress patterns.
Photos for the article were sent by members of my groups on social networks "Cutting, sewing and free patterns."
Attention! Most models with cutouts are NOT suitable for slouching girls and girls with protruding shoulder blades.
Some models will not fit even girls with normal posture and are designed ONLY FOR BENDED figures.
As you may have guessed, neckline cutouts are different and they require a different approach.
The easiest option is a dress based on a ready-made pattern.
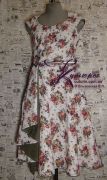
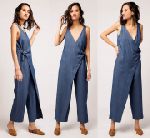
Consider photo 1.
 All these models can be sewn using very simple basic patterns. For the extreme left and right and gray in the center at the top, both the stretch base and any other base are suitable.
Stretch base - see how to build patterns for free at the link.
For all these cutouts, it will also work. little black dress pattern, which can be downloaded almost free of charge in the pattern store.
We will analyze the long black dress separately later, but you can make these cutouts on any basis with a straight or flared skirt.
That is, the one presented above is also suitable. little black dress pattern or pattern "dresses with a flashlight". Fitting is carried out on the fitting.
Let's figure out how this is done.
So, you have made patterns WITHOUT a cutout on the back. Prepared the product for fitting.
Put on and mark the cutout configuration. It is especially important to outline the width and depth.
 When marking, remember that the dress should be measured on the bra with which you will wear it.
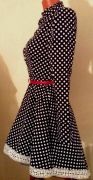
This is especially important if you are sewing a dress that hides the “bridge” of the bra (a long dress in photo 1 and photo 2).
If you are going to wear a dress without underwear, the fitting should be carried out by putting the dress on the naked body.
It is worth noting that low-back stretch dresses tend to deform, so another adjustment may be required after processing the neckline.
Amateurs believe that if you sew such a dress for yourself, you can try on a friend, but I would warn you about this, even if you have the same chest and hip volumes.
But it is a good idea to involve a friend in the fitting - let her outline the width and depth of the neckline.
After marking is done, remove the dress and fold it in half, armhole to armhole, sleeve to sleeve, matching the shoulder and side seams.
Use tailor's pins to pin the product along the shoulder and side seams, along the armhole and in other places, so that both halves of the dress form one whole.
Correct the cutout line on one side and pin the product near this line with pins.
Only after all these preparations, boldly cut out, stepping back, if necessary, from the above line of 0,5 - 1 cm for processing the cutout.
Thus, the cutout should be strictly symmetrical.
When sewing clothes At home, the issue of processing such cutouts is acute.
For stretch fabrics, the easiest option is processing with "oblique" trim, according to the type of neck.
The inlay should be cut from the stretch along the transverse thread, therefore we call it “oblique” conditionally.
Processing with a special stretch trim is also possible if you have the necessary tools for this.
For non-stretch fabrics - processing is suitable regular bias tape и turning. That is, we process it in the same way as the neck.
 For stretch guipure, there is an even simpler way - overcast and stitch with a zigzag triple (see "Machine seams") lace of the desired width.
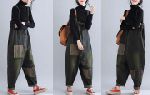
This option is suitable for the models shown in photo 2.
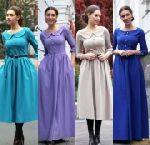
Now let's talk about dresses, the cutout on the back of which is laid constructively, that is, at the time of creating the patterns (photo 3).
For all the dresses in photo 3, as a skirt, you can use the usual four-seam flared as the basis, adding the necessary deflections along the side and back middle seams, as for a black dress, or without adding - for red and white (Fig. 1).
In order not to be mistaken, the RFP of the skirt can be made with a high one-piece "belt" (10 - 15 cm), and cut off the excess on the fitting or attach (butt with adhesive tape) to the template of the RFP of the skirt a fragment of the back.
The shelf should definitely be combined with the PP skirt.
In photo 4 - a similar model, but it looks like the skirt is straight.
 (By the way, skirt pattern straight free и pattern of a straight skirt with a one-piece belt almost free download)
You will have to model by taking a pattern of an adjacent or semi-tight dress, like this one.
Since there are only small fragments from the back of the bodice, it would be unreasonable to cut it out entirely and mark the neckline when trying on.
Therefore, only modeling (Fig. 2)!
Moreover, if you are going to wear it, then I recommend closing the neckline with a very thin flesh-colored “mesh”.
A very important question for this model is what will be the clasp? On fig. 2 shows the allowance of the transition part for the fastener.
 And, the last model in this article with a "sun" skirt (photo 5), which is easy to sew by yourself.
(see how to make a sun skirt pattern)
We can only imagine the shelf, and the back is modeled in two steps: cut and combine.
On the shelf we cut off the “extra” fragment of the shoulder, trying not to lower the armhole.
A hidden zipper is conveniently placed in the side seam.
And whether you need an additional clasp on the shoulder - you decide on the fitting.
As you can see, sewing clothes is a delicate matter ...
Patterns for skirts and trousers


Sew a dress according to a pattern
|
||||||||||||