 From a series of tutorials for beginners on how to sew a skirt and ready-made patterns for several skirt options based on my sewing and sewing books.
Processing the belt of a skirt is one of the first difficulties that a novice tailor faces.
In this article, we will consider the mistakes that beginners make when sewing skirts with a belt,
the nuances of how to sew a skirt to the belt,
as well as ready-made PDF patterns in which you can use this belt processing technology.
Lesson content:
- How to properly cut the belt for a skirt.
- Basting a belt on a skirt.
- Processing the ends of the skirt belt.
- Ready-made patterns of full-size skirts.
1. How to properly cut the belt for a skirt
The belt is a rectangle whose width is double the width of the belt in finished form + 2 cm for seams,
and the length is waist circumference (From) + 5 cm for the edge seams of the belt and the transition part.
The first mistake that self-taught couturiers make is related precisely to the length of the belt.
They measure the length of the waist section of the skirt after processing the darts and cut out the belt detail along it.
This is not true, since the skirt should have some freedom of fit, and the belt should fit snugly against the body, perhaps even create some tightening.
But let's not get ahead.
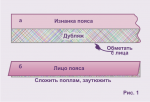
After cutting out the belt, it should be duplicated (figure 1 a).
Dubbing - also a rectangle (strip) of interlining or dublerin.
It is half narrower than the belt blank.
You can use special adhesive strips (tape) designed for dubbing the belt.![]()
Whatever material you choose, it is very important that the dubbing does not stretch too much.
It is glued to the belt from the wrong side.
After that, the workpiece is overcast from the dubbing side along the “face”, see picture 1 Article "Machine stitches".
Then the belt is folded in half, inside out and ironed (figure 1 b).
The dubbing border allows you to do this very accurately without resorting to basting.
In conclusion, a very important operation: pulling the cut of the belt sewing.
To perform it, the half-iron blank of the belt is laid with the fold towards itself and the swept side up.
Slices are pulled back, the fold is sutured.
As a result, the belt should become arched (picture 2) and the length of its drawn sections should be measured.
2. Basting the waistband of the skirt
The next operation is basting the belt on the skirt.
Let me remind you that at this stage, the tucks, side and middle (if any) seam of the back half of the skirt should be processed (stitched and ironed).
Under the processing of seams is meant overcasting of sections and their ironing, grinding of seams with subsequent ironing of sections.
Of course, a fitting must be carried out and the length of the waist section of the skirt must also be measured.
Actually, only one, non-duplicated side of it is taken up.
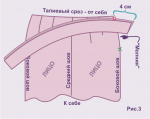
The belt is unfolded and superimposed on the front side of the waist section of the skirt with the wrong side of the non-duplicated side (picture 3).
You should start the line, leaving a preliminary 4 cm of the belt on the transition part (to which the button will be sewn).
When basting a belt, remember that the length of the belt is always less than the length of the waist cut by 1 or more centimeters, and therefore the skirt should be planted.
In order not to be mistaken with the size of the fit, you have already measured the length of the belt and the length of the waist section of the skirt.
When the belt is tucked in (one side) and its length corresponds to the circumference of the waist, it is stitched, stepping back from the tacking line towards the belt 0,1 cm.
Of course, the stitching line begins and ends with a bartack.
If the mark was made carefully, then it will not have to be removed.
3. Processing the ends of the skirt belt
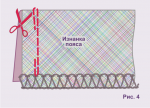 On the 4 drawing shows the processing of the end of the skirt belt without the transition part, on which the loop will be located.
The belt is folded inside out and its end is sewn up, while the line should be as close as possible to the zipper.
Then, the corner of the seam is cut off and the end is turned inside out.
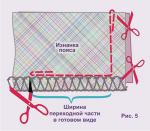 On the 5 drawing shows the processing of the end of the belt with the transition part, on which the button will be sewn.
The belt is also folded inside out and its end is turned, while the line also ends as close as possible to the zipper.
The corners of the turned part are cut off, a notch is made at the end of the transitional part, not reaching the line of 0,2 cm, and the end is carefully turned inside out.
Finally, the swept part of the belt is tucked into the skirt (not the belt!), while the raw ends of the skirt and belt are tucked into the same belt.
The belt is ironed on the pillow (see article Ironing pads), while the product should be placed with the belt towards you, and ironed from the inside, moderately moistening or through an iron.
The very last line is laid along the belt or exactly along the seam of attaching the belt to the skirt (so it will be invisible), the basting is removed and the product is steamed. See tutorial article "Bottom Processing".
4. Ready-made patterns of life-size skirts
Check out some ready-made skirt patterns where you can apply this belt processing.
4.1. Ready-made pattern of a Tulip silhouette wrap skirt
An electronic PDF file for downloading, printing and assembling with your own hands a pattern of a wrap skirt from 40 to 52 life-size without seam allowances. Detailed instructions on how to sew this tulip wrap skirt for beginners on the pattern page.
Download pattern skirt with the smell of "Tulip"
4.2. Ready-made pattern of a pencil skirt with peplum
Electronic pattern for printing in full size for sizes 40 - 52. Sewing difficulty level: medium. For sewing, thin suit fabrics, dress wool and its synthetic counterparts, thick silk and thin denim are suitable. When choosing a fabric, keep in mind that the peplum will be double.
Download full size pencil skirt pattern
4.3. Ready-made pattern of large sizes for a skirt - trousers
PDF files for printing do-it-yourself ready-made patterns in full size models of "pants skirt" and "pants skirt with pleats" for sizes from 42 to 62. The complexity of sewing - patterns for beginners with step-by-step instructions on how to sew. The style is suitable for all types of figures of any fullness and any height.
Download a pattern of large sizes skirt-trousers
I also recommend a ready-made simple pattern for a top of a flyaway for sizes from 38 to 52 for this style of trouser skirt:
Download ready-made top pattern
4.4. Pattern of a long wrap skirt
A ready-made pattern of a long wrap skirt for beginners with instructions on how to sew such a skirt with your own hands. Sizes: 40-52. The sewing difficulty level is simple - a pattern for beginners who have mastered sewing a straight skirt.
Download pattern long wrap skirt



 Join my community on Viber...


