Attention!
The measurement method described here may differ from the methods you are familiar with.
The couturier is not responsible for the fit of the product if the rules for taking measurements proposed below are violated and / or the rules and accuracy of cutting and sewing technology of the product are violated.
- Measuring points and their names when taking measurements for sewing.
- Designation of measurements in the table.
- The procedure for taking measurements in the video.
- Designation of measurements on the back.
- Designation of measurements on the front.
- Half girths
- Taking measurements for sewing trousers, swimming trunks, shorts.
- Increases.
- Removal of measurements for corsets and increase in corsets.
- Measurement of the lumbar deflection.
- Extensibility coefficients when sewing from stretch fabrics.
- What else to consider when sewing on ready-made patterns.
- Measurement table.
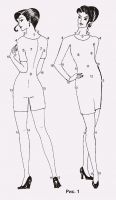
1. Points used to measure the figure (picture 1).
1. Point of the seventh cervical vertebra.
2. Side points of the neck.
3. Jugular cavity.
4. Shoulder points.
5. Posterior points of the armpit.
6. Anterior points of the armpit.
7. Points of the base of the shoulder blades.
8. Centers of the bulge of the chest.
9. Middle of the back at the waistline.
10. Side waist points.
11. The middle of the front along the waist line.
12. Point of protrusion of the abdomen.
13. Femoral points.
14. Knee points.
15. Ankle points.
16. Elbow points.
17. Point of the first joint of the thumb.
18. Point of the wrist.

 2. Designation of measurements
O - girth;
C - half-girth;
W - width;
D - length;
B - height;
C is the distance between the centers.
Indexes in capital letters designate measurement areas.
The greatest accuracy can be achieved by measuring underwear. When starting to measure the figure, you should determine the waist line, since the accuracy of the main balance measurements depends on it - the length of the shelf to the waist (dpt) and back length (Ds). Children are measured in the same sequence as adults. Minor differences are described in Chap. 1.4.
For the accuracy of balance measurements and related measurements of chest height (Wg), shelf shoulder slope (Npp) and oblique shoulder height (VPK) it is important to correctly determine the position of the shoulder seam, noting the highest point of the back (at the base of the neck, it is also the lateral point of the neck No. 2) and the end point of the shoulder seam (shoulder point No. 4). Mark these points with chalk directly on the body, and if the measurement is made on a light dress, the line of the shoulder seam can be marked with fitting pins. Mark the center of the bulge of the chest.
The figure should be measured without allowances for a free fit, coordinating the measurements of the length of the sleeve, skirt.
The measurement of the figure is usually started after the choice of style.
3. The procedure for taking measurements
Note 1. Each measure can have several names. Choose the one that is easier for you to remember.
Measurements start on the back (picture 2).
Di - product length - measured from the seventh cervical vertebra to the bottom line.
Ds, dts or Dst - back length length to the waist, measured along the back or the length of the back to the waist - from the side point of the neck and vertically down to the waist line.
Note 2. For men's shoulder products, in most cutting systems, a measurement of Ds is used, taken from the VII cervical vertebra. To distinguish it, we will write it Ds7.
VPK - oblique shoulder height - from the shoulder point to the middle of the back at the waist line.
Dboch - barrel length - from the corner of the armpit to the braid at the waist. Measured on the right side of the back.
du - skirt length - from the side point of the waist to the desired length (picture 3).
Shs - back width - the distance between the axillary angles. The centimeter tape must necessarily pass through the bulges of the shoulder blades, but not go under the arms (write down 1/2 of the value obtained).
Shpl (Dpl) - shoulder width or shoulder length - from the lateral point of the neck to the shoulder point.
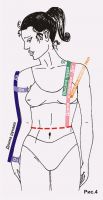
Further measurements will be made on the side (picture 4).
Dr. - sleeve length - from the shoulder point along the straight arm to the first joint of the thumb or along the half-bent arm to the point of the wrist.
Op - shoulder coverage - in the upper widest part of the shoulder horizontally.
Oz - coverage of the wrist.
 Now measurements on the front (Also picture 4).
dpt - the length of the shelf to the waist - from the side point of the neck through the center of the bulge of the chest to the waist line.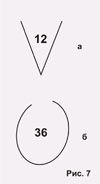
Wg - chest height - from the lateral point of the neck to the bulge of the chest. Usually, measurements of Dpt and Vg are taken in one motion, fixing the centimeter tape on the center of the bulge of the chest in order to remember the value and then immediately move the hand along the tape to the level of the waist. Then two measurements are recorded at once.
Npp - shoulder slope of the shelf - from the shoulder point to the center of the bulge of the chest (for women) or from the shoulder point to the midpoint at the waist (for men).
Half girths taken from the same positionpicture 5).
ssh - half of the coverage of the neck - measured through the point of the seventh cervical vertebra, the lateral points of the neck and the jugular cavity (record 1/2 of the obtained value).
SG upper - half the girth measured above the chest through the axillary angles.
sg - half of the chest coverage - the centimeter tape should pass through the points of the base of the shoulder blades, armpits and in the center of the breast nipples (record 1/2 of the value obtained).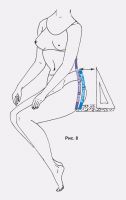
sg bottom (or Cg under gr.) - half of the circumference measured under the bust.
Note 3. Measurements Cg lower and Cg upper - are auxiliary and are used only in some styles of women's clothing. Cr lower for trousers and skirts with a very high corsage, Cr upper for some types of sundresses and corsets.
Comply - half the circumference of the waist - horizontally along the braid at the waist (record 1/2 of the value obtained).
Sat - half coverage of the hips - along the most protruding points of the buttocks, taking into account the protrusion of the abdomen (write down 1/2 of the value obtained). Correctly taking into account the protrusion of the abdomen for this measurement is sometimes quite difficult. Each master has his own method for this. Someone adds “by eye”, someone applies a ruler to the most protruding point of the abdomen and measures around it. Sometimes they just lay their hands on it.
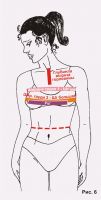
Shg1 or Shg small (picture 6) - the width of the chest is the first - between the corners of the armpits above the mammary glands (record 1/2 of the value obtained).
Shg2 or Shg large - chest width second - between the corners of the armpits through the centers of the bulges of the chest (write down 1/2 of the value obtained).
Note 4. Merck Shg 2 or Shg big и rcg removed from the figures of women and girls with mammary glands. New names for measurements Shg introduced to make it easier to remember.
rcg - the distance between the centers of the bulges of the chest (record 1/2 of the value obtained).
Neck Depth or position of the point of convergence of the shelves is an additional measure that can be indicated graphically (figure 7 a) with a big bird, and place the value between the ends of the character. The depth of the notch is measured from the jugular cavity along the vertical symmetry of the front to the point that determines the depth of the notch.
You can also graphically represent armhole length, measured according to the product or drawing before the construction (or selection) of the base of the sleeve (figure 7 b).
Note 5. It is advisable to measure the length of the armhole only according to proven patterns or according to the product after trying on and processing the shoulder and side seams.
4. Measurements for trousers and swimming trunks.
Total or Vsid - seat height - removed from a person sitting on a hard chair. From the waist line to the surface of the chair (picture 8).
 UPU — infragluteal fold height (picture 3) - from the infragluteal fold to the level of the heel (or floor). This is more of a test measure, although some cutters prefer it to seat height. For self-test, you will perform the following calculations:
Vbr + Vps = dB or
Sun + Vps = dB.
 Db - the length of the trousers - usually removed from the side point of the waist to the floor or heel level, like the length of a maxi skirt.
For products of minimum volume - knee circumference Ok. Ok or Oh count. is recorded in full size, since the measurement does not pass through the middle of the figure.
Pants hem width shn - also recorded in full, since the measurement does not pass through the middle of the figure. Take off shn better with ready-made trousers of the width that suits you.
To avoid confusion, below is procedure for taking trouser measurements.
First the half-girths: Comply, Sat. Then: Total, (UPU - optional for self-test), Db, Ok и shn.
For swimming trunks, jumpsuits and bodysuits, measurements are taken Dsed.
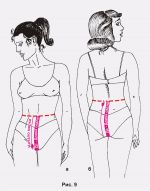
Dsed - saddle length - from the lace that girdles the waist down the half-skid, draw a centimeter tape between the legs and finish measuring at the back waist at the midpoint (picture 9).
Do not confuse this measurement with the length of the seat - Dsid, which is removed for trousers on the side from the waist to the surface of the chair on which the customer is sitting (picture 8).
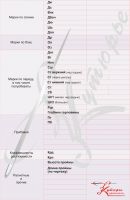
For convenience, all the measurements you receive should be in a certain order, using the universal measurement table.
This form of recording will avoid errors in measurement. When ordering patterns, you will be offered an abbreviated table of measurements for each type of clothing, which should be filled in by choosing the necessary measurements from the universal table.
5. Increases
 You must also indicate the size of the chest increase (Pg) in the order measurements table.
Based on its value, the couturier will calculate other increases provided for by the cut rules - along the lines of the chest, waist and hips.
If in women's clothing in dresses of an adjacent silhouette, the traditional allowances for free fitting along the chest are equal to 2-3 cm; for products of a semi-adjacent silhouette - 3-4 cm; and in free-form dresses from 4 to 12 cm.
The exceptions are corsets and products made from highly stretchable stretch fabrics.
6. Measurements and increments for corsets
 Measurements for corsets are taken without underwear or by slimming underwear - a bra or grace, a corset product, as well as by slimming tights or without them. T-shirts, t-shirts, skirts, trousers and any other clothing are not allowed.
sg - measure at the most protruding points of the chest and shoulder blades.
Comply - Tight, but not tight at the waist.
Sat - on the most protruding points of the hips.
wb - we measure high, preferably with a flexible ruler at hand and up to the waist.
The increments in this case are negative, that is, when drawing a drawing, they are subtracted from the horizontal values, and not added to them. The purpose of the increase in corsets is to tighten, reduce the size.
The size of the increments (tightening) may vary depending on the style, purpose of the product and the accessories used:
Pg - zero to minus 2 см,
Fri - from zero to minus 10 см,
Pb - from zero to minus 4 см.
Council. If you are a beginner, do not start learning how to sew a corset with a large drawstring. Start with the following increments Pg = minus 2 cm, Fri = minus 3 cm, Pb = minus 1 cm.
7. If you have a special figure or how to measure the lumbar deflection
 That is, if your buttocks protrude very strongly, a large lumbar deflection, a strong stoop or a size larger than 52, order a base with an average seam.
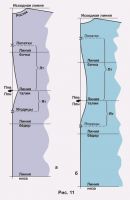
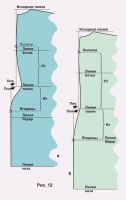
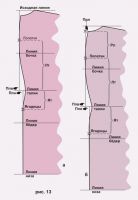
To measure the lumbar curve take a ruler and a regular square (picture 10). Attach the ruler with zero to the lace encircling the waist, in the region of the spine in such a way that its plane is horizontal, that is, only the edge of the ruler would be visible from the side, and the numbers were on top. Place a square on the ruler with a short leg (shortest side). Its long leg (middle side) should touch the most protruding part of the shoulder blades. On the 9 drawing the most protruding points are marked with crosses. Write the value as "lumbar deflection upper" (PPV).
Then measure "lumbar deflection lower" (Ppn). Attach the ruler also with zero to the lace in the spine. Position its plane horizontally, but so that the numbers are at the bottom. Lean the square against the most protruding part of the buttocks with a long leg, lean the short leg against the ruler. Write down the value.
The distance to the most protruding points of the shoulder blades and buttocks, if necessary, can be measured along with taking measurements PPV и Ppn. Measurements should be made strictly along a vertical line, and can be written as "shoulder-waist" - Lt. Accordingly, the distance from the waist to the most protruding point of the buttocks can be written as "buttocks-waist" - Yat.
With a large stoop, you need to measure the distance from the germ to the bulge of the shoulder blades - "sprout-blades" (RL) and the value of the deflection to the sprout - "sprout-blade deflection" (Prl). All possible measurement options are shown in the figures. 11, 12 и 13.
 8. Tensile coefficients
for stretch fabrics
8.1. Coefficient of "arbitrary" extensibility
For determining stretch values, take a cut of the stretch and draw a chalk line on the wrong side at a distance 1 m from a horizontal cut. Collect a cut along this line in your left hand, attaching the beginning of a centimeter tape to the chalk line. Weigh the cut in your hand so that the area to be measured does not touch anything. In most cases, its length will increase by several centimeters. Suppose a meter section in suspension has a length of 102 cm, which means that tensile value along the lobar thread in this case was 2%.
The next step is the calculation tensile values along the transverse thread. The calculation is also performed, only the chalk line is applied parallel to the edge.
For brevity and simplicity of further calculations, the extensibility values should be converted to stretch coefficients. If we omit the mathematical calculations, we get:
|
With extensibility |
The coefficient is |
|
2% |
0,98 |
|
3% |
0,97 |
|
4% |
0,96 |
|
5% |
0,95 |
|
... |
... |
|
67% |
0,33 |
|
68% |
0,32 |
|
69% |
0,31 |
|
70% |
0,30 |
That is, to get the stretch factor, subtract the stretch percentage from 100 and divide the difference by 100.
Kp = (100 minus stretch value) divided by 100
8.2. Coefficient of "forced" extensibility.
For determining values of "forced" extensibility in addition to a piece of fabric, you will need a ruler and a pair of tailor's pins. Poke the pins horizontally into the fabric at a distance 10 см from each other. Then stretch the jersey as much as necessary and measure the resulting distance between the pins (14 drawing). The number of additional millimeters will correspond to the amount of extensibility in percentage terms.
For example, after stretching the fabric, the distance between the pins increased by 35 mm, which means that the amount of stretch, in this case, is 35%. The coefficient is also calculated:
Cr = (100 minus 35) divided by 100 = 0,65
9. Other things to consider
 Patterns and patterns are made without seam allowances.
Seam allowances are required when cutting on fabric, no matter how it is done.
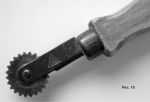
The transfer of the lines of the drawing to the material from which the pattern is made is carried out with a cutter.

 Join my community on Viber...


