 How to calculate fabric consumption, how to cut a straight skirt step by step with your own hands, building the basis of a straight skirt for full and thin people?
You will find the answers to these questions in this tutorial on patternless cutting for beginners.
Calculation of fabric consumption for a straight skirt
The flow rate is Di + hem + 2 cmWhere 2 см - allowance for basing and processing of tucks and storage.
For full - Di + hem + 4 cmWhere 4 см allowance for pattern correction in accordance with the features of the figure, as well as for basing, processing tucks and storage.
Why is the correction allowance for the skirt increased? The fact is that for full “features of the figure” (protruding buttocks or stomach) are larger than for thin ones, so an additional allowance may come in handy.
The order of cutting a straight skirt
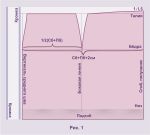
Fold the fabric in half, bending over the width of the layout (Fig. 1 - for full, Fig. 2 - for thin). The width of the layout is in any case equal to the width of the skirt pattern:
Sat + Pb + 2 cm on the middle seam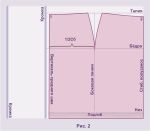
Pb = 2 cm.
The result of the calculation is postponed from the edge and is determined fold vertical, over which the fabric is folded. Thus, further errors in the calculations are excluded.
If the skirt will have a side seam, relief, slot or pleat, this must also be taken into account when calculating the width of the layout.
The drawing traditionally begins with basics and horizontal lines.
basics - in this case, this is the alignment of one cut of the fabric so that the line of this cut is strictly perpendicular to both edges and the fold.
Basic cut matches with bottom hem of skirt, from it we measure hem allowance. If you cut for the full, set aside 5 - 6 cm, this is a lot, but usually full waist и underline are not arranged horizontally, so additional 2 - 3 cm here "insurance" alignment allowance. From bottom lines measure up du - waist, from the waist down - 18 - 20 cm - hips.
Let's move on to the verticals.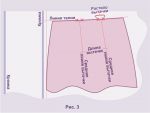
Side seam line: from the edge we measure the allowance for the middle seam (if laid), draw a vertical middle seam and put away from it
1/2 Sat,
but for ladies with a voluminous belly side seam line can be located in the middle of the cloth, that is, at a distance
1/2(Sat+Fri)
from vertical middle seam. If the buttocks strongly protrude, we draw a deflection along the middle seam (Fig. 1). For details, see the article about the "Middle Seam".
Darts
 Difference between Comply и (Sat + Fri) – it amount of skirt darts and it is distributed in accordance with the features of the figure.
The "standard difference" is 12 - 15 cm.
Distributed as follows:
The sum of the darts is 12 cm = 6 cm for the side seam + 2 cm for the PP darts + 4 cm for the RF darts
The sum of the darts is 15 cm = 7 cm for the side seam + 3 cm for the PP darts + 5 cm for the RF darts
In this case, PP darts might b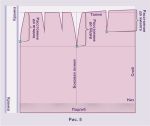 be implemented as one tuckWhereas darts RFP, only as two darts.
Start building darts after building side seam (or notches) and corrections waist cut. For full, the “standard” option is an increase PP waist on 1 - 1,5 cm, for thin people - lowering vertical half skid on 2 см, lowering vertical mediumseam on 1 см.
After that we put on the drawing middle lines of tucks, placing them fan-shaped (Fig. 3).
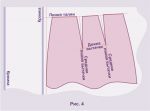
Then we mark length inytachek, observing the rule: PP darts (7 - 9 cm) - shorter darts RFP (8 - 11 cm), and in paired darts in short, the one closest to side seam. We complete the darts by marking them solution. Professionals consider it tuck markings finished. But, if you are still studying, connect points that determine the length of the darts - is tuck top points - with dots solution (Fig. 4). Level if necessary side lengths each tuck in length.
Building the base of a skirt for full
By the way, if your figure is far from the standards, you can go the other way of building the base (Fig. 5). To do this, mark on the figure the most problem points. For example:
- the most protruding points of the buttocks,
- the most protruding point of the abdomen,
- the most protruding point of the hips on the side.
Tie up with a lace, and measure down from the lace the distance to these problem points (the method of taking these measurements is described in the article “About the middle seam”). Write down the results. Measure also deflections: lumbar и sidesой. When building a drawing, put on it, according to the measurements, problem points. Most prominent hip point on the side - defines hip line position, and the most prominent abdominal point - waist tuck length PP.
Side deflection measured twice in one direction and the other from the sideline. The rest of the freeness at the waist is distributed between the darts of the PP and ZP according to the same principles.
As for the seams and reliefs - sometimes you can’t do without them. For example: the presence of a large lumbar, as well as lateral deflections, obliges us to make a model with side and middle seams. In exceptional cases, reliefs may also be needed, but if this is the case for you, is it worth sewing a straight skirt when there are more comfortable and fashionable types of clothing? The answer to this question is in the book "We sew clothes for any figure", and we will return to the straight skirt.
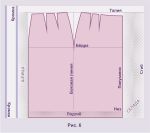
The slot at the back is already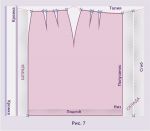 classics. For cutting, it is enough to step back from the edge 5 - 7 cm (Fig. 6). The slot can be replaced with a stock, the amount of indentation is the same. If you need an oncoming warehouse in front, we retreat from the semi-skid 10 - 12 cm.
After that, the skirt can be cut out (Fig. 7). Cut out only the top and the extra part from the bottom edge. Now we need the same stock in 2 см, which we added at the very beginning. It is needed for "houses" over lateral notch и allowances for tuck processing or slots. The rest of the sections are cut over the line, the edges are also cut off, since in most cases they are deformed. The blue crosses indicate notches. Notch length 0,3 - 0,5 cm.
What are we for notches? - a fairly common question from beginners. They have several appointments.
First - tuck solution limitation - when transferring the darts to the second half of the skirt, it remains to transfer only the points of their vertices.
Second - transfer frommiddle seam is not needed, when grinding (or sweeping), it will be enough just to combine the notches on both halves.
Third - when sweeping warehouses notches are also combined, which allows it to be processed more accurately.
Skirt patterns




 Join my community on Viber...


