Vera Olkhovskaya
The processing of the back pocket can be done in different ways. We will look at one of the simplest options: a frame.
We have already processed the tucks and completed the WTO RFP. We start the pocket with the preparation of parts. As mentioned above, we need two facings, a valance, burlap and an air loop so that the pocket fastens (see parts list here).
The procedure for processing when sewing trousers
Fold the facings lengthwise and iron in half, overcast long sections together.
Overcast the gap on one long side and iron. The loop is folded in a special way (Fig. 12) and ironed.
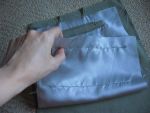
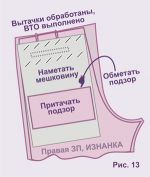
The contour of the pocket is already marked (Fig. 1). The lining is placed on the wrong side of the right ZP parallel to the waist section and 2-3 cm above the pocket contour (Fig. 13). The valance is laid so that after processing the burlap it is against the pocket (See photo: two horizontal lines are visible on the burlap - this is the area of the valance. When combining the horizontal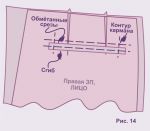 without burlap with a waist cut, the valance will be against the entrance to the pocket).
 The valance is stitched, as seen in the photo with two horizontal lines. After that, the burlap is basted on the RFP with oblique stitches 2,5 cm long, as shown in fig. 13.
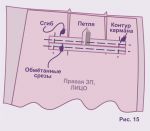
Then, on the front side of the right RFP, prepared facings are superimposed, as mentioned above. First, we lay the facing on the lower horizontal markup, placing the fold down, the swept sections up (Fig. 14). We transfer the markup from the RFP to the facing very accurately and grind it very accurately according to the markup, starting and ending the line with bartacks. We lay the second facing on the upper horizontal of the pocket marking in a mirror way: the fold is at the top, the overcast is at the bottom (Fig. 15). We transfer the markup to the facing, observing jewelry accuracy. With the same accuracy, we grind the facing and put the prepared loop on the middle of the line, which we also sew very accurately.
Note: the second (top facing) can be replaced with a valve.
The result is shown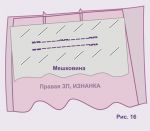 in fig. 16: Stitches should be perfectly parallel and equal in length, beginning and ending with bartacks. Buttonhole bartack - matches the top stitch. If you have not achieved the desired result, it is pointless to continue further - the pocket will be damaged. But we will proceed from the fact that everything worked out for you and we will continue.
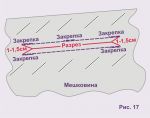
We cut the pocket from the side of the burlap, starting from the middle (Fig. 17). Very carefully cut the corners, leaving 1 mm to the end of the backtack. If you leave more - the pocket will not turn out, if less - it will fall apart.
We turn the cut pocket inside out (Fig. 18) and iron it, carefully straightening the corners.
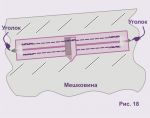 Note for the diligent: before ironing, the entrance is swept up at the pocket and sewn around with oblique stitches up to 1,5 cm long. Only for burlap!
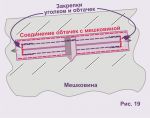 The next operation is also very important and the quality of the product directly depends on the accuracy of its implementation. These are bartacks for corners and facings (Fig. 19).
 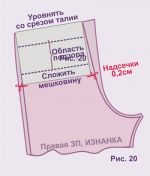 Turn the RFP face up and fold back the RFP and burlap, you will see the corner and under it the facings. It is necessary to sew a corner to the facings very close to the existing lines. Then fold the burlap, leveling the horizontal cut with the waist
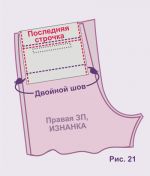
(Fig. 20). As mentioned earlier, the gap should overlap with the entrance to the pocket. For convenience, small notches, 0,2 cm, are made on the burlap and each vertical side is treated with a double seam.
The last stitch holds both layers of burlap together at the top (fig. 21). To do this, turn the RFP face up and fold it back at the waist. You will see another unnecessary entrance to the pocket: lay the line as close as possible to the existing lines, grabbing the top facing and the gap with it.
It remains only to sew a button inside the pocket.
Download patterns of men's trousers and other clothing for men
Patterns of women's trousers and skirts
|
||||||||||||












 Join my community on Viber...


