 Vera Olkhovskaya
Sewing yourself is not the most common national pastime, but it is the most honorable one.
And the ability to cut makes the home couturier a very respected person, even in the eyes of his “worst friends”.
So let's keep learning!
 Today we will look at some tricky techniques for cutting and sewing thin stretch using the example of modeling two dresses and a top.
All three styles were chosen by the visitors of Vera Olkhovskaya's "Couturier" website.
To create dress patterns, we need stretch base, constructed without taking into account the coefficients of extensibility.
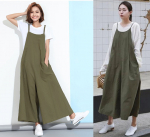
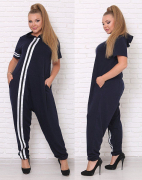
In photo 1 we see a dress with a straight skirt and collar-type collar.
This dress is NOT recommended for ladies with a short neck and a round face, as well as with "small bones" or strongly developed hips.
We start by building a one-piece rack (Fig. 1).
The stand-up collar pattern has been considered repeatedly in my booksbut I'll turn around.
We extend the middle seam of the back by 4 cm and set aside 4 cm upwards from the side points of the neck and the sprout.
 On the shoulder sections from the same side points, we measure again 4 cm each.
We bring the rack smoothly, expanding it along the middle seam of the back by 1 cm.
Then we measure the desired depth of the cutout from the rack of the shelf.
I note that in this case, the depth of the notch should be measured from the lateral point of the neck, and not from the jugular cavity.
Please note that the angle between the half-skid line and the arc of the collar edge must be straight.
The pattern of a straight skirt in this case is not so simple.
Patterns for skirts and dresses


|
||||||||||||


For modeling, we perform a PP pattern in a turn (Fig. 2) and make the first cut from top to bottom, without cutting a couple of millimeters.
We outline the point from which the rest of the cuts will go and perform them the same way, without cutting.
We move the petals apart, numbering them in advance, and circle (Fig. 3) on a new sheet of paper or plastic wrap.
 Figure 3 shows a PP skirt pattern already with seam allowances.
If you are a novice couturier, do not forget to sign the cuts in hot pursuit.
And the most important question: where to put coefficients?
The coefficients for the length - we lay in the length of the bodice (that is, cut it off from the bottom), in width - in the middle seam of the back (cut off at the waist and hips).
Let me digress to a small "knitwear sewing master class":
to try on, sew the pieces with a double-thread overlock stitch (modern overlocks have such a seam in their arsenal).
It is easy to dissolve by pulling on one thread.
The biggest difficulty in tailoring this dress is the processing of the assembly.
And for experienced For other tailors, I offer another option for cutting the skirt (Fig. 4) - without side seams.
The coefficient is laid in the middle of the RFP - literally a fold on the pattern.
I do not recommend narrowing the side seams.
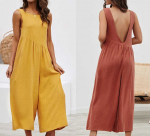
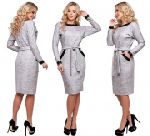
Top style photo 2.
We cover the finished base pattern with a plastic film and put all the lines on it with a permanent marker.
The shelf is double. The lower shelf and back are cut out according to the pattern of the base of the dress.
On fig. 5 they are highlighted with a lilac dotted line. Determine the width of the shoulder cut.
Let's say 4 cm and draw an armhole-side cut line tangentially to the armhole of the shelf.
Then we measure the length of the side cut along the back and shorten the side cut of the shelf by 3-5 cm, depending on the coefficients.
 We set aside the depth of the cutout and measure the width of the shelf, observing the main principles of modeling - we keep the volumes and right angles on the folds.
Please note that the coefficients for the width are laid in the back, which we can cut like a rectangle.
As a result (Fig. 6), we get a shelf pattern that resembles a “square” top, which was very popular a few years ago.
The shelf of such a top was simply “tied” to the chest.
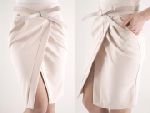
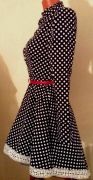
And the last model - photo 3.
 In this case, we are modeling the back, trying to avoid the same mistakes as the author of this model and photo.
On the base shelf, we change only the neck (Fig. 7), while leaving just a couple of centimeters from the shoulder seam.
On the back, we immediately mark the width of the cutout from the highest point of the side seam and the middle line.
Of course, the depth of the cutout is pre-measured according to the figure from the intended side seam.
We draw the side seam of the new back, keeping the width at the waist and hips.
Coefficient  - cut along the fold of the back.
In general, I think this model is imperfect.
In my opinion, there is not enough jumper on the back.
The photo shows that the back of the sleeves is pulled together by a piping, but this will not be enough to keep the dress securely on the figure and the shelf does not protrude.
The ideal option would be the second part of the back, cut out of a transparent bodily strech “mesh” on the base.
Remember that this model is not suitable for stooped girls, make a preliminary layout and do not save on fabric, because sewing is free for you.


