
Vera Olkhovskaya
Article and video with answers to questions on patterns and their use when sewing products.
What materials are best used for making and copying patterns?
Suitable paper (from newspaper to wallpaper) or plastic film of various thicknesses.
You can use cardboard or non-woven wallpaper, but this is quite expensive.
You can make patterns on polyethylene: build a drawing or copy from paper drawings with a CD marker / permanent marker.
At the same time, flaws are easily erased with a dry cotton swab.
Cut out a copy and use it for modeling or cutting out the product, with the addition of seam allowances. The standard should be kept.
It should be noted that when cutting, polyethylene patterns are most convenient. 
They should be pinned to the fabric and cut out, skipping the stroke operation.
Of course, in this case, it is preferable to use technological allowances and perform all the required notches and marks.
Council. Do not rush to break off polyethylene patterns from the cut. Do this at the time of assembly of the product.
Thus, you will reduce the likelihood of errors, do not lose the marks you need, and also do not forget what allowances and reserves you have laid.
Remember that the first step in creating the right patterns is taking the right measurements. Watch the video "How to take measurements"
How to transfer a tuck to fabric?
Contrary to popular belief, the transfer of contours, marks and darts from patterns to fabric often leads to errors than a patternless cut.
Finely sharpened chalk or a remnant will increase the accuracy of the stroke, but it’s not worth dwelling on the transfer of tucks from the pattern, not the fabric.
Let's say we made a pattern. If you cut a tuck on the pattern along the line of the drawing, then the outline of the stroke will shift inward by a couple of millimeters, and the top will “jump” by almost 1 см.
Therefore, to improve accuracy, the tucks on the pattern should be cut on 0,1 см for the stroke line.
Definition:  the top of the tuck is located at the intersection of the lines of the sides of the tuck with the axial line and the horizontal segment that defines its top (Fig. 1).
The tuck can have two peaks in shoulder products and one in skirts or trousers.
In order for the peak to hit exactly the place intended for it, draw a horizontal line on the pattern that determines the exact location of the peak (Fig. 1).
Cut out a rhombus with a rib at the top of the tuck 0,7 см, as shown in fig. 2 (see "increasing the top of the tuck").
Council. If the pattern will be used repeatedly, then for ease of storage, do not cut out the tuck completely, leave a small "web" between the sides.


How to change the size of the sleeve pattern?
We will consider the change in the length and width of the pattern immediately during the stroke using the example of a two-seam sleeve (Fig. 3).
Please note that both halves of the sleeve will be cut from the same pattern.
In the manufacture of patterns of the "two in one" type, the inner contour is cut out, like a tuck, outside the stroke line, the corners can be supplemented with a dash that limits the top of the inner corner and a diamond-shaped slot.
The first stage of stroke (Fig. 4 a) is the ulnar cut and the part of the upper rim adjacent to it. The stroke is shown with a heavy dash-dotted line.
The second stage (Fig. 4 b) - the pattern is shifted strictly horizontally at a distance from 1 to 3 cm, if necessary, the front cut and part of the upper rim are outlined.
Both cuts - elbow and front - are elongated by 1 см.
At the third stage, as you may have guessed, the missing sections of the drawing are completed: the cut of the bottom and part of the rim (Fig. 4c), as well as allowances for the seams.
Stage four: lower half - elbow cut (Fig. 4d).
In conclusion, as for the upper half, after shifting the pattern, you should circle the front cut and the missing parts of the bottom and lower rim (Fig. 4e).
If the sections were lengthened in the upper half, then they also need to be lengthened in the lower half.
 How to increase or decrease the size of a blouse pattern?

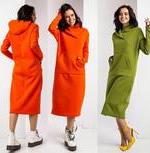
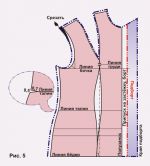
When it is necessary to increase the pattern of a jacket or blouse by one size, then the changes will only affect the shelves (Fig. 5).
For a larger increase, it is better to build a new pattern, because there is a possibility of changing the proportions of the figure.
Let's consider this process in more detail.
First, the side seam, the armhole and the part of the shoulder seam adjacent to it are outlined.
In this case, the shoulder should be raised to 0,5 - 0,7 cm.
Then, the pattern of the shelf is shifted horizontally by 1 - 2 cm and circle the rest.
As a result of the shift of the shelf, the shoulder became longer.
It should be leveled in length with the shoulder of the back, of course, the shoulder and chest tucks should not be taken into account in comparative measurements.
The excess part of the shoulder of the shelf is cut off from the side of the armhole, as shown in Fig. 5.
Why are notches made on patterns?
Notches are transferred to cut details and used to facilitate the assembly process in mass and individual clothing production.
For example, take the same jacket.
During cutting, on the details of the cut of the shelves and backs, they usually put a small (0,3 - 0,5 cm) notch on the side seam allowance at waist level. 
On the patterns, such a notch is performed in order to accurately put a mark corresponding to the horizontal of the waist.
How to make a cut on the patterns?
Slots on patterns are much less common than notches. But, if you need to mark, for example, a place for pulling a belt, then a slot with diamonds at the ends will make the task easier (Fig. 6).
What are the rules for cutting leather?
Before cutting out of leather, you need to buy it, and before you go shopping, make patterns - this is the main rule that you need to follow in order to avoid mistakes.
If you do not have enough experience, make patterns for all paired parts - two sleeves, two collars (upper and lower), two shelves, two backs, as well as piping and two selections.
 Sign the patterns, mark the "face" and the wrong side.
This will help you to correctly estimate the consumption of the skin.
When buying, a sheet of leather is laid face up on the table and all the patterns are laid out on it, again face up.
Coquettes, the upper part of the bands (“face” of the lapel), shelves, back details, and upper halves of the sleeves are laid first on the best places of the sheet.
The sequence of laying the rest of the parts is not too important.
For them, you can use the skin with small defects.
To save money and reduce the number of lunges, the shelf and back can be unmodeled by cutting the shelf and back patterns into several structural parts.
The seam allowances for leather are the same as for other outerwear.
 Why do you need modeling, if not "for beauty"?

Indeed, modeling is able to solve not only aesthetic problems.
We give some examples.
1) Simplification of sewing technology, for example, through the union of parts.
An example is a one-piece stand (see Model range) or the location of a pocket in the seam of a coquette, relief.
And the back of the jacket cut off at the waist will simplify the processing of slots.
2) Save fabric and/or other consumables.
The most striking example of this is the tailoring of classic denim trousers: the yoke on the back half of this model not only closes the necessary darts, but also equalizes both halves of the trousers in length, reducing fabric consumption by 5-7 cm.
3) Alignment of tailoring technology with the characteristics of the fabric.
Let's say you cut from clothes leatherette - avoid darts, give preference to reliefs.
 4) Strengthening individual components or parts of the product.
A striking example is the model of a leather jacket on a yoke, combining a fragment of the back and shelves.
In this case, we avoid the shoulder seam.
5) Visual correction of the figure - a low-lying yoke on jeans with a low waist will noticeably shorten your legs.
And additional vertical reliefs will lengthen the figure.
What are "basics"? And how to use them?
The basis or base pattern can be used both for sewing a product and for modeling.
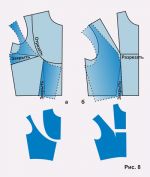
 Here are a few simple options for modeling an adjacent bodice - rice. 7,8, 9.
On fig. 7 - shows the closure of the side and chest darts, in fig. 8 - closing waist tucks and modeling coquettes, and in fig. 9 - partial closure of the chest tuck.
See the book for more details. "Cutting Technique".
How to use a set of patterns for collars and sleeves?
Copy only the desired contour onto dense polyethylene or any material convenient for you, keeping the standard.
Is it possible, when ordering (or self-constructing) a stretch base, not to take into account the coefficients of extensibility?
Yes, it is possible in two cases.
The first case is small coefficients.
The second case is to subtract them when cutting.
 For example, to subtract Krd when cutting a dress, lay on the templates a warehouse equal to this coefficient, as shown in fig. ten.
To subtract Kp, the warehouse should be laid vertically, as in fig. eleven.
Details on the calculation of the coefficients of fabric extensibility can be found in the book. "Croy's Technique".


