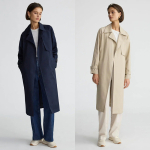
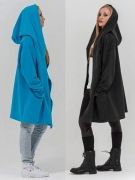
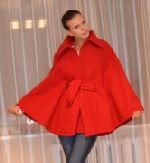
 In this article, I will describe how to build a pattern for a large size women's coat or jacket with a breast tuck with my own hands, and I will also present several of my ready-made PDF patterns of such models of women's clothing for sizes up to 64. This base pattern with a breast tuck can be used for sewing a jacket or coat for a full woman with small shoulders and lush hips.
You should start building such a basis only if you not only already know how to take measurements, have learned their brief designations, but also took measurements, writing them down in the table of measurements.
Watch the video master class on taking measurements, and read everything you need to know about this tailor at the link below.
It will be difficult for beginners to learn the technique of cutting and sewing to master the drawing of this pattern, so you should start with simpler drawings.
How to take measurements - video and interpretation of the symbols of measurements
Table for recording measurements
Ready-made patterns for coats and jackets
How to build a pattern for the base of a coat or jacket with your own hands
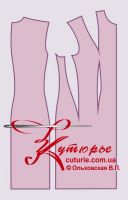 As usual, we carry out the base pattern on paper (Fig. 1) and start the drawing with horizontal and vertical lines, which teachers of cutting technique often call the “grid”.
We will consider the left vertical cut of the paper as the middle line of the back, and the lower horizontal cut of the sheet as the level (line) of the bottom.
We measure up from the bottom level Di and draw the initial horizontal for the back on the left side of the sheet.
Down from the original back we measure Ds - and get the waist level, down from the waist 18 - 19 cm - the level of the hips.
Up from the waistline, measure the difference
Dboch minus 2 cm
And we draw a horizontal level of the armhole. Please note that in this basis the horizontals of the armhole and the barrel coincide.
After that, we build the middle seam, as described in the article for taking measurements.
And we proceed to the construction of the sprout (the neck of the back).
Sprout Width = 1/3Ssh + 1,2cm + 0,5cm,
where 1,2 см - an increase in the width of the neck, used for cutting outerwear, and 0,5 см - bending allowance at the top of the middle seam.
Further -
Sprout height = 1/3sprout width
These actions are shown with a blue dotted line.
Then, lift the highest point of the middle seam to 0,2-0,3 cm for work. Shape the sprout, and raise its lateral point to 0,5 см. These actions are shown with a red line.
The next stage is the construction of the shoulder section.
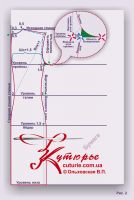 As you probably remember, the shoulder point (marked with a green cross) is formed at the intersection of two arcs. We make one arc by placing the leg of an imaginary compass at the midpoint along the waist line
R1 = Vpk + 2 cm,
where 2 см - rise to the shoulder pad. Another notch is from the lateral point of the sprout:
R2 = Dp + 2 cm,
where 2 cm - Shoulder extension and fit.
For visual comparison, the blue dotted line shows the outlines of the sprout and the shoulder seam, as they would look when cutting a light dress and without allowance for the shoulder pad.
We continue: the width of the back from the middle seam to the corner of the armhole (bracket in Fig. 2)
ws + 1,5 cm
Set aside the required value at the level of the armhole and put a dot (in Fig. 2 it is a red cross). From it (the top of the armhole angle of the back, indicated by a red cross) should be set aside to the right 1/8 armhole width (and put a blue cross). Let me remind you that
Armhole width = 1/4 (Sg + Pg)
 When building a similar basis for outerwear, we use Pg 6 - 8 cm.
The "1/8" dot (blue cross) will determine the position of the back side seam. Lower the vertical down from it. Draw a waist deflection on the vertical 1,5-2,5 cm and hip bulge 0,5-1 cm (Red line).
The curve of the back armhole should be completed completely. After that, use a cutter to copy the green fragment of the armhole of the back, after placing the paper under the top layer of fabric. This fragment of the armhole will be needed when building the shelf.
The pattern of the back for a coat or jacket is ready!
Building a drawing of a shelf in a pattern based on full
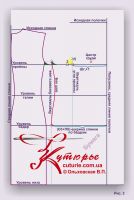
We begin the construction of the drawing of the shelf with the same grid as for the back. Extend to the right the horizontal lines of the bottom, hips, the height of the armhole-barrel (Fig. 3).
 The vertical half-skid - the middle line of the shelf should be at such a distance that the shelf pattern fits on the sheet.
The easiest way to find the correct position of the half-skid is to set aside the volume of the product along the hips from the middle vertical of the back and add a few more centimeters:
Sat + Pb + 5 cm,
at Pb 4 - 6 cm
After the half-skid, it is the turn of the initial horizontal of the shelf. Up from the waistline, set aside dpt.
Find the center of the bulge of the chest: from the original down, measure Wg and according to the level obtained from the half-skid towards the construction, set aside rcg.
The center of the bulge of the chest is an important constructive mark when building any female pattern, so pay attention to the accuracy of measurements Wg и rcg.
At the level of the armhole from the half-skid, step back to
Shg2 + 1,5 or 2 см
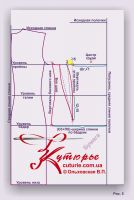 From the resulting point, which is also the top of the armhole corner of the shelf, draw a vertical up and down. Let's call it the armhole vertical. After that, limit the detail along the hips, measuring from the half-skid:
(Sat + Pb) minus the width of the back at the hips
draw another vertical - the vertical of the side seam.
Then, use the part of the back armhole you copied (green fragment). It must be attached to the vertical side seam of the shelf.
And you can arrange the side seam of the shelf. Deflection at the waist from 1,5 to 2,5 cm.
When making the side seam of the shelf, it is important that its length is equal to the length of the side seam of the back.
It was the turn of the corner of the armhole of the shelf.
It is marked in yellow on the drawing. Return to the vertical of the armhole and up it from the level of the armhole set aside 5 см, and in the direction of the side seam from it - 3-4 cm. Put points "5" and "3". (In the drawing, they are marked with blue crosses.) Point "3" will determine the position of the side tuck going down from the armhole.
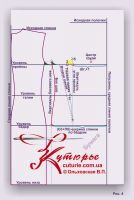
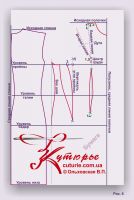 Let's start building a side tuck (Fig. 4)
The first side tuck line is at a distance 1,5-2 cm from the intersection of the vertical of the armhole and the horizontal of the waist (point "2" is indicated by a green cross).
Through points "3" and "2" draw a straight line down, ending it on 12-15 cm below the waistline. The solution of this tuck at waist level will be from 1,5 to 2 cm, excluding deflections.
Having drawn the second line of the side tuck, make deflections along the entire length of the tuck (Fig. 5) and align them along the length. After you plot the deflection curves on the drawing, the tuck gap will increase by another 1,5-2 cm, that is, in total 3 - 4 cm.
And we proceed to the construction of a waist tuck (Fig. 6).
From the center of the bulge of the chest, lower the vertical parallel to the line of the half-skid. On it down from the center, retreat to 4-6 cm. The resulting point is the upper peak of the waist tuck of the shelf (green cross). And its lower peak (lower point, lower green cross) is located below the waist on 9-11 cm and shifted to 1 см to the side seam. The tuck solution depends on the shape and volume of the abdomen and can be specified during the fitting.
Neck.
Its width:
1/3Ssh + 1,2cm
Height:
Neck width + 1 cm
The shoulder cut and chest tuck are built in the usual way (see Fig. base with chest tuck).
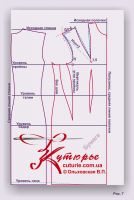 On the original horizontal from the side point of the neck, set aside 4 - 5 cm. Point "4" connect with the center of the bulge of the chest. This segment is the first line of the chest tuck. Shorten it at the top 1 см, down on 1,5 см. Connect point "1" with the side point of the neck, which will give the section of the shoulder seam.
Place the leg of the compass in the center of the bulge of the chest and with a radius
Rcg + 2 cm,
draw an arc. In an arc from its intersection with the first tuck line, set aside
difference between measurements1 and Shg2
Through the obtained point from the point “1,5”, indicated by a green cross (and not from the center of the chest), draw the second line of the tuck, equalize its length with the first line.
Shoulder extension - cut after tuck (Fig. 7). From the highest point of the second line of the tuck, make a notch with a compass with a radius equal to the difference between the measure Dp and the already existing segment of the shoulder seam
R = Dp minus 4 cm or 5 см
Make the second notch to determine the shoulder tuck from the center of the bulge of the chest, taking into account the rise to the shoulder pad. The radius is
npp + 2 cm
Both tuck lines are drawn with smooth lines, and to decorate the remaining armhole fragment, we need a shoulder point, a “five” and the highest point of the first tuck line coming from the armhole.
It remains only to make a half-skid correction of the shelf and the base pattern for a coat or jacket is ready.
Here is such a difficult lesson on cutting technique from Vera Olkhovskaya!
Ready-made patterns for women's coats and jackets
|
||||||||||||










 Join my community on Viber...


