 with an English collar. rice1") Vera Olkhovskaya
Vera Olkhovskaya
Warning: according to this article it is impossible to learn how to cut a jacket, since the description contains only the very basis of the pattern without additional details and nuances of the cutting technique. Training in tailoring of classic men's clothing should be done ONLY under the guidance of experienced tutors who are qualified as a "tailor of men's outerwear". Neither "fashion designer" nor "designer", but "tailor of men's outerwear".
The description of the basis is published at the numerous requests of visitors to the site of Vera Olkhovskaya, only in order to convey to them the level of complexity of the issue.
The author of the article is not responsible for unsuccessful attempts to cut jackets by home couturiers.
Table of measurements for building a pattern for the base of a men's jacket
To build a pattern-base for a jacket (a men's jacket is meant - Fig. 1, since a similar female shoulder product is called a jacket), the following measurements will be needed. Remove them from the figure and enter in the table of measurements:
|
Di |
Npp |
|
Ds7 |
ssh |
|
VPK |
sg |
|
Dboch |
Comply |
|
Shs |
Sat |
|
Dpl |
Shg |
|
Dr. |
Point of convergence of shelves |
|
Op (desired sleeve width on the shoulder) |
Pg = 8 |
|
Oz (sleeve width at the bottom) |
Fri = 4-6 |
|
dpt |
Pb = 4-6 |
|
Wg |
In the "calculated" section of the table, it is advisable to pre-write and calculate all the formulas available below in the description. This will significantly reduce the time of work on the drawing and the construction logic will become more understandable.
Vg for this design is removed from the lateral point of the neck to the most convex point of the chest.
Building a pattern for the base of a jacket for men
Initial vertical, we will consider the left vertical slice of paper, it will also serve vertical for middle back seam.
 with an English collar. rice2") Step back from the bottom horizontal cut of the sheet 1-2 see to lengthen the shelf (Fig. 2.) and draw a horizontal line at the bottom. Measure up from it Di and draw reference horizontal for the back.
Step back from the bottom horizontal cut of the sheet 1-2 see to lengthen the shelf (Fig. 2.) and draw a horizontal line at the bottom. Measure up from it Di and draw reference horizontal for the back.
Waistline is down from the original horizontal by a length Ds. hip level down from waist to
1/2Ds minus 2,5 cm
armhole line - up from the waist to
dB minus 2 cm
Blade level - up 1/3 of the distance between the level of the armhole and the original.
Please note: the lines of the armhole, waist, hips and bottom are common to the front and back, and the lines of the shoulder blades and the original back are drawn only to the width of the back - about 1/3 of the width of the sheet.
 with an English collar. rice3") Now that the contours are ready, let's build middle seam (Fig. 3). It will be in contact with the original vertical only at the point of its intersection with the level of the shoulder blades. On the original horizontal of the back, step back from the original vertical by 0,5 см, waist - from 2 to 4 cm. The greater the indent, the higher the degree of fit of the product. Now let's take the average - 3 см. On the hips from the original vertical - on 0,5 см less than waist.
Now that the contours are ready, let's build middle seam (Fig. 3). It will be in contact with the original vertical only at the point of its intersection with the level of the shoulder blades. On the original horizontal of the back, step back from the original vertical by 0,5 см, waist - from 2 to 4 cm. The greater the indent, the higher the degree of fit of the product. Now let's take the average - 3 см. On the hips from the original vertical - on 0,5 см less than waist.
The middle seam is drawn in a certain sequence. The waist and hips are connected by a straight segment, which is extended in a straight line to the bottom. Waist - shoulder blades: the upper third of this segment is straight, and the lower two thirds are with a deflection 0,3 - 0,5 cm. The shoulder blades - the original - are connected smoothly.
Sprout width
1/3Ssh + 1,5cm
measured along the original horizontal, and from the resulting sprout width points - set aside up sprout height
1/3 sprout width + 0,5 cm
In the formed right corner we build bisector long
0,6 sprout height
and draw a smooth curved line.
Examples of patterns for men's clothing:


Old cutters advise when cutting to lengthen the middle seam of the back by 0,3 см up (see the picture in the bubble) to compensate for some tightness of the machine stitch in the bartack area. If this is not done, a small notch will appear in the middle of the sprout. It is not necessary to lengthen the shoulder and side seams in this way, since the armhole will undergo a rut before the sleeve is rolled in.
shoulder cut, as in a dress, we build, connecting the highest point of the sprout with shoulder point, which is formed at the intersection of two arcs made with the following radii:
from the highest point of the sprout - R1 = Dp + 1 cmWhere 1 см - the size of the puff;
from the middle seam at the waist - R2 = Vpk + 1,5 cmWhere 1 см - rise to the shoulder pad and more 0,5 см for a prank.
 with an English collar. rice4") About sutyuzhka (Fig. 4)
About sutyuzhka (Fig. 4)
 with an English collar. rice4")
The value of the suture around the area of the shoulder blades is equal to 1,5 см. For tight-fitting products, the suture can be increased to 2 cm. Distribute the plot like this: 0,5 - 1 cm - in the shoulder cut and 1 см in the armhole For stooped figures or if the fabric is stiff, you can tuck from the shoulder 1 - 2 cm, but this will not make the suture in the armhole area unnecessary.
By the way, modern sewing workshops are equipped with special presses with an ideal concavity shape. The details of the back are placed under the press and in a few seconds they get the perfect shape of the back. The working surfaces of shelf presses have their own specific concave shape. At home and in a small atelier, you have to dress with an iron and a tailor's pillow, relying only on the eye and the shape of the tailor's mannequin at your disposal.
Now we will limit the back in width at the level of the shoulder blades. Previously, the total increase in the chest - Pg - distribute between the main sections of the drawing:
add 30% to the back
Shs + 0,3 Pg
to the shelf - 40%
Shg + 0,4 Pg
to the armhole the remaining 30%. armhole width we calculate according to the formula:
(Sg + Pg) - (Shs + Shg + 0,7Pg)
Use the following formulas to check your calculations.
Back width = 0,4Sg + 0,3Pg
Shelf width = 0,35Sg + 0,4Pg
Armhole width = 0,25Sg + 0,3Pg
Of course, all formulas are given for conditionally proportional figures.
Set aside the calculated value of the back at the level of the shoulder blades.
Point of armhole touching the back width vertical - up from the level of the armhole to 8 - 9 cm. It can be calculated using the formula
1/12Cr + 0,3 armhole width
Bisector from the corner of the back armhole about 4 cm. Formula:
0,15 armhole width + 1,5 cm
And the point touching the armhole to the level of the same name is at a distance
1/2 armhole width
from the vertical that defines the width of the back.
By connecting both points of contact through the bisector of the angle, you will get the back half of the armhole curve.
 with an English collar. rice5") Back side seam (Fig. 5). The position of the top of the side seam of the back of the jacket can be different. The larger the size and / or the looser the jacket, the greater the distance between the top of the armhole angle and the vertical that determines the width of the back to the side seam. So for sizes
Back side seam (Fig. 5). The position of the top of the side seam of the back of the jacket can be different. The larger the size and / or the looser the jacket, the greater the distance between the top of the armhole angle and the vertical that determines the width of the back to the side seam. So for sizes
from 48 to 52 use the distance 1,5 - 2 cm,
for 52 – 56 distance 2 - 4 cm,
for 56 - 60 increase to 4 - 6 cm,
and after the 60th we retreat 1/4 armhole width.
Let's say we got the value 2 см.
Now, the width of the back detail along the hips
0,8 back width at the level of the shoulder blades + distance to the side seam + 1 cm
Having measured the calculated width from the middle seam of the back along the horizontal of the hips, lower the vertical from the obtained point to the bottom and draw a straight line (dotted line) upward from it until it intersects with the top of the side seam and armhole. From this guideline, measure to the waist to the left. 1 см. Connect the "one" with a straight line to the hip point and a concave line to the highest point of the side seam on the curved armhole.
The back is ready.
You need to think about the placement of the shelf. Two options are possible here.
- Amateurish. We retreat from the right edge of the sheet of paper the approximate width of the lapel. For the classic version, taking into account two basics, it is enough 6 - 7 cm. Unfortunately, this method does not guarantee accuracy.
- Professional. Calculate the width of the shelf along the hips, add the size of the solution of the tuck from the armhole (if such is conceived), expand the shelf along the bottom 1-2 see. And a couple more centimeters for the convenience of drawing a shelf.
So, the width of the shelf along the hips is
Sat + Fri minutes back width at hips
The size of the tuck solution from the armhole - 2,5 см.
There is little expansion at the bottom. - no more 1 см.
The calculated width, equal to the sum of the above values, is set aside along the bottom line to the right of the side seam of the back and draws a vertical half skid.
Half skid definition:
Half skid - the middle line of the symmetrical shelf and the line corresponding to the middle line of the body in front. The semi-skid in the product is superimposed on the midline of the body, passing through the jugular cavity and the navel. Half-skids of shelves in a jacket, jacket or coat coincide when applied.
 with an English collar. rice6") Source contour (Fig. 6) for the shelf is at a distance of measurement dpt from the horizontal waist, which is common with the back. In addition to the horizontal waist, we extended the lines of the armhole, hips and bottom.
Source contour (Fig. 6) for the shelf is at a distance of measurement dpt from the horizontal waist, which is common with the back. In addition to the horizontal waist, we extended the lines of the armhole, hips and bottom.
For typical figures and for building a pattern, instead of dpt you can use the calculation Balance:
1/2 (Dpt minus Dts) + 1/2 No. of fullness minus 0,2 Ssh
In this case, the number of completeness is from one to four. Small (M) - 1, medium (C) - 2, large (B) - 3 and in sizes starting from the 58th (OB, that is, very large) - 4.
The balance value is measured upwards from the original backrest, after extending the latter. If the figure is stooping, the balance will be negative and it will have to be measured down from the original horizontal of the back.
Armhole width already calculated and should be postponed from the semi-skid. Formula
Shg + 0,4 Pg
We denote the width of the shelf by a vertical and proceed to the construction of the neck.
Neck Width = Stem Width
Neck height = 0,45 Ssh
 with an English collar. rice7") As usual, we measure the width along the original horizontal, the height - along the half-slip and connect the resulting points with a smooth line (in Fig. 6 it is blue).
As usual, we measure the width along the original horizontal, the height - along the half-slip and connect the resulting points with a smooth line (in Fig. 6 it is blue).
Conditional center of the chest (indicated by a cross) we find at the intersection of two perpendicular segments: down from the original - Bg and to the left of the half-skid the distance to the center of the chest. We calculate the distance by dividing in half the width of the shelf to the armhole and retreating 1 см to the side cut from the division point.
Next - the corner of the shelf sutyuzhka.
From the intersection of the semi-skid and the horizontal of the height of the chest with a radius 13 см draw a notch, along which we measure from the semi-skid into the shelves 0,7 см. “0,7” is connected to the point of intersection of the half-skid and the chest height line.
To simplify the next operation, put a sheet of tracing paper or dense polyethylene on the fabric and circle the neckline you built (blue), the upper part of the half-slip to the chest height line and the chest height horizontal itself. After cutting along the stroke, lay the resulting pattern on the sloping line drawn through "0,7" and circle it.
 with an English collar. rice 7 The basis of a jacket (male) with an English collar. rice8") By this action, we took into account the bulge of the chest.
By this action, we took into account the bulge of the chest.
But you can just lay the corner of the shelf 1 см. It is located at the height of the chest. In order to account for it, a sheet with a stroke is superimposed on the upper side of the corner (hatching). This method is simpler, although fashion designers will be indignant at such simplicity.
Now let's return to the neck already to the one that turned out after the turn (Fig. 8).
Neck tuck. The easiest way is to use the neck lines obtained by the first and second rotation of the shelf fragment (gray dotted line and thick black line). For each of these necks, from the bottom points, measure along 4 см. Between the fours, draw a line to the center of the chest and use it as tuck symmetry line. tuck length - 5 - 7 cm. Based on the value you have chosen, draw a tuck, aligning its lines along the "solid black" neckline.
Armhole shelves.
The height of the armhole of the shelf is equal to the height of the armhole of the back minus the suture.
In this case, the height of the armhole should be measured from the extreme point of the shoulder vertically to the level of the armhole. Let me remind you that the suture of the armhole of the back is 1 см and we do not take it into account when measuring.
Auxiliary armhole points. We start by marking the full width of the armhole from the vertical of the shelf width, we find touch point with armhole level, dividing the width of the armhole in half.
 with an English collar. rice 7 The basis of a jacket (male) with an English collar. rice9") Then, placing the paper under the fabric, we circle with a cutter a part of the armhole of the back - from the vertical of the top of the side seam of the back to the point where the armhole of the back touches. The resulting figure (pink triangle) is cut out, superimposed and outlined (Fig. 9).
Then, placing the paper under the fabric, we circle with a cutter a part of the armhole of the back - from the vertical of the top of the side seam of the back to the point where the armhole of the back touches. The resulting figure (pink triangle) is cut out, superimposed and outlined (Fig. 9).
Tangent point on the shelf width vertical calculated by the formula
0,3 armhole width + 1,2 cm
The value is measured up from the level of the armhole.
shoulder point located at the intersection of two arcs.
First arc performed with a radius equal to the segment from the point of contact on the vertical to the level of the height of the armhole of the shelf. In the drawing, this segment is indicated by curly brackets and R1. The center in which the leg of the compass is placed is shifted by 0,5 см to a half-skid from a point on the vertical. Second arc, you guessed it, is performed by the radius Dp from the side of the neck.
Upper deflection of the armhole usually amounts to 2,5 - 3 cm, but it can be calculated using the formula
0,1 armhole bend + 0,8 cm
The segment to be bent should be divided in half and a perpendicular of the appropriate length should be built to it.
Armhole angle bisector – the last point required to complete the curve – is 2 - 2,5 cm. But it can also be calculated using the formula
0,15 armhole width
To check, you can use the armhole length formula:
0,2 SG + 1,6 armhole width + 2 armhole freedom + 14 cm,
while the increase in the freedom of the armhole, as mentioned earlier, is 30% of Pg.
When checking, compare the calculated value with the length of the armhole measured along the curve. The main mistake of beginners is to measure the armhole length twice using the copied dark triangle (near the touch point at the level of the armhole). The ideal difference between measurement and calculation does not exceed 1 см.
Continuing the drawing, measure the width of the shelf along the hips from the half-skid, using the formula
(Sat + Pb) minus the width of the back at the hips
Extending the vertical to the waist from the top of the side seam of the shelf, connect the resulting waist point with the side femur and extend the line to the bottom.
Next, lower the waist and the bottom of the shelf by 1 см.
This value is given to take into account the height of the shoulder pad from the side of the shelf. If necessary, a shrinkage coefficient is added to this value, which is calculated similarly to the stretch coefficients.
To make things easier, lower 1 см waist level on a semi-skid and extend the vertical chest center to the waist and 1 см way down. Connect the "units" and the point of intersection of the side seam with the waist with straight segments.
To shape the bottom, lengthen the half skid by 1 см and connect with the side point at the bottom.
Pocket. The pocket entry length in most cases is 15 - 16 cm. But for the calculation, you can use the formula
0,15 Cr + 8,5 cm,
while the maximum length of the entrance for heroic sizes 18 см.
The pocket line in this model is marked down from the waist level to 7 - 8 cm and parallel to the bottom of the shelf, while the vertical width of the shelf should divide the segment of the entrance to the pocket in half.
Armhole tuck can be either with two vertices (solid line) or with one (blue line). In any case, we start marking from the line of symmetry of the tuck, for which we measure the width of the shelf from the vertical at the level of the armhole 3,5 - 4 cm, and affordable - 2,5 - 3 cm from its midpoint.
Armhole tuck solution waist in the vast majority of cases is 2 - 2,5 cm. If the tuck will have one vertex, then its opening at the level of the armhole will also be equal to 2 - 2,5 cm. To compensate for the loss of the length of the armhole, the barrel area (shaded) is shifted to the side by the amount of the solution and is shaped with smooth lines.
For slender young men, you can add another tuck above the pocket. Solution - 1 см, length 12 - 14 cm. Distance from the beginning of the entrance to the pocket 1 - 2 cm.
In conclusion, it remains to level the side sections of the shelf and back (curly braces and equal sign) from the waist to the bottom and draw the bottom of the shelf with a smooth line with a deflection of about 0,5 см.
The base is ready ... almost ready ...
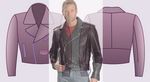
 with an English collar. rice 7 The basis of a jacket (male) with an English collar. rice10") Before you start building lapel (Fig. 10), it is necessary to shift the shoulder seam: rise for the back and lower for the shelf by 0,5 см. In addition, the shoulder of the shelf must be extended towards the neckline by 2 - 3 см and, having marked on the half-skid the point of convergence of the shelves according to the measure, connect the “convergence” with the “troika”. Thus, you will receive lapel fold line.
Before you start building lapel (Fig. 10), it is necessary to shift the shoulder seam: rise for the back and lower for the shelf by 0,5 см. In addition, the shoulder of the shelf must be extended towards the neckline by 2 - 3 см and, having marked on the half-skid the point of convergence of the shelves according to the measure, connect the “convergence” with the “troika”. Thus, you will receive lapel fold line.
Next, you will need a vertical that limits the width of the bead. Spend it, stepping back from the half-skid to the fold of the fabric 4 - 4,5 cm.
The neck will also require correction - it is lowered by half skid by 1 - 3,5 cm. The neck curve is then extended to vertical edge of the board.
The flyaway part of the lapel is made out with a barely convex line. If the fabric is striped, the bulge cannot exceed 0,3 - 0,5 cm, since the strip should go along the flying edge.
In models of single-breasted jackets, the lower part of the side is allowed to deviate from 1 to 4 cm. For our drawing, take 1 см.
If desired, the bottom of the side can be rounded, but it is better to make a bulge along the edge of the side with an angle that turns into the bottom line. This will simplify the subsequent processing of the product at the stage of connecting the “top” with the lining.
Layout leaflets: length 10 - 12 cm, the slope is arbitrary. The distance from the armhole to the beginning of the entrance to the pocket is not less than 7 cm. Lapel entry - no more 1/3 length.


