
Size charts What is the height of the pattern Payment methods Ask a question Reviews
PDF pattern for printing on a printer or plotter in full size for cape sizes from 40 to 64.

How to sew a cape with a tailored shoulder line and reliefs (cape) according to a finished pattern with your own hands
Contents of the instruction:
- Description of the electronic PDF of the cape pattern.
- How to download and print ready-made electronic cape patterns.
- Features of cutting a cape - a cape with reliefs with your own hands according to the finished pattern.
- How to sew a cape pattern - cape step by step.
Description of the electronic PDF of the cape pattern

Sizes: 40-64 (buyer gets ALL sizes!)
File format for download in order:
PDF in full size and without seam allowances.
After paying for the order, you will receive links to download two files cape (cape) patterns:
- PDF A4 file adapted for printing patterns on sheets of A4 paper in any program on any device, including mobile phones.
- Multi-format PDF file for printing on sheets of any size from A0 to A4 on a printer or plotter using Adobe Reader.
The level of complexity of cutting and sewing a cape - a cape
The level of complexity of the cut is simple, and the complexity of sewing is medium without lining and high complexity with  lining. For beginners, this pattern is not recommended, as it requires serious skills and experience.
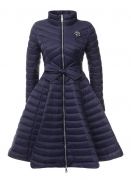
The style is suitable for absolutely all types of figures of any height.
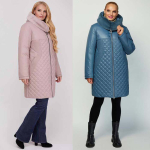
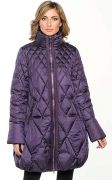
The set of cape patterns with reliefs includes (picture 1):
 patterns "shelves" - side and middle parts, while the middle part is made with a one-piece selection;
- patterns of the "back" - side with the middle part without a middle seam;
- collars "rack", "turn-down" and "turn-down on the rack".

In the patterns of the collars, the sizes are not prescribed, since the collars are cut out according to the PRODUCT after trying on.
Lining patterns are not included in the kit, but the description gives detailed instructions on how to cut the lining according to the "top" patterns.
Recommended fabrics and consumption
 Soft and not too loose coat fabrics such as semi-drape, tweed, "diagonal", "lightweight" boucle and "cashmere" are suitable for sewing.
The lining fabric can be ordinary, "twill" or taffeta is also suitable.
The consumption of the "top" fabric will be about 200 - 220 cm, lining - 150 - 170 cm.
How to download and print ready-made electronic cape patterns
How to choose a pattern size without taking measurements and using size charts.
How to buy and download a pattern.
How to print a pattern at home in full size on A4 sheets.
Download the pattern of this cape - cape
Features of cutting a cape - a cape with reliefs with your own hands according to the finished pattern
 I'll start with the difficulty level.
Many home couturiers naively believe that sewing outerwear is greatly simplified if the sleeve is one-piece or if it is not.
But really the most difficult and time-consuming operation is the manufacture of sides, fasteners and collars. In these operations, symmetry, great precision and accuracy are very important.
This is followed by WTO (wet-heat treatment, it is also ironing) and the connection of the “top” with the lining. In order to simplify the process of cutting and sewing, the cape pattern with reliefs is designed with a one-piece selection.
See more about one-piece rebounds...
Pay special attention to how to correctly duplicate the middle part of the shelf and the pick (drawings 2 и 3) and what seam allowances are provided by the cutting and sewing technique.
But the first thing to do after making the patterns is to determine the length of the product (picture 1) - five length options are marked on the cape patterns.
 You can immediately lay an extra 3,5 - 4 cm in the length of the product for a hem along the bottom or add an allowance along the bottom already when cutting (figures 2 - 3).
No seam allowances are added along the neck, sprout (neck of the back) and the drop edge of the pick-up. If you add an allowance to the neck, it will become shorter.
To the bottom collar for seams - 0,7 - 1 cm, to the top 0,2 - 0,3 cm more to get a fit, but it is better to cut out the collar after trying on, when the shoulder seam is stitched and carefully ironed. Following this sequence, you can choose the appropriate collar length for the product.
The direction of the grain thread in the middle details of the front and back coincides with the half-slip and the middle line of the back.
In the side parts, the lobar is perpendicular to the waist - we check by attaching a square to the fold of the fabric or to the edges and aligning one of the legs with the waist line.
The middle line of the collar is shared for the upper collar. The lower collar can be cut in the same fractional direction as the upper one, but it can also be cut along an oblique thread (picture 3). The collar will be cut out after trying on, but when laying out, do not forget to leave room for it, taking into account seam allowances.
Dubbing for a product without lining is done only along the selection, lower collar and along the bottom of the product.
Duplication of details of a cape with a lining is performed on a larger area (picture 2).
The middle part of the shelf is completely duplicated without allowances for seams, completely, but without allowances for seams (shoulder and bottom), the selection is duplicated. There is one subtlety: the middle part of the shelf and the border are one part, but the dubbing of this part consists of three parts pasted at intervals of 0,5 - 0,7 cm.
 The gap between the details of the dubbing of the shelf-selection must pass clearly along the line of the edge of the board and along the line of the bottom. The lower fragment of the selection, which will be folded during processing, should not be duplicated at all. The lower fragment of the shelf, equal to the width of the hem of the bottom, is also duplicated with an indent of -.5 - 0,7 cm.
Such indents along the fold lines make it possible to easily iron the part, allow the WTO (wet heat treatment) to hold well, even in wet weather.
The rest of the details in the cape with lining are partially duplicated: the side of the shelf - in the area of the shoulder and chest, the side of the back - in the area of the shoulder and shoulder blades, the middle part of the back - above and not below the waist.
The hem of the bottom is duplicated with strips of dublerin, cut along an oblique thread.
In products without lining, only the pick and hem of the bottom are duplicated (picture 3).
Cutting the lining is done according to the same patterns. It is better to make the lining non-removable (sewn).
A fragment from the middle part of the shelf is added to the side of the shelf, which is not overlapped by the selection (picture 4). To determine this fragment, fold the shelf-headline pattern along the edge of the bead - you need a part protruding from under the headline.
This part is added to the side of the shelf, but it is very important that the distance from the relief line along the waist does not exceed 1,5 - 2 cm.
 For larger sizes, in order to save the lining, the middle part of the back can be cut along the waistline into two fragments.
It is better to make a pocket overhead, since in the traditional location of the pocket (near the selection) the belt will interfere.
The dimensions of the pocket can be checked with a passport or a smartphone - 15 by 20 cm in finished form - more than enough.
Seam allowance for lining:
on the shoulder, back relief - 1,5 cm;
along the cut of the connection with the selection - 2,5 - 3 cm, that is, a double allowance;
at the bottom 5 - 7 cm (the excess can then be cut off);
do not add by sprout;
pocket allowances - 5 - 6 on top and 1,5 - 2 on the remaining sections.
The layout of the lining is not performed with such a strict coincidence of the share (Fig. 5). Parts are stacked in the most economical way, taking into account seam allowances.
How to sew a cape pattern - cape step by step
- After making the patterns, choose the length of the product.
- Taking into account the allowances for the seams, we carry out the layout and cut out the details of the “top”, then the dubbing details and the lining.
- We carry out the WTO of the details of the top, while they are folded in twos and then we paste the dubbing (except for the hem zone).
- We carry out WTO boards.
- We grind reliefs with a pass under the belt and iron them using ironing devices.
- See, what are pillows for ironing...
- We grind and iron the shoulder seams of the “top”, we make a shoulder pad and try on.
- The task of this fitting is to reconcile the balance of the product by adjusting the sprout and neck, and also to correct the spacers for the belt.
- Download free pattern epaulette shoulder pads can be found on the website at this link.
- Then, we process the sections (we edging or overcasting), if there is no lining.
- See how to make bias tape at home.
- If the cape is lined, we process the lining, leaving holes for the belt and in order to be able to turn the product inside out to process the bottom.
- See how to process lined pockets...
- Glue the “oblique” strip of dubbing onto the fold area along the bottom of the cape, edging (if the cape is unlined) or simply tuck and iron the bottom.
- We sew on the shoulder pads and connect the “top” with the lining along the bands.
- On the mannequin, we sew the lining to the cape at waist level with large oblique stitches.
- Then, having laid out the product on the table, we notice the lining and connect it with the cape along the bottom, turning the product inside out.
- We make a collar and stitch it in.
- You can carry out a second fitting, after which it remains only to sew and fasten the collar, pick up and sweep out the loops.
- See video how to sew loops on outerwear ...
Download this pattern pdf:
Pattern "cape with reliefs"
$2.00 (80 hryvnia)
Bank cards of the Russian Federation are not accepted for payment!
Size charts What is the height of the pattern Payment methods Ask a question Reviews
Vera Olkhovskaya in social networks:


-
Any pattern for free for a review of a previously made order
More...
Lifetime promotion for buyers of patterns!

Leave a review about my store of patterns for an order that you made before, and you will receive any paid pattern of your choice Free!
Catalog:
New patterns on the site


Most readable articles
- How to print patterns in full size on sheets of any format? Category: F.A.Q.
- Pattern of a dress for a babydoll girl Category: Dress patterns for free
- How to take measurements for sewing Category: Sewing: general questions
- How to sew a skirt without darts and without a pattern: "Tatyanka" Category: How to sew...?
- How to learn to sew from scratch at home for free? Category: F.A.Q.
- Skirt with a belt - how to sew a belt to a skirt and processing the belt when sewing a skirt for beginners Category: Waist section processing with and without belt
- How to choose a pattern size? Do Olkhovskaya patterns require a fit? Category: F.A.Q.
- Do-it-yourself parsley, Cossack and Gnome according to free patterns by Vera Olkhovskaya Category: How to sew a New Year's costume and costumes for the holidays with your own hands
New lessons and reviews
-
I sewed a boho trapeze dress size 42 according to your pattern
Category: Patterns - photos and reviews from users

-
I made two dresses with this pattern.
Category: Patterns - photos and reviews from users

-
Thanks for the fast order processing.
Category: Patterns - photos and reviews from users

-
When sewing, I slightly deepened the front neck
Category: Patterns - photos and reviews from users
