This article is written specifically for those who are just starting to learn how to cut and sew. You will notice in it details and clarifications that will not be of interest to the masters, as well as simplifications that are accessible to the understanding of the home tailor, who previously used only ready-made patterns for sewing.
Finished skirt patterns
To build a pattern of a straight skirt with your own hands, see the information below for examples of these full-size ready-made patterns, which you can download and print immediately for sewing.
How to build a pattern for the basis of a straight skirt with your own hands
Let me remind you that it is from the drawing of a straight skirt that it is recommended to start your acquaintance with the cutting technique. This choice is due to the minimum measurements that you need to be able to take and the simplicity of tailoring the product.
To build the foundation, we need St, Sat and Di.
See video master class on how to take measurements correctly and read how to spell them correctly
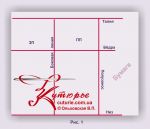
On a rectangular sheet of paper we draw three lines - bottom, waist and hips (Fig. 1).
bottom line – can coincide with the horizontal cut of the sheet
Waistline - from the bottom line, postpone the measurement du and draw a line parallel to the bottom line.
hip line - is located parallel to already drawn lines on 18-19 see down from the waistline.
Now you can start building vertical lines.
Skirt width = Sat + 2 cm - is deposited from the left vertical cut of the sheet.
We limit the width of the skirt to the vertical on the right side of the sheet half-skid line. The line of half skid corresponds to the middle line of the figure in front, passing from the jugular cavity down through the navel.
ZP width = 1/2Sb - is also deposited from the left vertical cut of the sheet.
On this "grid" for a straight skirt pattern can be considered complete.
It must be understood that further actions depend on the figure of the customer. You should take into account such nuances as the presence of a lumbar deflection, protruding buttocks, wide or narrow hips, a protruding stomach, as well as the tilt of the figure ...
All this information should be reflected in the drawing of the master in the future. But, while you are learning, let's do a simplified version.
And we calculate the sum of the darts of the skirt according to the formula:
(Sat+2) minus St
That is, from the width of the skirt, measured according to the drawing, we subtract the measurement of St.
Let's say we are building a drawing of a skirt for a slender girl without the "architectural luxury" of the figure.
We distribute the result of the sum of the tucks between the middle seam of the RFP, the side “notch” (which is obtained from the slope of the side seams), the darts of the PP and the tucks of the ZP.
In most cases, the amount of tucks is from 12 to 18 cm.
Let's say the amount of tucks is 15 cm:
2 cm - the middle seam of the RFP;
6 cm - side "notch";
4 cm - 2 darts RFP;
3 cm - 2 darts PP.
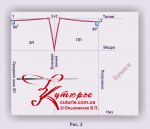 So, the design of the middle and side seams has a somewhat confusing sequence (Fig. 2).
From the side vertical line we measure 6 cm - 3 on each side.
We lower the waistline by 1 cm in the back and 2 cm in front.
Of course, with a protruding belly, it would be better to raise the waist of the PP, just as with protruding buttocks, you need to raise the waist of the PP.
We connect the points marked by us with straight lines, and then draw out the shaping ones, keeping right angles at the vertical of the half-skid and the middle seam of the RFP.
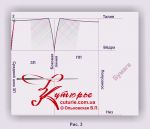 After that, you can draw the bend of the middle seam (Fig. 3) - with a straight line and shaping lines.
And darts.
We mark the location and length of the tucks with straight lines. We place the tucks closer to the side seam, dividing the PP and ZP approximately in half (Fig. 3 - the area of the tucks is shaded).
First, mark the middle lines of the tucks (Fig. 4) and limit their length to horizontal marks.
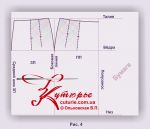 Pay attention to the fact that the middle lines of the tucks are located obliquely and, if this is possible due to the large difference between the volumes of the waist and hips, then fan-shaped.
The length of the darts ranges from 11 to 15 см.
The general pattern is that the larger the tuck solution and the size of the product, the longer it is. Thus, the darts of the RFP must be longer than the darts of the PP. And the tuck that is closer to the side seam is always shorter than the one that is closer to the half-slide and the middle seam.
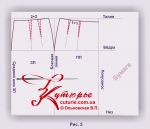 When the middle lines of the tucks are ready, you can add the extreme lines (side lines of the tuck) to them, taking into account the solution (Fig. 5).
The lines of the tucks are equalized according to the one that is longer and are drawn smoothly.
Professionals who draw lines do not build, but always mean. Moreover, many sewers draw only the middle line of the tuck, the top (length limit) and one side line. The same marking method is used in the mass production of clothing.
Having mastered the drawing of a straight skirt, you can cut it without a pattern, immediately on the fabric.
See how to cut a pencil skirt without patterns
And also ready-made pattern of a straight skirt with a one-piece belt real size




 Join my community on Viber...


