Vera Olkhovskaya
The set-in bar is one of the simplest and most common types of fasteners.
It can be used not only on T-shirts, blouses, windbreakers and dresses, but also in skirts instead of the traditional vent.
 Sometimes the slots of the sleeves are processed with a set-in bar.
For processing, you will need 2 parts of the strap, a shelf and a doubler, suitable for the fabric from which the product is sewn.
We start with markup.
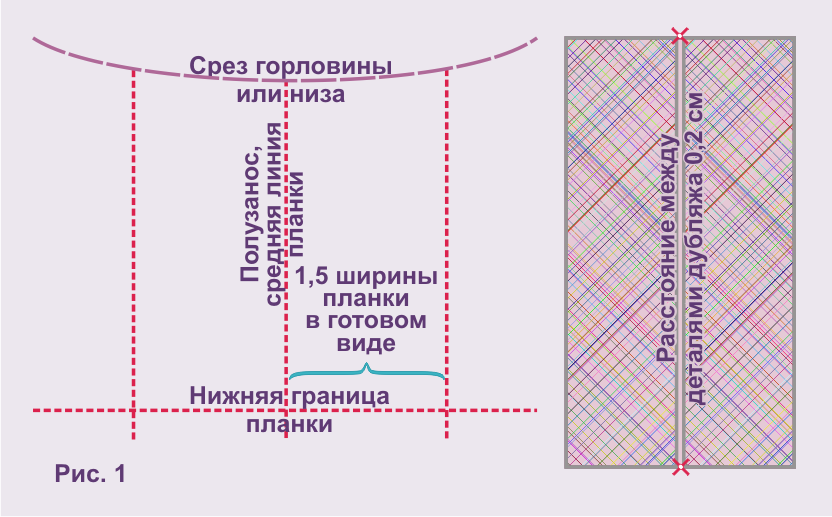
The bar is marked with three verticals and one horizontal (Fig. 1).
The first vertical - the middle one - runs along the half-drift or the middle line of the future plank.
Extreme verticals - at a distance of 1,5 strip widths in finished form from the middle vertical.
Horizon l - along the lower border of the plank in finished form.
Plank blanks can be cut from the same fabric as the product or from a companion fabric.
It is also possible that the bar is turned over, i.e., in finished form, the bar is “wrong side”.
Plank blanks are rectangles (Fig. 1 on the right), the length of each of which is equal to
finished plank length + 5 cm,
and width
three widths of finished plank
Each blank-rectangle should be completely duplicated, after cutting the dubbing blank in half lengthwise.
When sticking dubbing, do not forget about the distance between its parts of 0,2 cm.
Zat iron the workpieces in half, combining long sections.
If you left a gap between dubbing fragments, then this will be very simple.
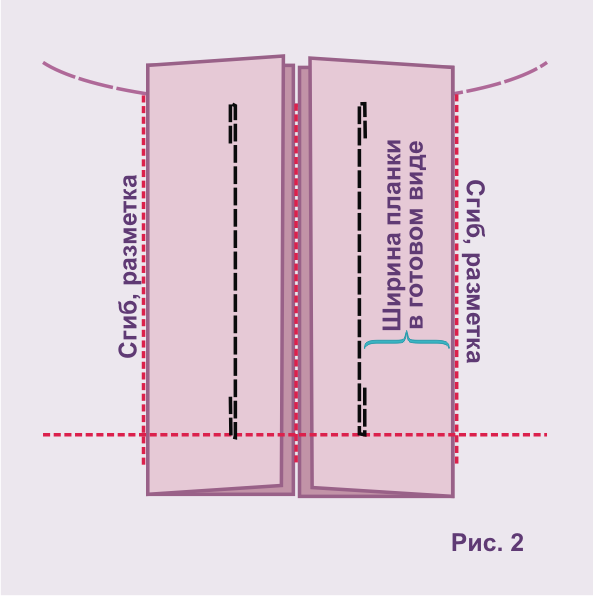
On each workpiece, draw a line along the width of the finished plank from the fold (Fig. 2).
Put the blanks prepared in this way on the shelf, aligning their ironed folds and the extreme vertical markings.
On top of the stacked planks, draw a horizontal line for the bottom border of the plank.
Lay the lines along the lines drawn on the blanks strictly to the bottom border.
These stitches should begin with bartacks and end with bartacks as well.
Then, check the quality of the stitches (Fig. 3): they should be parallel and of the same length, the distance between them should be equal to the planned width of the finished bar, the bartacks should be of high quality.
When the quality of the stitching is checked, the bar is cut along the center line and “corner”, as shown in fig. 3.
Pay attention to the accuracy of the cut: do not cut literally “one thread” to the corners of the bar.
The height of the "corner" - 1 cm.
You having filled the cut, turn the bar inside out so that the facing cuts are on the wrong side, straighten the “corner” (Fig. 4).
After that, perform a horizontal bartack (it is indicated in Fig. 4 by a red dotted line), bending the corner and the bar in one direction, and the shelf in the other.
The bartack line is laid from the side of the base of the "corner", begins and ends with a return bartack and exactly connects the vertical lines of the bar (which are indicated in Fig. 4 by a black dotted line).
Overlock open sections on an overlock and cut them to a width of 1 cm.
With a seam width of overedging of 1 cm, those sections that were formed after cutting will fall under the overlock (see Fig. 3, 4, 5).
We complete the processing by basting the bar with oblique stitches 1–1,5 cm long.
The operation is performed from the face of the product.
We start by sweeping the bar (Fig. 6), that is, we connect both planlets with oblique stitches, then we sweep around.
Having swept out - we cut off everything that goes beyond the neck line and iron it.
If necessary, we make another bartack (Fig. 7).
Patterns of women's skirts and trousers


Women's jackets and coats
|
||||||||||||


Women's coats Fur coats Jackets Capes
|
||||||||||||