Size charts What is the height of the pattern Payment methods Ask a question Reviews
Instructions for patterns of a demi-season women's coat-shirt in small and large sizes - cutting and sewing at home
 Contents of the instruction:
- Description of patterns.
- What patterns are included in the set of simple patterns for a women's coat-shirt.
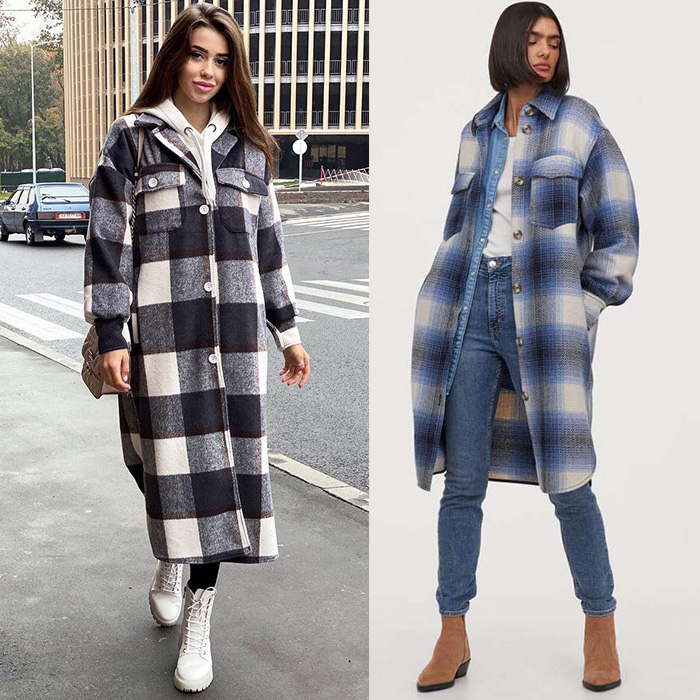
- Description of the design of the style of this demi-season women's coat-shirt.
- From what you can sew a women's coat-shirt for spring - autumn and how much fabric you need.
- How to buy and download ready-made simple patterns of a coat-shirt with a printout on a home printer or plotter.
- How to cut a shirt coat according to ready-made patterns.
- How to sew a demi-season coat and shirt at home - sewing sequence.
Buy and download this coat pattern
1. Description of the pattern
 Sizes: 40-52 and 52-64 - all sizes in one file.
File format: PDF full size and without seam allowances
After paying for the order, you will receive links to download two files shirt coat patterns from 40 to 52 or from 52 to 64 sizes:
- PDF file A4, adapted for printing patterns on sheets of A4 paper in any program on any device, including mobile phones.
- Multi-format PDF file for printing on sheets of any size from A0 to A4 on a printer or plotter using Adobe Reader.
The level of difficulty of sewing from intermediate to professional depends on the chosen fabric and processing option.
The style is not suitable for figures with very wide hips and very lush breasts.
Pattern is for home use only. Tailoring may require professional sewing equipment.
2. Complete set of patterns for a women’s coat “shirt”

- Back patterns - Back yoke and Back.
- Shelf pattern with markings for cutting the selection.
- Non-stop sleeve patterns - PP Sleeve (front half) and ZP Sleeve (back half).
- Patch pocket and flap for this pocket.
- Pocket burlap – for a pocket in the side seam or a “leaf” type pocket, which is marked on the shelf.
- Collars - shirt on the stand (with a "protrusion") and without a stand (without a protrusion).
- Facing for processing a rounded bottom – Back facing and Front facing.
Cuffs are not included as they are rectangles. How to cut them is described below.
3. Description of the design of the coat-shirt pattern
 Coat of a loose straight silhouette with a lowered shoulder and a two-seam non-stop sleeve.
The design does not contain a tuck for the chest, which, combined with a straight silhouette, makes the style convenient only for sports figures. For ladies and girls with curvy shapes, it is recommended to choose a larger size.
The coquette on the back is not only a decorative element. It allows you to get rid of the thickening of the fold, "not letting" it to the collar.
Non-stop sleeve with a very low hem and pleats under the cuffs. The relief not only helps to narrow the sleeve according to the arm, but also makes it easier to create a sleeve vent.
It is worth noting that all design differences from the classic men's shirt are due only to some adaptation of the style to coat fabrics, which will avoid unnecessary thickening and additional processing difficulties.
4. What to make a coat shirt from
 Suitable, but not too dense and not too thick coat fabrics. It can be loden, and towed knitwear, and tweed.
Suit and overcoat tartans, of course, are a priority.
Do you need a lining, decide for yourself. Below is a variant with partial processing of the lining.
The consumption of overcoat fabric will be approximately from 300 to 350 cm, with a width of 150 cm.
The consumption of lining fabric for partial processing is about 30 cm (for a yoke, valves and burlap). If it is planned to make an oblique trim from the same lining for edging open sections, then the consumption will increase to 100 cm.
Dublerin consumption depends on the duplication area and will be from 30 to 120 cm.
5. Instructions on how to buy, how to print and others
 How to choose a size without using tables and taking measurements
What height are the patterns for?
How to buy a pattern ready-made electronic pattern
How to print a pattern at home in full size on A4 sheets or on sheets of any other size
How to assemble a pattern after printing
Simple patterns for dresses, sweatshirts, skirts and trousers in full size Free
6. How to cut a coat with a one-piece sleeve using a simple ready-made pattern
Before cutting, as usual, we determine the length of the product or sleeve.
") In this case, the sleeve is measured from the side point of the neck through the bent elbow to the bone of the wrist. That is, as for raglan or kimono. On the pattern, too - along the shoulder seam and along the middle line of the PP sleeves, summarize, and then compare with the measurement. We take into account that the width of the cuff will be 4 cm in finished form. If you want a width of 5 or 6 cm, then we take into account this width.
In this case, the sleeve is measured from the side point of the neck through the bent elbow to the bone of the wrist. That is, as for raglan or kimono. On the pattern, too - along the shoulder seam and along the middle line of the PP sleeves, summarize, and then compare with the measurement. We take into account that the width of the cuff will be 4 cm in finished form. If you want a width of 5 or 6 cm, then we take into account this width.
Adjusting the length of the pattern does not imply anything unusual. To shorten the length, we place horizontal folds on the patterns; to lengthen them, we cut the patterns horizontally and spread them apart.
When the correction is ready, we deal with the processing, which differs from the processing of an ordinary shirt.
As you probably know, coat fabrics, due to their properties, create additional complexity in sewing, so the design should level them as much as possible.
Let's start with the traditional shirt placket. Does she need a coat? It’s easier to replace it with a one-piece trim and make decorative stitches that will imitate this strip.
We cut out the pick-up according to the same pattern as the shelf, using the pick-up line. Exactly as in the model Coat with large pocket See rice. 2 – 3 via link
Now about the bottom line.
If it is straight, then add a 3 cm allowance to the hem.
If the bottom has roundings at the side seams, then we process it partially with facings, and partially with a hem - in the area of the fold of the back. In this case, the edges of the facings are stitched to the hem and hem. The corresponding inscriptions are on the drawings.
The collar can be chosen as a shirt (with a ledge) and a “coat” (without a ledge (as in Fig. 2). For thinner fabrics, you can choose any of them, and for looser ones, “coat”.
As for the sleeve vent, which exists in the shirt for the convenience of fastening the cuff, it is not difficult to make it in the elbow seam. It can be an ordinary “spreader” without additional elements and allowances.
The calculation for the cuff is as follows:
Cut Width = Two Finished Widths + 2cm
Cuff length in cutting = Wrist girth + 10 (12) cm -
10 cm for small buttons, 12 for large ones.
Please note that the width of the pleats along the bottom of the sleeve may change when sewing. Lay the folds "in place".
Seam allowances - 1 - 1,2 cm.
Exceptions - we do not add along the neck, sprout and armholes. The rest is not important. For processing the entrance to the patch pocket - 3 cm.
A fragment of the bottom of the back, which will be processed into a hem (Fig. 2), will require an allowance of 1 cm at the junction with the facing. The facing will also require 1 cm at the junction with the bottom. Do not forget. All allowances are shown in Fig. 2
The dimensions of the leaflet for the welt pocket are as follows:
Width of the leaf when cutting = Two widths when finished + 2 cm = 2 x 2,5 cm + 2 cm = 7 cm
Leaf length in cutting = Pocket length in finished form + 4 cm = 15cm + 4cm = 19cm
After cutting, do not forget to mark the border of the bottom facings, notch the fold of the back, notch the hem and half-skid.
The lines of the pick-up and half-skid are best marked with a lining stitch on each shelf. Then, mark the welt pocket. Patch pocket - at the discretion of the couturier, but it is better to mark on the fitting.
Next, cut out the details from the lining fabric: the “bottom” yoke (to slide), the “bottom” flap and burlap for the welt pocket or pocket in the side seam.
A few words about the pocket in the side seam.
Instead of a valance, we use burlap from the top fabric (one pair of parts) - it will be stitched on the back side. And burlap from the lining fabric (the second pair of parts) from the shelf side.
The notches for such a pocket are made on the side cuts and to make the notches, all four side cuts should be folded together. We retreat 25 - 30 cm down from the armhole, depending on height, and make the first notch, another 15 cm down - the second notch.
7. How to sew a women's coat and shirt
From the explanations on cutting, it has already become clear to you that a coat-shirt is something in between a coat and a shirt, not only in appearance, but also in processing.
During the cutting process, you should have finally thought through the sewing technology. But the method of processing open cuts can be considered after cutting.
We have several options:
- Leaving open cuts open is a good method when the fabric does not crumble or when the cuts are covered with a lining. Sometimes open raw sections are cut with zigzag scissors.
- Overlock with an overlocker - if you have an overlocker and the knife cuts well, then this option is suitable for almost any fabric. Try it on a piece of fabric and evaluate the result.
- Bias binding is the best option, although it is quite time consuming. In this case, you can use both a purchased oblique inlay and a homemade one.
Below is an example sewing sequence.
Download this pattern pdf:
Women's shirt coat pattern
$3.00 (120 hryvnia)
Bank cards of the Russian Federation are not accepted for payment!
Size charts What is the height of the pattern Payment methods Ask a question Reviews
Vera Olkhovskaya in social networks:


-
Any pattern for free for a review of a previously made order
More...
Lifetime promotion for buyers of patterns!

Leave a review about my store of patterns for an order that you made before, and you will receive any paid pattern of your choice Free!
Catalog:
New patterns on the site


Most readable articles
- How to print patterns in full size on sheets of any format? Category: F.A.Q.
- Pattern of a dress for a babydoll girl Category: Dress patterns for free
- How to take measurements for sewing Category: Sewing: general questions
- How to sew a skirt without darts and without a pattern: "Tatyanka" Category: How to sew...?
- How to learn to sew from scratch at home for free? Category: F.A.Q.
- Skirt with a belt - how to sew a belt to a skirt and processing the belt when sewing a skirt for beginners Category: Waist section processing with and without belt
- How to choose a pattern size? Do Olkhovskaya patterns require a fit? Category: F.A.Q.
- Do-it-yourself parsley, Cossack and Gnome according to free patterns by Vera Olkhovskaya Category: How to sew a New Year's costume and costumes for the holidays with your own hands
New lessons and reviews
-
I sewed a boho trapeze dress size 42 according to your pattern
Category: Patterns - photos and reviews from users

-
I made two dresses with this pattern.
Category: Patterns - photos and reviews from users

-
Thanks for the fast order processing.
Category: Patterns - photos and reviews from users

-
When sewing, I slightly deepened the front neck
Category: Patterns - photos and reviews from users
