Vera Olkhovskaya
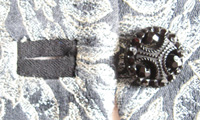
This material reveals the secret of the so-called "frame" - the most common way to process pockets, stitching loops and slits for hands in products such as a poncho cape.
It is no secret that for beginner tailors, it is the processing of pockets that is the most difficult.
So if this is your first pocket (loop or slit), do it on a piece of fabric.
Pocket frame marking
Attention! You will need very sharp scissors that cut well at the ends (see "How to choose scissors" in the "Equipment" section).
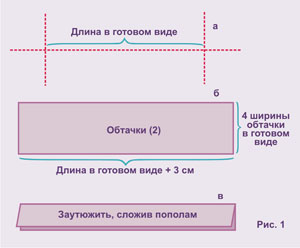 The “frame” should start with the markup (Fig. 1 a).
Marking lines are applied to the product or flap for the training sample on the front side - a horizontal and two verticals that determine the position and length of the future frame.
When marking, it should be borne in mind that pockets and slots for hands made using the “frame” method should be marked in a mirror way.
"Frames" - pockets and slots can be placed horizontally, vertically and at an angle, that is, along an oblique thread.
But, you need to understand that horizontal "frames" will require an additional loop or zipper,
to prevent sagging, and in some cases they can “cut the figure” ugly.
Vertical "frames" work well in socks, but are more suitable for coat pockets and for slits on capes and ponchos.
"Oblique" "frames" are the most widespread.
They are used in both coats and jackets, but are not well suited for loose and loose fabrics.
Hinges - frames
Now about loops - "frames". It should be borne in mind that the stitching loops are performed in two stages.
The first stage - the manufacture of the frame - before the sides are turned.
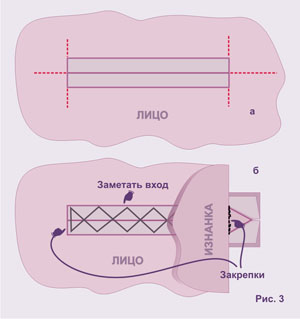
That is, the sides are processed when the “frame” (or several “frames”) on the shelf are already completely ready (Fig. 3).
On the processed selection - the next stage is the opening of the loop (loops).
Of the small details, you will need two facings for each (Fig. 1 b), which should be ironed, folded in half inside out (Fig. 1 c).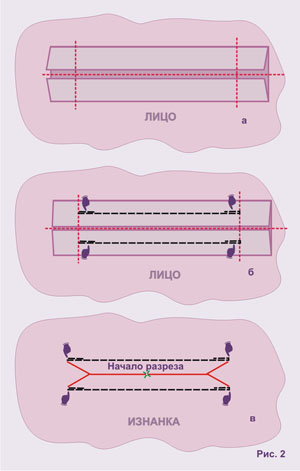
Tip for beginners: cut and iron all the facings you need at once.
Rule for pockets: making both pockets or all loops, slots is done in parallel.
When the facings are ready, lay them on the markup, as shown in fig. 2.
That is, open slices - to the horizontal marking line.
For convenience, vertical marking lines can be drawn on the facings.
Stitch the facings, laying the stitching lines from one marking vertical to another.
Each line must begin and end with a bartack.
On fig. 2 b bartacks are indicated by pointers.
Check the correct stitching of the facings: the lines must be strictly the same length and run exactly in the middle of the facing.
Pay special attention to the strength of the ends of the lines, because if they are not fastened well, the pocket will not work.
At the end of the check, look at the product from the inside and check the parallelism and length of the lines again (Fig. 2 c).
Then, stitch the facings to the second shelf and do the same check.
Please note that all four lines must be exactly the same length.
When processing stitched loops of the "frame" type, it is also better to perform all operations in parallel.
That is, first stitch all the facings and then check all the lines.
The next stage is cutting the "frame" (Fig. 2c - the cut line is marked in red).
We start from the middle. For convenience, you can bend the "frame" across.
Please note that the cut should be no less accurate than the stitching.
 We do not cut literally a couple of threads to the ends of the line.
If you cut more than necessary, the "frame" will be damaged, if you do not cut it, it will be impossible to turn it out.
If you have done everything exactly and correctly, turn your “frame” inside out and it will look like in fig. 3 a.
Well, almost like this. What is missing? Haven't guessed yet? Iron!
Novice tailors and amateur tailors avoid ironing at all costs.
And this is their main mistake.
How to iron a frame
So, in order to iron the “frame”, you need to sweep it, fix it and sweep it.
Let's understand these abstruse terms.
Cover the entrance to the "frame" with cross stitches, as shown in fig. 3 b.
These are temporary stitches that we will save until the product is ready.
Let me remind you that all temporary stitches (basting, note, basting, basting, snares, interlining stitches) should be done with white threads.
 It is advisable to choose a cotton thread, as it does not stretch at all.
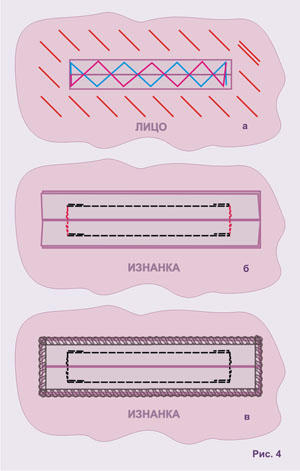
Cross stitches in this case are performed very simply, like ordinary oblique stitches,
but in two passes - first in one direction (Fig. 4 a - blue stitches), then back (Fig. 4 a - crimson stitches).
So, the entrance to the "frame" is swept up. Notice the rest of the "frames" on the product.
The next very important stage is fixing the ends of the "frames".
The product is located face up, one side of it is folded (Fig. 3 b), the fixing line is laid along the height of the “frame”,
at the same time, the corner resulting from cutting is carefully straightened beforehand.
Pay attention to the accuracy of this operation.
Perform such clips on all the "frames" of the product on both sides.
Check yourself: all the "frames" from the front and from the inside (Fig. 4 b) should have the shape of a regular rectangle and the same size.
Now baste the "frame" by laying around oblique stitches 1,3 - 1,5 cm long (Fig. 4 a). The same for the rest of the "frames".
Ironing is done from the front and from the wrong side on the "large" tailor's pillows.
It is better to do this through two layers of damp white cotton fabric.


Processing pockets, slots and loops
Further processing of pockets, slots and loops of this type is different.
We leave loops and pockets without overcasting (Fig. 4 b).
Slots for the hands - we overcast the facings from all sides (Fig. 4 c).
Further processing of the loops, as mentioned earlier, is carried out after processing the bead.
A selection is attached to the shelf in the area of \uXNUMXb\uXNUMXbthe loops.
To do everything exactly, you should baste the selection very accurately and repeat the notch around each loop, as before ironing (Fig. 4 a).
After marking by touch, mark the cut lines, as shown in fig. 2 in, to open the loops from the side of the selection.
Cutting the line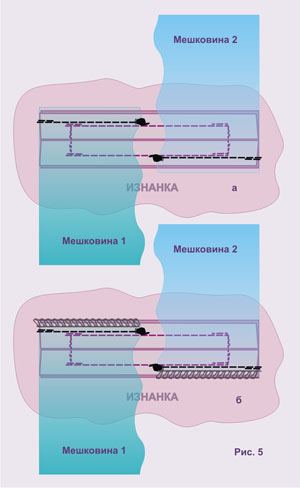 , fold the excess inside and hem with blind stitches.
The loops are ready, they should only be carefully ironed, removed all temporary stitches and steamed to remove thread prints.
And the pockets "require" burlap! Let's analyze the method where the burlap consists of two parts.
Let me remind you that in women's clothing, the burlap of pockets is cut out of the lining fabric.
The width of the burlap parts is equal to the length of the facings.
The length is equal to the depth of the pocket + 3 or 4 cm.
The cut parts of the burlap are stitched to the open cuts of the facings (Fig. 5 a).
If the product does not provide a lining, the stitching seams are overcast (Fig. 5 b).
The piece of burlap stitched to the bottom facing is folded down and ironed in this position (Fig. 6).
We sew the details of the burlap to the second pocket.
Then both parts are pinned or swept away to avoid distortions when they are connected.
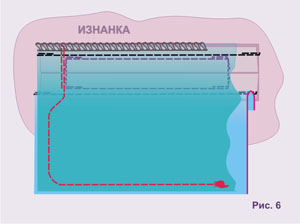 The stitching of the burlap starts from the very top of the pocket with a vertical bartack and the beginning of the stitching is also secured.
Next, there is an expansion of the burlap, we round off the corner, go along the bottom, round the corner again, up to the vertical bartack of the “frame” and finish the line with a bartack.
We repeat the same operation on the second pocket.
We overcast the stitching sections on the overlock.
More experienced tailors may use whole burlap.
It remains only to remove the slanting stitches and remove the lasses from the pocket.
Cross stitches are removed only when the product is completely ready before finishing ironing.
Life-size patterns for women's coats and jackets
|
||||||||||||