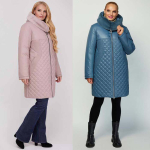
Size charts What is the height of the pattern Payment methods Ask a question Reviews
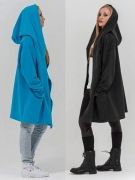
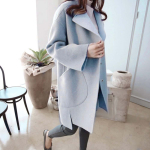
Electronic cocoon coat pattern for printing on a home printer or large-format plotter. Patterns can be printed on standard sheets of paper from A4 to A0.
 Free download instructions on how to sew a cocoon coat according to a pattern ...
Instructions on how to sew a coat on a pattern with your own hands
 Sizes: 42-52 and 52-62 - the buyer receives a choice of any gradation of sizes
File format for download in order:
PDF in full size and without seam allowances.
After paying for the order, you will receive links to download two files patterns of a coat a cocoon of the gradation of the sizes chosen by you:
- PDF file A4, adapted for printing patterns on sheets of A4 paper in any program on any device, including mobile phones.
- Multi-format PDF file for printing on sheets of any size from A0 to A4 on a printer or plotter using Adobe Reader.
Sewing difficulty level: professional. The style of the cocoon coat is suitable for all types of figures of different fullness.
Since the volume of the product is very large, the division into sizes is conditional. It is worth choosing the size based on the desired volume of the product.
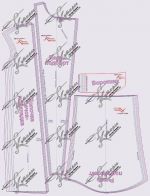 The consumption will be 290 - 300 cm with a width of 140 - 150 cm.
For sewing a cocoon coat, soft and loose coat fabrics such as boucle, tweed or cashmere are suitable. It is also possible to sew from pile fabrics, including women's rattan. Of course, pile fabrics add complexity to the work and require cutting all the details in one direction, which will increase consumption.
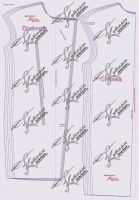
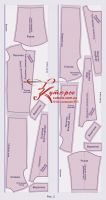
The set of patterns for the “cocoon” coat includes the following patterns (picture 1): back, shelf (whole), shelves board-pick, shelf side part-lining, collar and non-stop sleeve.
How to print a life size pattern at home on A4 sheets
How to choose a pattern size without taking measurements and using tables
 Buy and download this coat pattern
How to cut a cocoon coat
 It looks like a very simple coat, but processing it will require you to have professional sewing skills.
Before opening the product, pay attention to the design features of this coat: no darts, the shoulder is lowered and shifted forward - the conditional shoulder point is marked on the back for reference, the sleeve is non-stop, the collar is on the open neck.
A few more words about the conditional shoulder point. It will be useful to you when carrying out fittings to check the balance of the product.
 The point named on the drawing as “shoulder” should be located on the figure against the shoulder joint.
In addition, the shoulder point should be aligned with the midline of the sleeve. Landing can be distributed evenly.
But the main difficulty of the style lies in the processing of the collar and sides.
As for the whole shelf and the shelf, consisting of two parts:
A whole shelf can be used for a product with a fastener with buttons, air loops or coat buttons. In this case, the edge of the opposite side should coincide with the “zip stitching line”.
If your coat has a zipper, then it is better to use a shelf consisting of two parts "side" and "side". The side part of the shelf should also be used when cutting the lining.
 Duplication of details is performed according to the same rules as for other coat styles (picture 2). The shelf is completely duplicated. The lapel is duplicated with a “separation” from the shelf along the inflection line by 0,5 cm. The back is up to the level of the shoulder blades, the collar and collars (upper and lower) entirely.
Usually dubbing is cut out without seam allowances, that is, exactly according to patterns. But for convenience and to increase the accuracy of the cut, in individual tailoring, there is a practice of cutting out the selection along the shelf after the first fitting and fitting of the product. The dubbing of the selection in this case is trimmed along the details of the selection.
It is advisable to choose the direction of the shared thread in dubbing the same as in the details of the top.
Sometimes people ask me why duplicate the shelf?
Dubbing is needed to preserve the shape of the product, especially to preserve the shape of the side and lapel. In addition, pockets made on a duplicated shelf are easier to process symmetrically and without flaws. Dubbing increases the wear resistance of pockets and the entire product.
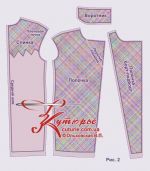
Now more about the share direction in the details of the "top" of the coat (picture 3).
The direction of the share for the shelf is traditionally parallel to the half-skid. Anticipating the questions of brave home couturiers who decided to sew a coat, but do not have sewing skills and knowledge of terminology, let me remind you that the half-skid on the product corresponds to the middle line of the human torso in front and passes on the figure through the jugular cavity and navel.
Another question that is asked by lovers of sewing clothes with their own hands.
Why bother with the middle back seam?
- Firstly, in order to avoid a shared thread in the middle of the back - a one-piece back will eventually become a little shorter in the middle than on the sides.
- Secondly, along the middle seam in this model there is a narrowing of the silhouette.
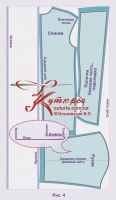 Shared selection runs along the edge of the selection. For the upper collar - along the midline, therefore, when cutting, we will lay it on the fold. For the lower collar, the share should go along the rake - that is, along the visible section of the seam for sewing in the collar (picture 3).
Lobar sleeves - along the part, that is, along the midline.
Seam allowances are the usual for coats.
Shoulder, side, shelf relief (if any), middle seam of the back (in this style without slots), front-back seams of the sleeve - 1 - 1,5 cm each.
The sprout, the neckline, the edge of the shelf, the armholes, the hem of the sleeve are outside the stroke line, that is, in fact, with an allowance of 0,3 - 0,5 cm. No more is needed so as not to distort or shorten the curves.
It is advisable to cut out the selection after the first fitting, when the lapel and the side are adjusted. Suddenly you want to make changes to the product and you have to cut the selection along the shelf.
In this case, everything is simple - circle the shelf and cut out for the stroke line outward, getting an additional 0,3 - 0,5 cm for landing.
In the event that you cut out the selection by detail, then the landing allowance should be laid on your own - 0,6 - 1 cm, respectively.
We cut out the collar after the second fitting, on which the shoulder sections must be finished. The length of the collar is determined by the length of the neckline. We first cut out the lower collar with allowances of 1 cm, so that after the second fitting, cut out the upper one along the blank of the lower collar.
Do not forget that all coat fittings, two or three, you should carry out with a shoulder pad. For this model, it is epaulette and it can be made larger than the free one offered on the site by adding 2-3 cm in a circle.
Since the shoulder pad in this case must be made of batting or similar material, its size and height can be easily adjusted at the first fitting.
At the bottom of the product and sleeves, add an allowance of 3,5 - 4 cm.
Please note that before cutting, you must accurately determine the length of the sleeve by measuring its length according to the figure from the side point of the neck, through the shoulder point and elbow to the wrist and adding another 2-3 cm.
The lining can be cut both according to the patterns and according to the details of the cut after the first fitting and after cutting the selection - so there are more chances not to get confused with allowances.
What are the advantages of cutting the lining according to the details of the cut of the product?
In the absence of the need to think about allowances. We circle the back with allowances, “automatically” adding an additional 0,7 - 1 cm and the lining will be guaranteed to be free enough so as not to tighten the product from the inside.
The lining of the shelf, if cut along the shelf, is always cut “according to the formula” of the shelf minus the edge and plus the allowance from the side of the edge.
If you cut according to patterns, add instead of 1 - 1,5 cm, and instead of 3 along the bottom - 5 - 6 cm for a non-flying lining and 8 - 10 for a flying one.
How to sew a coat step by step
Sewing sequence:
- For the first fitting, we perform the WTO shelves, backs, duplicate and sweep. Do not forget to apply lining lines (manually or on a typewriter, if there is a “for sweeping” line) of the half-skid line, the lapel fold and the “zipper sewing line”, if the shelf is solid. These lines should remain until the final ironing.
- Of course, we make the WTO “according to the male type”, forming a slight bulge of the shelf vertically, as for a classic men's jacket.
- Shoulder pad required. The sleeve is folded. If the coat has a relief and a zipper in it, then the relief of the left shelf is slightly ironed, the zipper is superimposed and swept up.
- At the first fitting, you need to clarify the balance of the product and the position of the pocket, compare the outlines of the lapel and the side with your expectations and, if necessary, make adjustments.
- Then, you should outline the location of the pockets. Pockets in the "cocoon" coat model can be located in "classic" places - 5 - 10 cm below the waist or immediately under the chest. You can also process two pairs of "frame" or "leaflet" pockets. The lower pockets can be laid on. Of course, if you decide on two pairs of pockets, then the position of the lower pockets may change.
- It will not be superfluous to check the length of the sleeve on the fitting. Adjustments are possible due to the shoulder pad.
- The second fitting - the sides, shoulder and side seams are processed, the lining is assembled and, possibly, connected to the "top". For this model, the lining can be processed, as in a classic men's jacket - in this case, it is already connected to the "top". Or like in a ladies' coat - then it will fly off and simply fastened with pins to ensure sliding on the fitting.
- At the second fitting, the sleeves should be processed - with a lining, if “male-type” and without a lining, if it will fly off.
- It is also necessary to duplicate and perform the WTO of the lower collar, drying it on a mannequin. And then push it into the neck.
- You can also roll up the sleeves. Of course, the bottom of the coat should also be processed according to the technology you have chosen.
- On the second fitting, we specify the shape of the collar, the length and fit of the sleeve.
- After that, the product can be finished.
Download this pattern pdf:
Coat pattern "cocoon"
$2.50 (100 hryvnia)
Bank cards of the Russian Federation are not accepted for payment!
Size charts What is the height of the pattern Payment methods Ask a question Reviews
Vera Olkhovskaya in social networks:

-
Any pattern for free for a review of a previously made order
More...
Lifetime promotion for buyers of patterns!

Leave a review about my store of patterns for an order that you made before, and you will receive any paid pattern of your choice Free!

