Size charts What is the height of the pattern Payment methods Ask a question Reviews
Electronic pattern of a jacket for printing in full size on a home printer or plotter. Sheets of paper from A4 to A0. Paperless cutting through the projector is possible.
 Free download instructions on how to sew for this pattern
Instructions for patterns of a jacket with a hood for winter and summer - cutting and sewing at home
Contents of the instruction:
- Description of patterns.
- What patterns are included in the set of patterns for a jacket with a hood.
- Description of the design of the style of a women's jacket with a hood for winter and summer.
- What to sew a hoodie jacket for autumn - winter and what to sew for summer.
- How to buy and download ready-made patterns for a women's jacket with a printout on a home printer or plotter.
- How to cut a jacket with a hood according to the finished pattern.
- How to sew a women's jacket with a hood at home - sequence.
1. Description of patterns


All sizes from 40 to 52 or from 52 to 64 are purchased in one pattern file.
File format: PDF full size and without seam allowances
After paying for the order, you will receive links to download two files patterns of a jacket with a hood of women's gradation of sizes from 40 to 52 and from 52 to 64:
- PDF file A4, adapted for printing patterns on sheets of A4 paper in any program on any device, including mobile phones.
- Multi-format PDF file for printing on sheets of any size from A0 to A4 on a printer or plotter using Adobe Reader.
Pattern assembly diagram when printing on A4 sheets of a home printer
For sizes 40 to 52:


The pattern is assembled on two large pages of patterns from 50 sheets of A4
1 page of patterns: 30 sheets, 5 rows of 6 sheets in a row
2 page of patterns: 20 sheets, 5 rows of 4 sheets in a row.
For sizes 52 to 64:

 The pattern is assembled on two large pages of patterns from 60 sheets of A4
1 page of patterns: 30 sheets, 5 rows of 6 sheets in a row.
2 page of patterns: 30 sheets, 5 rows of 6 sheets in a row.
The level of difficulty of sewing is high - you need the skills of cutting and sewing.
The style is suitable for women of any fullness and height.
The pattern is designed for sewing at home on household sewing machines.
2. What patterns are included in the set of patterns for a jacket with a hood

- Back patterns - middle part and side.
- Shelf patterns - middle part, yoke and barrel.
- Pocket patterns - pocket valance, burlap-turning.
- Hood patterns - side and middle parts.
- Sleeve patterns - narrow non-stop and two-seam classic.
- Lining patterns - back and shelf.
Bottom facing patterns are not included in the kit, as they are cut out according to the patterns of the barrels. The border line of the facings is marked on the patterns.
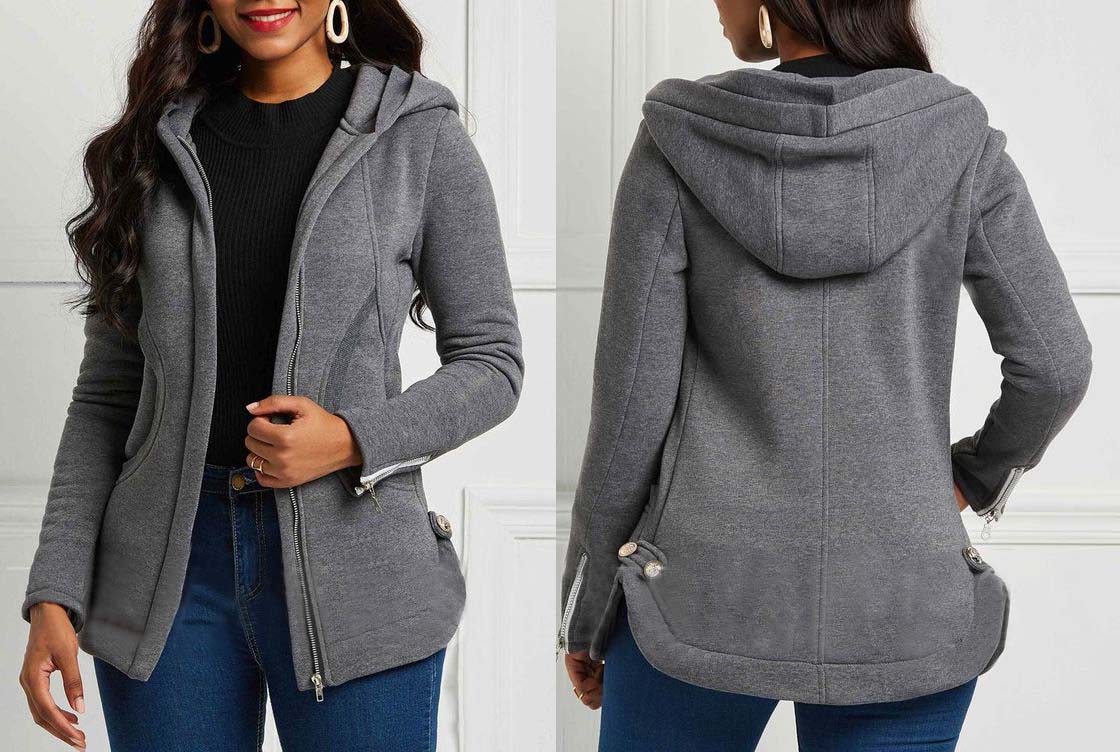
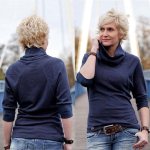
3. Description of the design of the style of the women's jacket with a hood for winter and summer

 It is a jacket of a semi-adjacent trapezoidal silhouette.
The set-in sleeve is presented in two versions - non-stop and two-seam jacket type. Non-stop for sewing from thin knitwear, and two-seam - for products made of thick footer or coat fabrics.
П The collar has a yoke, turning into a relief line of the pocket.
The design of the shelf includes a chest tuck, which allows you to expand the range of fabrics to choose from and improve the fit of the product.
The hood is of a simple design, two-seam.
The design of the jacket allows you to sew combined products.
4. What to sew a hoodie jacket for autumn - winter and what to sew for summer
The style allows this jacket to be sewn from both stretch and stable fabrics, both from fairly thin and thick ones.
For the cold seasons, a footer with a thick “felt” fleece and not too heavy coat fabrics are ideal. For example, boucle or loden, tweed or lightweight drape.
 The footer consumption will be from 150 to 210 cm, with a width of 180 cm.
Coat fabric consumption - from 200 to 270 cm, with a width of 140 - 150 cm.
Lining fabric consumption from 180 to 220 cm.
What details were taken into account when calculating the flow rate, see fig. 2. Pink indicates the details of the "top", green - the details of the lining.
The consumption of dovyaz (cuff fabric, "pipe") will be from 10 to 30 cm, depending on the design of the couturier.
5. How to buy and download ready-made patterns for a women's hooded jacket with a printout on a home printer or plotter
How to choose a size without using tables and taking measurements
What height are the patterns for?
How to buy a ready-made electronic pattern
How to print a pattern at home in full size on A4 sheets or on sheets of any other size
How to assemble a pattern after printing
Simple patterns for dresses, sweatshirts, skirts and trousers in full size Free
6. How to cut a jacket with a hood according to the finished pattern
 Embedded in the patterns Pg (increase on the chest) = 6 cm.
For summer products, choose a smaller size, for autumn and winter, a larger one. We check the size according to the patterns of the lining by measuring the patterns of the shelves and backs and comparing the girths with the same type of product.
Choosing a tailoring option, consider picture 2 - patterns, details and allowances.
If the product is lined, it is important to immediately know which parts will be cut from the lining fabric, and which from the "top" fabric.
On the 2 drawing it is shown that in addition to the front, back, sleeve and hood, a piece of “burlap-turning” is cut out of the lining fabric.
If the product does not require lining, then the "inner" hood and burlap-turning can be cut out from the fabric of the "top" or from a thinner fabric that matches the color. For example, in a thick fleece jacket with a “felt” fleece, the burlap lining and the “lower” hood should be cut out of thin knitwear.
Consider seam allowances. In this case, it is worth moving away from the rule “the footer does not require allowances” and sewing the jacket not on an overlock, but with a straight or narrow zigzag stitch.
So, most of the seam allowances are 1 cm. The exceptions are armholes, okats and necks - these sections are without allowances. At the entrance to the pocket, you can not add an allowance or add a minimum one - 0,5 cm. An allowance is also not needed along the lower cut of the burlap - it is already quite large.
The most interesting exception is the right shelf - along the edge of the side (semi-skid) we add 8 - 10 cm to make a buckle (bar) that will hide the zipper. If an open zipper does not bother you, then the allowance on the side is 1 cm.
Tip: if you are afraid to confuse for which shelf you need an allowance, make an allowance for the bar for both shelves, cut off the unnecessary one during processing. And pay attention to the fact that the part of the right barrel will also need an allowance for the bar.
As mentioned above, the bottom facings are cut out according to the same patterns - along the barrels to the line marked on the drawings.
If a two-seam classic sleeve is chosen, then we make a pattern from the pattern, according to which you can cut two halves of the sleeve at once, as shown in the bubble.
It is worth knowing that the lining of a two-seam sleeve can be cut without a front seam. Of course, if the fabric allows.
In the lining, the bottom allowance is not required, since the entry under the bottom turning is taken into account.
 An approximate layout of the "top" and lining is shown in 3 drawing - there are no difficulties here. To simplify the task, the same wide allowances for the strap of the slip fastener were added to both shelves.
The middle part of the hood is laid in the middle line on the fold or cut out separately. It is important to remember that you will only need one "top" piece and one lining piece.
After cutting, it is recommended to immediately make notches at the waist along the middle seam of the back, along the seams of the reliefs, along the entrance to the pocket and along the cuts of the sides. The notch at the waist will serve as a good reference point when assembling the product.
Notches will be needed at the highest point of the eye for a two-seam sleeve and along a half-slide.
7. How to sew a women's jacket with a hood at home - sequence
(the simplest option is considered)
- We start with processing the pocket: we sew the ironed strip of the tie to the shelf at the entrance to the pocket; we cover the seam with burlap-turning and grind; we “turn out” the cut of the entrance to the pocket and fix it with a finishing line; we enclose the “Pocket Valance” detail and perform bartacks; we grind the bottom of the burlap. In products without lining, the bottom of the burlap is overcast.
- We attach the yoke to the shelf, iron it and overcast it, if the product is unlined, we lay the finishing line.
- Tailoring this model has only one difficulty - the connection of the shelf and back with the details of the barrels. To simplify the task, you can pre-add additional marks on both parts. Iron the seams by making notches.
- We sew lightning.
- We process the side seams.
- We grind the bottom.
- We collect the hood and sleeves.
- We carry out a fitting: we cut the armhole according to the figure, we outline the junction points of the sleeve and the armhole.
- We roll up the sleeves. In the non-stop sleeve, we distribute the fit evenly, aligning the highest point of the eyelet with the shoulder seam.
- Sweep and stitch the hood.
- We process the lining, if provided.
- We connect the lining with the "top".
Download this pattern pdf:
Pattern of a jacket with a hood for winter and summer
$3.00 (120 hryvnia)
Bank cards of the Russian Federation are not accepted for payment!
Size charts What is the height of the pattern Payment methods Ask a question Reviews
Vera Olkhovskaya in social networks:

See similar clothing patterns and how to sew on them


-
Any pattern for free for a review of a previously made order
More...
Lifetime promotion for buyers of patterns!

Leave a review about my store of patterns for an order that you made before, and you will receive any paid pattern of your choice Free!
Catalog:
New patterns on the site


Most readable articles
- How to print patterns in full size on sheets of any format? Category: F.A.Q.
- Pattern of a dress for a babydoll girl Category: Dress patterns for free
- How to take measurements for sewing Category: Sewing: general questions
- How to sew a skirt without darts and without a pattern: "Tatyanka" Category: How to sew...?
- How to learn to sew from scratch at home for free? Category: F.A.Q.
- Skirt with a belt - how to sew a belt to a skirt and processing the belt when sewing a skirt for beginners Category: Waist section processing with and without belt
- How to choose a pattern size? Do Olkhovskaya patterns require a fit? Category: F.A.Q.
- Do-it-yourself parsley, Cossack and Gnome according to free patterns by Vera Olkhovskaya Category: How to sew a New Year's costume and costumes for the holidays with your own hands
New lessons and reviews
-
I sewed a boho trapeze dress size 42 according to your pattern
Category: Patterns - photos and reviews from users

-
I made two dresses with this pattern.
Category: Patterns - photos and reviews from users

-
Thanks for the fast order processing.
Category: Patterns - photos and reviews from users

-
When sewing, I slightly deepened the front neck
Category: Patterns - photos and reviews from users
