Size charts What is the height of the pattern Payment methods Ask a question Reviews
PDF pattern for printing on a printer or plotter in full size for jacket sizes from 40 to 54.
How to sew a women's youth jacket according to a finished pattern
Read this guide:
- Jacket style, pattern set, fabric consumption.
- How to download a pattern and work with it.
- How to cut and sew this women's jacket:
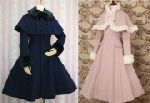
Description of the style of the jacket, a set of patterns and fabric for it
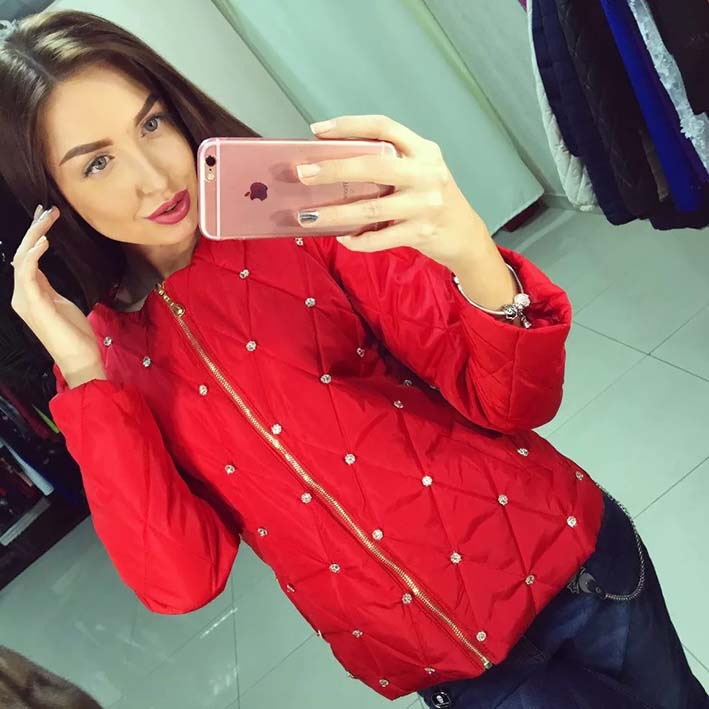
 Electronic pattern of women's jacket "bead" 40-54.
 Sizes: 40-54 - the buyer receives ALL sizes.
File format for download in order:
PDF in full size and without seam allowances.
After paying for the order, you will receive links to download two files patterns of women's jackets gradation of sizes from 40 to 54:
- PDF file A4, adapted for printing patterns on sheets of A4 paper in any program on any device, including mobile phones.
- Multi-format PDF file for printing on sheets of any size from A0 to A4 on a printer or plotter using Adobe Reader.
Sewing difficulty level: medium. Spring-autumn youth women's jacket of a fashionable cut.
This style of jacket is only suitable for slender girls with small breasts.
The consumption of the "top" fabric is approximately 150 cm with a width of 140 - 150 cm.
The consumption of the insulating pad depends on the width (there are pads 150 cm and 220 cm wide). With a width of 150 cm, the consumption of insulation will be about 150 cm, and with a width of 220 from 80 to 100 cm, depending on the size.
The consumption of the lining, taking into account the burlap of the pockets, will also be about 150 cm.
In addition, you will need a zipper with a length of 50 - 55 cm, depending on the size.
Only raincoat fabrics with special windproof properties are suitable for sewing. There are no special requirements for the lining fabric, except for slip. As a warming pad it is better to use a synthetic winterizer.
The set of patterns for the “bead” jacket includes (Fig. 1):
- back patterns;
- shelves;
- double-seam sleeve with an assembly along the collar;
- single-seam sleeves with a small fit.
The insulation and lining are cut out according to the same patterns, more precisely according to the details of the cut of the “top” of the product.
How to download and print jacket patterns
 How to buy an electronic pattern.
How to print a life size pattern at home on A4 sheets.
How to choose the size of a pattern without taking measurements and using tables.
Download free patterns of dresses and coats for children.
How to cut and sew a women's jacket with your own hands
(detailed description with sequence)
Therefore, I will confine myself to the sequence and features of this model.
How to cut the top of a jacket
 We start, as in the case of sewing a down jacket, by cutting the fabric of the “top”:
- Before cutting, you need to make sure that the length of the patterns and the size of the jacket corresponds to the length and volume of the product you need. To orient yourself absolutely accurately, it is worth measuring a similar jacket and comparing its length and volume with patterns.
- Particular attention should be paid to the length of the sleeve. Please note that when determining the sleeve length, you need to take into account the thickness of the insulating pad, shoulder pad and cuff width, if you have one.
- The length of the product can be adjusted to the length of the zipper if the teeth are difficult to remove. Or a zipper - under the length of the product, if the teeth are easy to remove. In any case, this point should be considered before cutting.
- To cut the “top”, we fold the fabric in half, aligning the edges and lay out the patterns, taking into account the fractional thread and allowances for seams and stitching (Fig. 2).
- Side, shoulder, half-skid (there will be a zipper), front and “vertical” sections of the sleeve (for a single-seam it is an elbow seam, for a two-seam - front and elbow) - will require an allowance of 2 - 3 cm.
 Sleeves, armholes, neckline and sprout - 2 cm.
- On the bottom of the sleeve - 5 - 6 cm. On the bottom of the product - 5 - 7 cm is enough.

Please note that the “standard” seam allowances are increased, as the part may deform after stitching. To avoid this distortion of the cut, after quilting, it is recommended to adjust (correct) the details according to the patterns, taking into account the usual seam allowances.
How to cut a synthetic winterizer for a jacket
After cutting the “top”, we immediately proceed to cutting the synthetic winterizer - this is the usual insulation for a demi-season jacket:
- We spread the synthetic winterizer in one layer and lay out the details of the cut on it, providing for a uniform allowance for stitching along the cuts (1,5 - 2 cm). Such a stitch allowance will not be needed only along the bottom of the sleeve and the product, since when processing “in the hem”, the synthetic winterizer can be cut off at the allowance.
- The share thread does not matter.
- So, we laid out the details of the cut (Fig. 3).
 Then, after basting or pricking the “top” on the insulation, you should cut out blanks with the specified allowances, put a pattern on them and stitch.
- Choose your markup tool carefully so that the lines can be easily cleaned up.
- When the stitch is completed, we proceed to re-cutting out (basing) the details of the “top” from the existing blanks. This time with regular seam allowances.
- Shoulder, side seams of the shelf, semi-skid, front and elbow seams of the sleeve - 1 cm. Armholes, neck, sprout, okat - without allowance. Bottom - 4 cm.
- According to the adjusted details of the “top”, the lining is cut out; allowances are not needed, but in fact, allowances of 0,5 - 0,7 cm are obtained along the perimeter of the parts.

Having finished cutting, we come to a very important question - do we need pockets on this jacket.
In the original model, pockets are provided only on the lining due to the decor and length.
Further operations are very simple. It is necessary to collect the "top" and collect the "lining", not forgetting the loop on the last one. On the lining, a pass should be made in the seam of the sleeve - through it we will get access to the last seam, more precisely, to the last fragment of the seam of the bottom of the product.
Please note that the seams must be ironed out, but the synthetic winterizer must be ironed very carefully with the nose of the iron or on a narrow block, since under the iron it loses its volume and thermal qualities. Therefore, when ironing the “top”, we iron ONLY the seams, and the lining is completely and efficiently.
We take on the zipper and shoulder pads, put the “top” on the lining and carry out a fitting, after which it remains only to connect them.
The sequence of connecting the "top" and the lining.
We start with the neck and sides. Having turned the neck and sides, we perform notches along the arc, turn inside out, vyvyazyvayut and lightly iron the very edge of the neck and sides. We lay the finishing line, which will play the role of fixing the lining.
After that, we process the bottom of the sleeves and the product, having previously swept the “top” and the lining separately, then we sweep it together. Focusing on the last running line, we lay the machine line and hem it from the inside with hidden stitches.
We process the last section of the bottom seam through the lining of the sleeve. Finally, we grind the lining.
See other models of women's jackets with instructions on how to sew them in the section of our website
Patterns of women's jackets
Download this pattern pdf:
Pattern jacket "bead"
$1.50 (60 hryvnia)
Bank cards of the Russian Federation are not accepted for payment!
Size charts What is the height of the pattern Payment methods Ask a question Reviews
Vera Olkhovskaya in social networks:


-
Any pattern for free for a review of a previously made order
More...
Lifetime promotion for buyers of patterns!

Leave a review about my store of patterns for an order that you made before, and you will receive any paid pattern of your choice Free!
Catalog:
New patterns on the site


Most readable articles
- How to print patterns in full size on sheets of any format? Category: F.A.Q.
- Pattern of a dress for a babydoll girl Category: Dress patterns for free
- How to take measurements for sewing Category: Sewing: general questions
- How to sew a skirt without darts and without a pattern: "Tatyanka" Category: How to sew...?
- How to learn to sew from scratch at home for free? Category: F.A.Q.
- Skirt with a belt - how to sew a belt to a skirt and processing the belt when sewing a skirt for beginners Category: Waist section processing with and without belt
- How to choose a pattern size? Do Olkhovskaya patterns require a fit? Category: F.A.Q.
- Do-it-yourself parsley, Cossack and Gnome according to free patterns by Vera Olkhovskaya Category: How to sew a New Year's costume and costumes for the holidays with your own hands
New lessons and reviews
-
I sewed a boho trapeze dress size 42 according to your pattern
Category: Patterns - photos and reviews from users

-
I made two dresses with this pattern.
Category: Patterns - photos and reviews from users

-
Thanks for the fast order processing.
Category: Patterns - photos and reviews from users

-
When sewing, I slightly deepened the front neck
Category: Patterns - photos and reviews from users
