
Size charts What is the height of the pattern Payment methods Ask a question Reviews
PDF pattern for printing on a printer or plotter in full size for sundress sizes from 40 to 56.
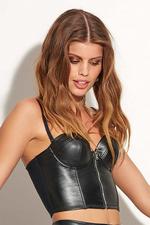
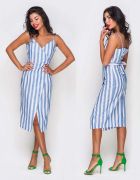
 In the photo, look at the top sewn according to this pattern from the customer Alexandra Vlasova:
"I sewed a top according to your sundress pattern: Size 46, the fabric is very cool, thick cotton 97% and elastane 3%, bought with a measured patch of 0.7 (with a width of 140) on a stock of Italian fabrics. The whole piece is gone. Thanks for the pattern! We are waiting for new products!"
 Free download instructions on how to sew to the pattern of this sundress
 Pay and download sundress pattern
Step-by-step instructions on how to sew a Tatyanka sundress with a relief with your own hands for beginners
Contents of the instruction:
- Description of the sundress pattern.
- What is included in the set of patterns and choice of fabric.
- Calculation of fabric consumption for different styles in a sundress.
- How to download and print a pattern.
- How to cut a sundress according to a full-size pattern.
- How to sew a sundress with your own hands.
- The method of connecting the upper frill and bodice.
- Loop marking.
Pay and download sundress pattern
Description of the finished pattern of a sundress in full size

Electronic pattern "Sundress-Tatyanka with a relief".
Sizes: 40-56 (buyer gets ALL sizes).
File format for download in order:
PDF in full size and without seam allowances.
After paying for the order, you will receive links to download two files sundress patterns gradation of sizes from 40 to 56:
- PDF file A4, adapted for printing patterns on sheets of A4 paper in any program on any device, including mobile phones.
- Multi-format PDF file for printing on sheets of any size from A0 to A4 on a printer or plotter using Adobe Reader.
Sewing difficulty level: easy. This pattern is designed for beginners learning to cut and sew at home.
The sundress style is suitable for most types of slender figures and for any height, since the length of the bodice can be easily changed during the fitting, and it is recommended to buy the straps ready-made.
What is included in the set of patterns and what fabrics to choose to sew a sundress
 Included in the set of patterns sundress-tatyanka with a relief are included

- pattern of the back of the bodice - the middle of the back and the side of the back;
- pattern of the bodice shelf - the side of the shelf and the middle of the shelf,
- as well as a template for bead processing.
(see sketch of sundress patterns)
The pattern of the “Tatyanka” skirt is a rectangle, the frills are strips of fabric, therefore they are not included in the set of patterns, but the cutting of skirts and frills, as well as the calculation of consumption, are described in detail below.
For sewing, you can use staple, cambric, chintz, linen, poplin, gauze, thin silk and thin jeans.
Stretch fabrics are not suitable for sewing such a sundress.
Back to the contents of the manual
Calculation of fabric consumption for sewing a sundress
 Fabric consumption (figures 3 и 4) can be calculated on the economic option or on the "lush" option.
Consumption directly depends on the length of the skirt in a sundress and the width of the frill.
The recommended skirt length (hereinafter Du) is 65 - 100 cm, the width of the upper frill is 5-7 cm (including an economical hem of 1 cm), the width of the lower frill is 12-15 (including a hem of 1 cm). The consumption of fabric per bodice with a width of 140 cm is 40 cm, taking into account allowances for seams and a margin for adjustment (fabric alignment).
When determining the exact length of the skirt in the cut, you need to take into account the length of the lower frill minus 2 cm for stitching and hem.
Let's calculate the length of the skirt with a frill, as they will be in the cut:
Du in finished form + 2 cm for the seams + Width of the bottom frill in finished form + 2 cm for the seam and bottom processing
Now let's calculate the expense for the economic version of the sundress:
Cost per bodice + Du + 2 cm + Upper frill width + 2 cm + 2 lower frill width + 4 cm
Approximately, this will be from 150 to 185 cm with a width of 140-150 cm.
And the consumption of a sundress with a "lush" Tatyanka:
Cost per bodice + 2Du + 4 cm + Upper frill width + 2 cm + 4 lower frill widths + 8 cm
Approximately it is from 250 to 320 cm with a width of 140-150 cm.
How to choose the size in the pattern, how to buy and print it

How to choose a size without using tables and taking measurements
How to buy an electronic pattern
How to print a life size pattern on A4 sheets
How to assemble a pattern with your own hands after printing
Ready-made patterns of dresses in full size download for free.
Download PDF pattern of this sundress
How to cut a Tatyanka sundress with a relief according to a finished pattern
Before cutting, it is important to understand what seam allowances are needed for each part of a sundress and how to determine the fractional direction of the thread.
To begin with, all "vertical" cuts will require an allowance of 1 cm (picture 2), but the middle part of the shelf must be bent along the notches, which are indicated in the drawing, and only then add 1 cm to the middle vertical of the shelf.
Later, when the sides are processed, we will straighten the pattern of the middle part of the shelf and compare it with the product. If the pattern and the corresponding part of the product turn out to be congruent, then the sewing is done with high quality.
We add 3-4 cm along the bottom of the bodice in order to be able to adjust the length of the bodice during the fitting. We do not add allowances along the upper cut of the bodice.
The template strip is also needed more for self-control during processing than for cutting. With it, you should compare the width of the fastener in finished form and you can cut out dubbing, if it is provided for.
The detail of the fastener in the cutting is a fractional strip of fabric with a width
2 template widths + 2 cm
 Cutting the product is very simple. The fractional direction of the thread in the middle part of the bodice shelf runs along the edge of the bead. In other details of the bodice, the share is perpendicular to the waist section.
The fabric is folded in half face inward, the edges are aligned and parallel to the edge of the cutting table. Then, the fabric should be grounded - make the trimmed edge of the fabric perfectly straight and perpendicular to the edges. If the edges pull the fabric together, they should be cut off.
The layout of the economic version of the sundress is shown on 3 drawing, and a sundress with a fluffy skirt - on 4 drawing.
How to sew a Tatyanka sundress according to the downloaded pattern with your own hands
First, the details of the bodice are ground off, the stitching seams are overcast and ironed. If the bodice is on silicone "bones", then the "bones" can be inserted directly between the layers of fabric of the "vertical" seam allowances of the reliefs. If you use regilin, then you can immediately sew it on the reliefs.
When using regilin or silicone “bones” (harder ones are not worth it), please note that products with them should sit quite tightly on the figure.
See how to sew with "bones" and regiline
Then, you should make the sides - duplicate from the middle line of the workpiece (duplication is shaded in the figures), iron in half, stitch at the top of the ledge, turn out and iron.
The sides are tacked to the middle part and you can try on.
If the sundress is on the bones, then there may not be a strapless. But, if straps are planned, they should be temporarily attached to the seams of the shelf reliefs (or to the seams of the back reliefs, if you are trying on yourself) and specify the length in finished form.
Of course, it is better to use ready-made adjustable straps.
The task of fitting includes: determining the length of the straps and the length of the bodice, for which the bodice is tied with a cord. In addition, the volume of the bodice is also specified. Adjustment of the volume (degree of fitting) can be carried out both along the middle seam of the back and along the side seams, having previously firmly chipped the side.
When the adjustment of the volume and length of the bodice with straps is over, you can start sewing a skirt with frills.
Ruffles are sewn into a long ribbon with a double stitch or a backstitch.
The skirt, if it consists of two parts, they are also ground down.
The seams are carefully ironed and assembled. It is better to perform an adjustable assembly in order to easily connect all the frills and parts without difficulty.
See how to perform an adjustable assembly with a "weak machine stitch" - sewing video
Then all parts of the product are connected - they are ground, overcast, and the seams are ironed. Of course, the sides are stitched last.
Back to the contents of the manual
The method of connecting the upper frill and bodice in a sundress
As with other frills, you must first assemble along the top frill or sweep soft folds - this is optional.
One of the long cuts should be worked into an open cut hem (overcast and folded once). It can be processed with a Moscow or rolled seam, as well as pickled. The method of finishing the edge of frills should be chosen carefully, based on your skills, equipment and fabric properties.
See video master class about edge seams.
The prepared frill is laid "face" on the wrong side of the bodice and stitched. The stitching seam can be overcast and ironed towards the bodice, and the allowance can be sewn onto the bodice, stepping back from the stitching line 0,2 - 0,3 cm. This line should be laid from the wrong side of the bodice.
The final operation is ironing the frill on the shelf and fixing it in this position with vertical bartacks at a distance of 10 - 12 cm. The length of the bartacks is 1 - 1,5 cm.
Now you can stitch the sides. The sides should be turned on the top, but not on the bottom. The stitching seam is overcast and ironed in the direction of the product, and if desired, it can also be stitched. This is the easiest way to connect such a bead to the product.
After stitching the bead, you can process the bottom and sew on eyelets for detachable straps or stitch the straps themselves.
Loops in a sundress
A very important point is the marking of the loops. Before marking, it is important to decide whether you will wear a sundress with or without a belt. If with a belt, then a loop at the waist should not be done, if without, then a loop at the waist is required. In addition, a loop at the level of chest cents is required.
These two loops should be marked on the figure. The remaining loops are marked at regular intervals.
See sewing video how to sew machine buttonholes
И video master class sewing on buttons on a machine
Download this pattern pdf:
Pattern "Sundress-Tatyanka with a relief"
$1.00 (40 hryvnia)
Bank cards of the Russian Federation are not accepted for payment!
Size charts What is the height of the pattern Payment methods Ask a question Reviews
Vera Olkhovskaya in social networks:

More patterns of models of a similar style or cut
Bustier pattern $2.00 |
Pattern sundress "Tatyanka" with cups $2.00 |
See similar clothing patterns and how to sew on them


-
Any pattern for free for a review of a previously made order
More...
Lifetime promotion for buyers of patterns!

Leave a review about my store of patterns for an order that you made before, and you will receive any paid pattern of your choice Free!
Catalog:
New patterns on the site


Most readable articles
- How to print patterns in full size on sheets of any format? Category: F.A.Q.
- Pattern of a dress for a babydoll girl Category: Dress patterns for free
- How to take measurements for sewing Category: Sewing: general questions
- How to sew a skirt without darts and without a pattern: "Tatyanka" Category: How to sew...?
- How to learn to sew from scratch at home for free? Category: F.A.Q.
- Skirt with a belt - how to sew a belt to a skirt and processing the belt when sewing a skirt for beginners Category: Waist section processing with and without belt
- How to choose a pattern size? Do Olkhovskaya patterns require a fit? Category: F.A.Q.
- Do-it-yourself parsley, Cossack and Gnome according to free patterns by Vera Olkhovskaya Category: How to sew a New Year's costume and costumes for the holidays with your own hands
New lessons and reviews
-
I sewed a boho trapeze dress size 42 according to your pattern
Category: Patterns - photos and reviews from users

-
I made two dresses with this pattern.
Category: Patterns - photos and reviews from users

-
Thanks for the fast order processing.
Category: Patterns - photos and reviews from users

-
When sewing, I slightly deepened the front neck
Category: Patterns - photos and reviews from users
