
Size charts What is the height of the pattern Payment methods Ask a question Reviews
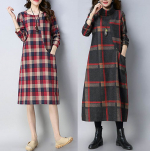
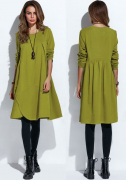
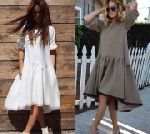
How to sew a trapeze dress with reliefs and pockets according to a simple pattern for beginners with your own hands
Contents of the instruction:
- Description of the pattern of a trapezoid dress and what to sew a dress with reliefs and pockets from.
- How to download and print dress patterns.
- A simple cut for beginners according to the finished pattern of an a-line dress.
- Sewing a trapeze dress with reliefs and pockets for beginners.
Description of the trapeze dress pattern and what to sew a dress with reliefs and pockets from
Sizes: 40-52 and 52-62 (the buyer receives all sizes of the selected gradation)
File format for download in order:
PDF in full size and without seam allowances.
After paying for the order, you will receive links to download two files patterns of a dress of the gradation of the sizes chosen by you:
- PDF file A4, adapted for printing patterns on sheets of A4 paper in any program on any device, including mobile phones.
- Multi-format PDF file for printing on sheets of any size from A0 to A4 on a printer or plotter using Adobe Reader.

Sewing difficulty level: simple, pattern for beginners. Below is a description of a simplified pocket that even a completely inexperienced tailor can handle. Of course, you can also sew a dress without a pocket - a pattern of a whole barrel of a shelf is attached.
The set of templates includes:
- back patterns - middle part and side part;
- shelf patterns - the middle part, the side part is solid, the side upper part with burlap, the side lower part with burlap;
- sleeve and collar.


A dress pattern with reliefs and pockets is suitable not only for slender, but also for full figures.
The expense for the dress will be from 2,5 to 3 m, depending on the size.
What is this dress made of?
Woolen dress fabrics are ideal for sewing, as well as tight knitwear with low stretch.
How to download and print dress patterns
How to choose размер patterns without tables and taking measurements
How to print a pattern on A4 sheets on a home printer in three clicks
How to assemble a pattern after printing
Download ready-made patterns of dresses in natural velvet for free
A simple cut for beginners according to the finished pattern of an a-line dress
 Cutting models with reliefs is easy if there is enough fabric, and difficult if you need to save money.
Seam allowances for patterns
Let's start with a simplepicture 2) - with seam allowances and the share direction of each part.
No allowances are added along the cuts of the neck, sprout (neck of the back), armholes and sleeves. You can not add on the cut of the pocket burlap.
On the shoulder, side and relief cuts - 1 cm.
On the bottom of the dress and sleeves - 2,5 - 3 cm.
Above the elbow tuck of the sleeve there is a small “house” so that the ironed tuck enters the seam.
Do not forget, when cutting, to make notches at the waist and outline the line of entry into the pocket.
About the shared thread when cutting a dress with reliefs
Most importantly, keep the right direction in the middle details of the shelves and back. The share thread of the middle part of the shelf coincides with the half-slip (the middle line corresponding to the middle line of the figure).
In the middle part of the back - with the middle line of the back. Please note that the middle line of the back, applied to the drawing, does not coincide with the middle seam.
The fractional direction of the side parts of the backrest and the shelf is along the part. How to define it along? Just fold the pattern lengthwise, approximately aligning the "vertical" sections - determine the share direction by the fold of the paper.
In the collar, the share is at the fold, and the sleeve can also be cut along the oblique thread. But it is better to cut the collar after trying it on, when the length of the neck of the product is precisely known.
If you need to save money when cutting, then it may not be possible to accurately maintain the share direction of the side parts of the shelf and back.
After cutting, do not forget to make notches along the waist, notches along the fold of the collar, along the fold of the shelf on the neck and mark the line of entry into the pocket on all four parts of the barrel of the shelf on the front side.
It is better to mark the pocket entry line with white threads.
Sewing a trapeze dress with reliefs and pockets for beginners
 We start sewing a dress with reliefs and pockets by processing the pocket.
The following is the easiest pocket processing option, suitable for beginners. A slight deviation from the technology will allow you to do without additional parts and reduce the number of operations. Of course, experienced tailors can process the pocket, as they say, "in the best traditions" of a unified technology.
As in other types of pockets, these pockets are processed in parallel: one operation on the right pocket, another on the left, again on the right and again on the left ...
 After the entry line (figures 3 - 4 - red dotted line) is marked, you should stick a dolevik - a strip of adhesive fabric, cut in the shared direction. The dolevik will prevent stretching of the entrance to the pocket.
So that the adhesive strip is not visible from the front side, we stick it directly on the burlap near the entry line from the wrong side (figure 3a). We paste on the left and right lower fragments of the barrel of the shelf.
And now a small violation of technology for the sake of ease of sewing - we overcast the burlap. Each separately (pictures 3 - 5) overcasting stitch shown in green dotted line)!
After gluing and overcasting, the burlap of the lower fragment of the shelf is folded inside out and ironed along the pocket entry line (Figure 3б).
The ironing is fixed with a finishing line (figure Xnumx, 5a – black dotted line). The finishing line is laid at a distance of 0,3 - 0,5 cm from the entrance to the pocket.
Then, on the lower side fragment of the shelf prepared in this way, we impose on the upper side fragment of the shelf (figure 4a-b), aligning exactly the pocket entry line marked on both parts (figure 4б).
And we sweep the upper and lower fragments of the barrels 0,5 - 0,7 cm below the entrance to the pocket (figure 4б – blue dotted line). We fix the beginning and end of the basting line with a few stitches.
Checking the accuracy of the overlay is also not a superfluous operation. To do this, you can simply compare with the pattern of a solid barrel of a shelf, which is included in the kit.
 Finally, we grind the burlap down from the mark (figure 5б).
Then everything is very simple: we grind reliefs, shoulder and side seams; we grind the middle seam of the back partially - we sweep the upper part under the zipper. We sew the tuck of the sleeve.
Then, we overcast all sections, except for the armhole, neck, bottom of the product and sleeves. We iron the overcast.
We iron the tuck of the sleeve, directing the allowance to the bottom, grind the sleeve seam and iron it.
After that, you can baste the zipper and try on. Having specified the fit of the dress, if necessary, cut the armhole and, without letting go of the customer, tuck in the sleeves.
See video tutorial on how to throw in a sleeve.
It is time to cut out and make a collar, choosing its length along the length of the neck.
See video master classes on cutting and sewing a collar.
And we complete the sewing of the dress by sewing on the collar, sewing on the zipper, processing the armhole and the bottom.
Video tutorial on sewing a zipper without a fixture.
И video master class on attaching a hidden zipper without notation.
Download this pattern pdf:
Pattern "dresses with reliefs and pockets"
$2.00 (80 hryvnia)
Bank cards of the Russian Federation are not accepted for payment!
Size charts What is the height of the pattern Payment methods Ask a question Reviews
Vera Olkhovskaya in social networks:

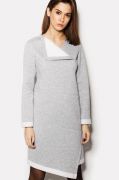
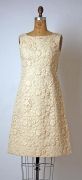
More patterns of models of a similar style or cut


See similar clothing patterns and how to sew on them


-
Any pattern for free for a review of a previously made order
More...
Lifetime promotion for buyers of patterns!

Leave a review about my store of patterns for an order that you made before, and you will receive any paid pattern of your choice Free!
Catalog:
New patterns on the site


Most readable articles
- How to print patterns in full size on sheets of any format? Category: F.A.Q.
- Pattern of a dress for a babydoll girl Category: Dress patterns for free
- How to take measurements for sewing Category: Sewing: general questions
- How to sew a skirt without darts and without a pattern: "Tatyanka" Category: How to sew...?
- How to learn to sew from scratch at home for free? Category: F.A.Q.
- Skirt with a belt - how to sew a belt to a skirt and processing the belt when sewing a skirt for beginners Category: Waist section processing with and without belt
- How to choose a pattern size? Do Olkhovskaya patterns require a fit? Category: F.A.Q.
- Do-it-yourself parsley, Cossack and Gnome according to free patterns by Vera Olkhovskaya Category: How to sew a New Year's costume and costumes for the holidays with your own hands
New lessons and reviews
-
I sewed a boho trapeze dress size 42 according to your pattern
Category: Patterns - photos and reviews from users

-
I made two dresses with this pattern.
Category: Patterns - photos and reviews from users

-
Thanks for the fast order processing.
Category: Patterns - photos and reviews from users

-
When sewing, I slightly deepened the front neck
Category: Patterns - photos and reviews from users
