
Size charts What is the height of the pattern Payment methods Ask a question Reviews

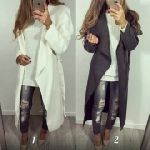
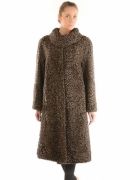
On the right in the photo is an example of a sewn coat according to this pattern by one of the customers Anastasia Samsonova:
"The fabric is single, coat woolen, its edge almost does not crumble, and to be sure, I smeared all the edges with transparent varnish, it is not visible at all and nothing crumbles. It seems to me that this pattern can be used to sew a summer cardigan, and warm (or not very ) coat."
 Free download instructions for this pattern...

How to sew a coat with your own hands according to a ready-made pattern for beginners
Read this guide:
- Description of the coat pattern for beginners.
- How to download and print a coat pattern.
- DIY pattern features of this coat for beginners.
Description of the coat pattern for beginners
 Electronic pattern "coat for beginners".
Sizes: 42-52 and 52-62 (the buyer receives ALL sizes of the selected gradation).
File format for download in order:
PDF in full size and without seam allowances.
After paying for the order, you will receive links to download two files coat patterns of your chosen size gradation:
- PDF file A4, adapted for printing patterns on sheets of A4 paper in any program on any device, including mobile phones.
- Multi-format PDF file for printing on sheets of any size from A0 to A4 on a printer or plotter using Adobe Reader.
Sewing Difficulty Level: Easy and although you will need some skills in working with thick fabrics, this coat pattern is designed specifically for beginners and home couturiers.
This coat style for beginners is suitable for all types of figures, has no fastening, no lining, no pick-up and can be worn under the belt.
 The fabric consumption will be about 210 cm with a width of 140 cm. More precisely, you can calculate after determining the length of the product and the length of the sleeve.
For tailoring, it is desirable to use double-sided coat or double-sided raincoat fabrics.
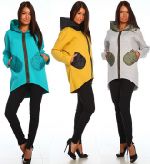
The set of coat patterns for beginners includes (picture 1):
How to download and print a coat pattern
How to print a life size pattern on A4 sheets
How to choose a pattern size without taking measurements and using tables
Download free patterns of children's coats and other children's clothing http://cuturie.com.ua/vikroieki/besplatnie-vikroieki.html
DIY pattern features of this coat for beginners
 First, let's deal with the fractional direction of the threads in the details of the cut (picture 2).
The lobar back should be parallel to the midline of the back. For convenience, you can make patterns for the back without cutting the middle line before cutting and navigate along it.
The lobar line of the shelf coincides with the semi-skid - the middle line of the shelf, which corresponds to the middle line on the human body from the jugular cavity and down through the navel.
The fractional thread of the sleeve should be located along the part.
 Please note that the collar can be cut out together with the shelf or separately from it.
Separately, if the collar needs to be turned over or cut out from another fabric. The lobar direction is arbitrary, but it is important that the departure line does not coincide with the lobar or transverse thread of the fabric.
Together - in other cases. It is very important not to forget to make a notch, which will cut the seam allowances exactly to the junction of the shoulder seam and the collar.
Now for the seam allowances.
 As in other products, we cut out the sprout, armhole and hem of the sleeve without seam allowances. No allowance is needed for the departure of the collar and the edge of the side. At the bottom of the coat and sleeves, an allowance is needed only if you process these sections into a hem. If you will edging them or leave them unprocessed, then the allowance for the bottom of the product and sleeves is also not needed.
The remaining allowances are 1 cm. These include shoulder and side seams, as well as “vertical” sleeve seams. If the collar is cut separately from the shelf, then we also add 1 cm along the stitching sections.
1 cm should be added to the middle seam of the collar. Please note that the increase in the size of the collar is carried out by shifting its middle seam. It is very important that the length of the stitching in the collar is equal to the length of the sprout.
Cutting is carried out in two stages (picture 3).
First, a shelf is cut out, while the fabric is folded in half face inward and the edges are combined.
Then, the fabric is folded along the width of the back, and the sleeves are laid out on the rest of the fabric. Please note that the sleeve patterns are located so that the pile on them will be in one direction.
It is important to remember that many coat fabrics have pile, which should be on all parts of the product in one direction.

The sequence of sewing a coat for beginners
- Sew middle back seam and shoulder seams.
- Carefully iron the stitched seams.
- Sew and iron the middle seam of the collar, and then sew the collar into the sprout.
- Stitch sleeves - they are sewn in without stitching, as when sewing sweatshirts.
- Watch the video tutorial on sewing how to sew sleeves without stitching
- Open sections of the coat can be edged or left untreated.
Download this pattern pdf:
Pattern "coat for beginners"
$2.00 (80 hryvnia)
Bank cards of the Russian Federation are not accepted for payment!
Size charts What is the height of the pattern Payment methods Ask a question Reviews
Vera Olkhovskaya in social networks:

More patterns of models of a similar style or cut


-
Any pattern for free for a review of a previously made order
More...
Lifetime promotion for buyers of patterns!

Leave a review about my store of patterns for an order that you made before, and you will receive any paid pattern of your choice Free!
Catalog:
New patterns on the site


Most readable articles
- How to print patterns in full size on sheets of any format? Category: F.A.Q.
- Pattern of a dress for a babydoll girl Category: Dress patterns for free
- How to take measurements for sewing Category: Sewing: general questions
- How to sew a skirt without darts and without a pattern: "Tatyanka" Category: How to sew...?
- How to learn to sew from scratch at home for free? Category: F.A.Q.
- Skirt with a belt - how to sew a belt to a skirt and processing the belt when sewing a skirt for beginners Category: Waist section processing with and without belt
- How to choose a pattern size? Do Olkhovskaya patterns require a fit? Category: F.A.Q.
- Do-it-yourself parsley, Cossack and Gnome according to free patterns by Vera Olkhovskaya Category: How to sew a New Year's costume and costumes for the holidays with your own hands
New lessons and reviews
-
I sewed a boho trapeze dress size 42 according to your pattern
Category: Patterns - photos and reviews from users

-
I made two dresses with this pattern.
Category: Patterns - photos and reviews from users

-
Thanks for the fast order processing.
Category: Patterns - photos and reviews from users

-
When sewing, I slightly deepened the front neck
Category: Patterns - photos and reviews from users
