Size charts What is the height of the pattern Payment methods Ask a question Reviews
Electronic pattern of a jacket for printing in full size on a home printer or plotter. It can be printed on sheets of paper from A4 to A0. Cutting through the projector is possible.
 Free download instructions on how to sew a large volume down jacket using this pattern
How to sew a large-volume down jacket with a simple pattern at home with your own hands
Contents of the instruction:
- Description of the jacket pattern file format.
- A set of patterns in a pattern and a description of the design of a large volume jacket.
- What to sew this jacket or down jacket.
- How to buy and download ready-made patterns.
- How to cut a jacket - a large-volume down jacket according to a finished pattern.
- How to sew a down jacket with your own hands at home.
 Buy and download this large volume jacket pattern
1. Description of the jacket pattern file format
All sizes from 38 to 52 or from 52 to 64 printed from one PDF file patterns.


File format: PDF full size and without seam allowances
After paying for the order, you will receive links to download two files patterns of a jacket - a down jacket of a large volume of gradation of sizes from 38 to 52 and from 52 to 64:
- PDF file A4, adapted for printing patterns on sheets of A4 paper in any program on any device, including mobile phones.
- Multi-format PDF file for printing on sheets of any size from A0 to A4 on a printer or plotter using Adobe Reader.
Pattern assembly diagram when printing on standard sheets of A4 paper at home printer
For jacket sizes 38 to 52:

The pattern is assembled on two large pages of patterns from 60 sheets of A4 paper:
1 and 2 pages of patterns on 30 sheets of A4 paper - 5 rows of 6 sheets in a row.
For jacket sizes 52 to 64:

The pattern is assembled on two large pages of patterns from 70 sheets of A4 paper:
1 and 2 pages of patterns on 35 sheets of A4 paper - 5 rows of 7 sheets in a row.
Sewing difficulty level is medium.
The style is suitable for all types of figures of any fullness and height, with the exception of figures with large hips and a small shoulder girdle (“pear”).
The pattern is designed for sewing at home on household sewing machines.
2. A set of patterns in a pattern and a description of the design of a large volume jacket
2.1. Complete set of simple patterns of a jacket - a down jacket of a large volume

- Back pattern.
- Shelf patterns - left and right.
- Pattern of a non-stop sleeve.
- Collar patterns - left and right.
- Attached hood pattern.
The patterns of the headbands and the lining are not included in the kit, since the lining and the headband are cut according to the same patterns as the details of the "top". Cutting lines are marked on the patterns for the front and back.
2.2. Description of the design of the jacket - down jacket
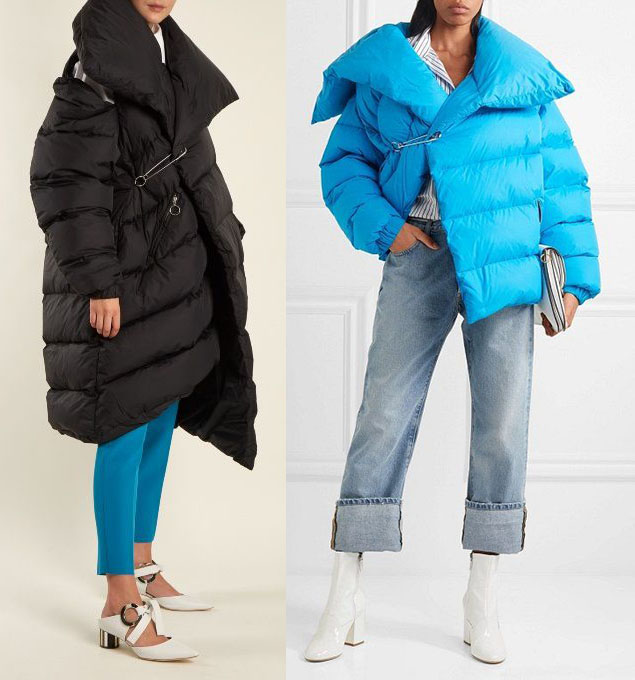
 This is an asymmetrical straight cut.
There are markings on the patterns that allow you to cut out both the jacket and the “coat”.
The armhole is lowered, the sleeve is without landing with the marking of the line of the elbow roll for cutting the pattern for reasons of economy.
Using the same patterns, you can sew a warm quilted vest or a transformer vest - a jacket with detachable sleeves (see the photo).
3. What to sew this jacket or down jacket from
Any raincoat fabric is suitable for sewing.
More about choosing a raincoat fabric

The thickness of the insulation for a short jacket can vary from 140 to 250 grams.
And for a long coat - a down jacket from 200 to 280 gr.
The consumption of raincoat fabric for a short jacket will be about 230 - 270 cm, with a width of 150 cm.
The consumption of raincoat fabric for a long jacket is approximately 270 - 350 cm.
Lining fabric consumption - 150 - 200 cm.
Insulation consumption depends on the chosen tailoring option.
The consumption of insulation is calculated based on the consumption of raincoat fabric.
4. How to buy and download ready-made patterns
How to choose a size without using tables and taking measurements
What height are the patterns for?
How to buy a ready-made electronic pattern
How to print a pattern at home in full size on A4 sheets or on sheets of any other size
How to assemble a pattern after printing
Simple patterns for dresses, sweatshirts, skirts and trousers in full size Free
Buy and download this large volume jacket pattern
5. How to cut a jacket - a large down jacket according to a finished pattern
 With the seeming simplicity of the style, its cutting is complicated by asymmetry.
Cutting is performed on one layer of fabric from the front side and the inscriptions of the patterns should “look up”.
If we assume that after cutting the details of the "top" the stitch will be performed, then the seam allowances should be increased by 1 - 3 cm compared to the standard ones. In this case, the rule is observed - the denser the stitch, the greater the allowances.
After stitching, the parts are aligned according to the patterns and the seam allowances are left as standard.
Let me remind you the standard - 1 - 1,2 cm.
No allowances are added along the neck, sprout, armhole and round.
") As for the patterns themselves, inexperienced home couturiers should make duplicate patterns, the cut of which is asymmetrical.
As for the patterns themselves, inexperienced home couturiers should make duplicate patterns, the cut of which is asymmetrical.
As mentioned above, the patterns of the shelves and the hood are marked with lines along which the patterns are cut for the subsequent cutting of the bands and lining (picture 2).
It is important to remember that if cutting will be carried out according to the same patterns without making duplicate patterns, then the inscriptions should be turned to the fabric.
An approximate layout of the details of the "top" is shown in 3 drawing. Please note that the sleeve template is cut along the line of the elbow roll for the most rational use of the fabric. Of course, you can not do this and cut the sleeves entirely.
The cutting of the lining is shown in 4 drawing.
Since of all the details of the lining, only the details of the shelves are asymmetric, it is convenient to cut it in two stages - the back and shelves, sleeves and hood. The rectangle in the upper right corner is a detail of a lined pocket.
At the first stage, fold the fabric in half along the width of the back and lay the middle line on the fold of the fabric. Then the shelves. The shelves of the lining should be mirrored to the shelves of the "top".
Fold the rest of the fabric in half and cut out the sleeves with a hood.
After quilting, we repeat the cutting (basing of parts) with standard allowances for each quilted part.
As for cutting the insulation, it is already cut out according to the details of the cut of the “top” and “lining” with allowances for the insulation of 2–3 cm. These allowances deviate from the cuts of the details of the “top” and “lining”.
An example of cutting insulation shown in the instructions for cutting and sewing a coat - a down jacket with a hood in figure 4.
6. How to sew a down jacket at home
(the simplest option is considered)
If we attribute the operations of quilting the details of the "top" and the details of the "lining" with subsequent basing to cutting, then sewing should begin with the assembly of the "top" and "lining".
") However, the sequence in this case depends on the stitch itself.
However, the sequence in this case depends on the stitch itself.
You can quilt the back and shelves separately or after sewing and ironing the side seams. The same can be said about the lining.
In any case, before stitching, the details of the “top” and the details of the “lining” are basted or pinned onto the details of the insulation.
An example of basting parts on a heater shown in the instructions for cutting and sewing a coat - down jacket "Lolita".
If the part is not quilted, then the insulation is attached to it along the edge with a machine stitch after preliminary basting or pricking.
Based on the foregoing, the approximate sewing sequence, then it looks like this:
- Basting or piercing the details of the "top" and the details of the "lining" on the insulation.
- Stitch.
- Basics.
- Making pockets.
- Top assembly.
- Lining assembly.
- Compound.
- Clasp.
Download this pattern pdf:
A simple pattern for a large volume down jacket
$2.50 (100 hryvnia)
Bank cards of the Russian Federation are not accepted for payment!
Size charts What is the height of the pattern Payment methods Ask a question Reviews
Vera Olkhovskaya in social networks:


-
Any pattern for free for a review of a previously made order
More...
Lifetime promotion for buyers of patterns!

Leave a review about my store of patterns for an order that you made before, and you will receive any paid pattern of your choice Free!
Catalog:
New patterns on the site


Most readable articles
- How to print patterns in full size on sheets of any format? Category: F.A.Q.
- Pattern of a dress for a babydoll girl Category: Dress patterns for free
- How to take measurements for sewing Category: Sewing: general questions
- How to sew a skirt without darts and without a pattern: "Tatyanka" Category: How to sew...?
- How to learn to sew from scratch at home for free? Category: F.A.Q.
- Skirt with a belt - how to sew a belt to a skirt and processing the belt when sewing a skirt for beginners Category: Waist section processing with and without belt
- How to choose a pattern size? Do Olkhovskaya patterns require a fit? Category: F.A.Q.
- Do-it-yourself parsley, Cossack and Gnome according to free patterns by Vera Olkhovskaya Category: How to sew a New Year's costume and costumes for the holidays with your own hands
New lessons and reviews
-
I sewed a boho trapeze dress size 42 according to your pattern
Category: Patterns - photos and reviews from users

-
I made two dresses with this pattern.
Category: Patterns - photos and reviews from users

-
Thanks for the fast order processing.
Category: Patterns - photos and reviews from users

-
When sewing, I slightly deepened the front neck
Category: Patterns - photos and reviews from users
