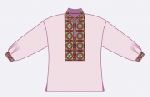
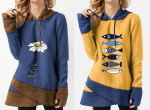
This method of processing the neck is suitable for products with embroidery on the shelf and with an insert from an embroidered border (Fig. 1).
A complete description of cutting, sewing a men's shirt like "vyshyvanka",
and also see patterns from 42nd to 52nd and from 52nd to 62nd size.
So, if you are using a ready-made embroidered border, then sewing a shirt should begin by joining the border and the shelf into one whole.
The procedure for performing work on the processing of the neck of an embroidered shirt
First - markup (Fig. 2). On the shelf we mark the area of embroidery, such as it will be in finished form.
Two vertical lines limit this area in width (if you expand the picture and the shelf), and a horizontal line along the bottom.
On fig. The 2 marking lines are shown with a blue dotted line.
 Then we draw lines along which a fragment of the shelf for embroidery should be cut out at a distance of 1 cm inward from the blue line.
Thus, the seam allowance will be 1 cm. The part of the embroidered insert should also have an allowance of 1 cm.
It is better to cut the neck on the insert after it is connected to the shelf.
But before connecting, do not forget to make notches on the shelves in the corners of the allowance, otherwise it will be impossible to sew the insert.
It should be noted that it is important to perform the notch very accurately, having previously unfolded the fabric and outlined the mirror angle. Do not cut literally 1 mm to the corner.
After the notches are made, the insert is stitched horizontally, aligning the half-skid lines on the insert and on the shelf.
If you are sewing a model for a man with a belly (see how to cut an embroidered shirt for a large belly), then assemble the shelf before stitching.
After the horizontal stitch, we sew vertically. At the same time, it is very important that the lines in the corners are well fixed and are on the continuation of each other.
The seams of the connection of the shelf and the embroidered insert must be overcast and ironed.


 Then perform the rest of the processing, leaving "for dessert" the processing of the collar and neck.
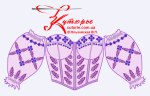
Processing the collar (Fig. 3) is not difficult, but it is very important that its length be 2–2,5 cm less than the length of the neck.
If you are using embroidered tape, a strip of fabric of the same width is sewn to it. The collar is folded in half lengthwise, its ends are ground off.
The corners of the seams are cut off, the collar is turned inside out and ironed.
After that, the collar is tucked into the neck.
Basting should be done from the side of the collar from the middle point of the collar (sprout) to the left edge of the neck and from the right edge of the neck to the middle.
Please note that the collar should NOT reach half-skid by 1,5 - 2 cm,
 The inset collar is sewn in. The beginning and end of the line should be carefully fixed.
After stitching the collar, we cut out a “triangular” facing according to the pattern of the shelf or according to the product (Fig. 4).
It is important that the facing not only exactly follows the contour of the neckline, but also reaches the shoulder seam.
We DO NOT duplicate the cut facing, but overcast along the shoulder cut and along straight cuts.
Then we put the product on the shelf face to face and tack exactly along the half-slip so that the facing does not move anywhere during processing.
On the shoulders, it can be fastened with a shelf with pins or large (2 - 3 cm) oblique stitches.
After such a serious preparation, the facing can be swept along the neck and clasp.
 When the basting is completed, ties are placed in the corners of the line, if any.
Please note that the fastener is turned in a straight line, the distance between these lines is 1,5 - 2 cm and the corners of this line should clearly coincide with the ends of the rack (Fig. 5).
If you are convinced that you have assembled all the parts correctly, it's time to connect the shelf, stand, piping and ribbons with machine stitching (in Fig. 5, the machine stitching is shown by a blue line).
At the same time, it is important to perform bartacks at the shoulder sections (that is, at the beginning and end of the line), in the corners on the ribbons and at the lower point of the fastener-cut.
Check the quality of the stitching from the inside of the product and cut the allowances along the neck, as for ordinary facings and along the half-slip to the bottom of the fastener.
The very bottom of the fastener is cut like a chicken foot (see Fig. 5 in the bubble).
After cutting, the facing is turned inside out, the corners are straightened.
The turning seam is swept out and ironed.
At the end, the facing is fastened along the shoulder seam, neckline and fastener contour by machine or by hand and with hidden hand stitches at the bottom point.
Embroidery patterns
|
||||||||||||