The fastener on the side of the kosovorotka, according to academician Likhachev, was created specifically so that the pectoral cross would not fall out during work.
They made the fastener more often on the left, less often on the right. If the fastener was processed with a strap, the top wasand embroidered right strap.
On the basis of the kosovorotka, tunics were sewn (see photo) during the time of Tsarist Russia and for the Bolshevik cavalry army.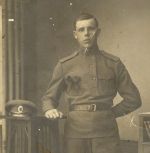
In this article, it is proposed to process the fastener of the blouse with a set-in placket on the left side, the right placket on top.
Patterns kosovorotkas / embroidered shirts / gymnasts 42 - 52, 52 - 62
It should be noted that the processing of the neck of the kosovorotka (Fig. 1) takes place in two stages: the processing of the fastener and the stitching of the collar.
Neck Processing for Beginners
For finishing, you can use both a special braid and an embroidered border.
Recall for beginner couturiers: the fastener of the kosovorotka is processed before the shoulder seams are sewn, that is, this is the very first operation after cutting the shirt.
And stitching the collar is the final operation of sewing this product.
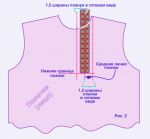 So, clasp. Let's process it as a set-in bar (see also "Set-in bar").
As with a regular set-in plank, we start with the markings (Fig. 2) on the front side of the shelf.
First, we determine the position of the plank and its length in finished form, for which we retreat from the left shoulder seam 1 - 5 cm, depending on the size, width of the plank and your desire.
The easiest way to navigate is to put a braid or border on a shelf.
For beginner couturiers, the question may arise: what is the optimal length of the bar? As a rule, 15 - 20 cm is enough.
It is important for us that the customer's head easily passes into the neck of the finished product.
If in doubt, measure the circumference of the head horizontally through the eyebrows and back of the head and compare the resulting measurement with the following sum of lengths:
neck + sprout + double plank length
Having decided on the position and length of the bar, draw the horizontal line of the lower border of the bar, then the middle line.
Stepping back from the midline of the plank to both sides one and a half strip widths in finished form, draw two vertical lines as shown in fig. 2, 3.
Now we will directly manufacture the details of the bar - the upper and lower (Fig. 3).
The width of the parts is
2 finished plank widths + 2 1cm seam allowances
The length of the plank parts is
Plank length in finished form + 10 cm for processing
What is included in these 10 cm for processing?
1 - 1,5 cm allowance on the bottom and the rest to fit under the curve of the neck.
Pay attention to fig. 2: the band attached to the shelf protrudes beyond the neck line.
If the product is sewn from a thin fabric, the strips can be duplicated with a very thin interlining or dublerin.
In this case, only half of the plank is duplicated, which will be in the wrong side of the product.
 The dubbing, of course, is glued from the wrong side and ironed the workpieces along the midline with the wrong side inward.
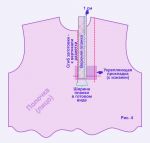
It is also desirable to duplicate the area of the lower border of the bar on the shelf (Fig. 4).
But interlining or dublerin, no matter how thin they are, will “beat off” on the face of the shelf.
Therefore, we strengthen the bottom of the bar with a lining from the same fabric that the kosovorotka is sewn on.
We fix the gasket with temporary oblique stitches 2 cm long.
Now the most interesting: we grind the blanks.
We lay the plank blank prepared in the above way on the front of the shelf, combining the fold of the blank with the marking vertical.
It is important that dubbing is on the top "layer" of the workpiece, embroidery - on the bottom.
For convenience, you can draw a seam line for attaching the workpiece on itself, stepping back 1 cm from the cuts.
If you did everything correctly and accurately, from the fold to this line will be the width of the finished bar.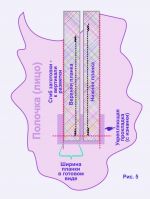
On fig. 4, the stitching line is shown as a blue dotted line.
Attention! In this case, we DO NOT take into account the middle marking line.
We don't need her anymore.
We also lay the bottom bar to the vertical marking line (Fig. 5).
Both blanks go down beyond the marking horizontal and beyond the neck.
We sew them, at the beginning and at the end of the lines - bartacks.
The lines in Fig. 5 are marked with a black dotted line.
After stitching, we check the quality of this important operation (Fig. 6): both lines should end at the same level and be carefully fixed at the beginning and end.
Patterns for men
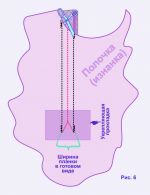 And, of course, their parallelism is required.
If the lines are made qualitatively.
It's time to cut the clasp.
The cut is exactly the same as in a regular set-in bar.
On fig. 6, the cut line is marked with a red dotted line.
Attention! You need to cut without cutting to the bottom end of the line 1 mm!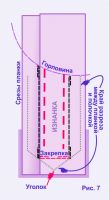
Then, “turn out” the fastener, laying the bar on the bar (Fig. 7).
Direct the corner resulting from cutting down.
And, sweeping the strips (thin red dotted line in Fig. 7), perform a horizontal backtack (thin red dotted line in Fig. 7).
To perform a horizontal backtack, lay the shelf on the wrong side and bend the strips with a corner.
Take the bent strips with a corner in your hand and place them under the foot.
Don't forget to check the quality of the bartack: the bartack should extend to the vertical stitches.
 We complete the processing of the fastener of the blouse by overcasting the sections of the strap (Fig. 8).
Please note: ALL cuts must fall under the overlock, including the corner and the gasket.
And only after overcasting we cut the strips that go beyond the cut of the neck.
We leave the mark until the moment when we will drive in the rack.
Of course, we will be able to sweep the rack only after processing the shoulder sections.
The rack is processed in the same way as for embroidery: the braid is adjusted to a strip of fabric with a width
2 finished stand widths + 2 x 1cm seam allowances
The length of the collar is
Neck circumference + 2 strap widths in finished form + 2 seam allowances of 1 cm.
Then the ends of the collar are ground off, the corners of the allowances are cut off and the stand is turned inside out. Don't forget to iron it.
The rack prepared in this way is swept into the neck.
More precisely, we sweep only its wrong side “layer”, if necessary, slightly seating.
We sew in the vmetanny rack, and bend its free front “layer” by 1 cm and sweep it.
After ironing, we iron and only after ironing we hem with manual blind stitches or adjust.
Loops, buttons. Ready!





 Join my community on Viber...


