Size charts What is the height of the pattern Payment methods Ask a question Reviews

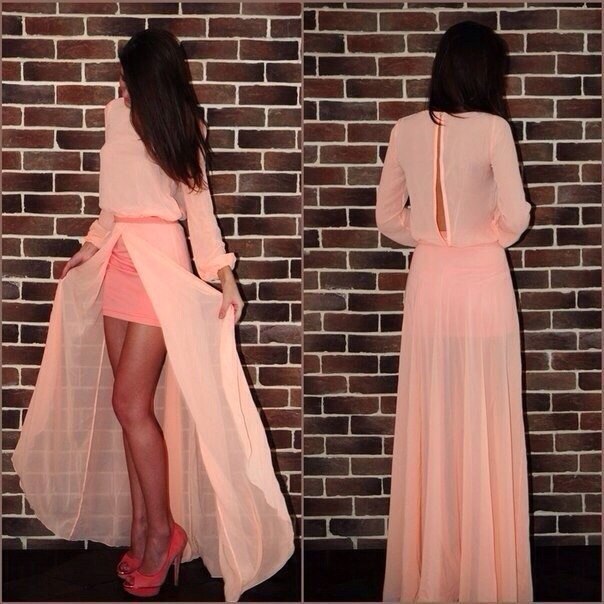
Electronic dress pattern "Peach"
Sizes: 42-56 - the buyer receives ALL gradation of sizes!
Format of files of an electronic pattern of a detachable dress:
PDF in full size and without seam allowances.
After paying for the order, you will receive links to download two files dress patterns gradation sizes from 42 to 56:
- PDF file A4, adapted for printing patterns on sheets of A4 paper in any program on any device, including mobile phones.
- Multi-format PDF file for printing on sheets of any size from A0 to A4 on a printer or plotter using Adobe Reader.
Sewing difficulty level: easy.
This dress pattern is from 2014. The model is suitable for slender girls and young ladies of medium fullness. In the following description, drawings and video tutorials on cutting and sewing are given ...
The dress can be sewn both with a straight skirt and with a "sun" skirt. "Tatyanka" can also be used, especially if you want a maxi and have a desire to save money.
Both crepe chiffon and thin silk are suitable for tailoring. Stretch fabrics are only suitable for sewing a dress with a “tatyanka”, as stretchability increases the likelihood of deformation of the “sun”. Can be used for petticoat Weave any thicker fabric that matches the color.
You can calculate the fabric consumption for cutting a dress of this model using the formula:
bodice length + 2 du + 40 cm
For an underskirt, one length is enough plus 4 - 5 cm for fitting and processing.

How to print a pattern ready-made full-size pattern at home
on A4 sheets
How to choose a size without taking measurements and using tables
The set of dress patterns includes (Fig. 1): bodice patterns (back and front), sleeve, notch pattern for the "sun" skirt and a straight skirt pattern.
How to cut and how to sew a Peach dress
 We start by cutting out the details of the "top". We fold the fabric in half, placing the fold along the transverse thread (Fig. 2).
We mark and cut out the skirt - how to cut the "sun" skirt is shown in detail in video tutorial for beginners.
And on the remaining fabric we place the details of the back of the shelf and sleeves.
The seam allowances in this case are as follows:
shoulder-side, waist cut, front-back-lower cuts of the sleeve 1 - 1,5 cm;
neck-sprout-armhole and sleeve okat - without allowances.
On the middle seam of the back we add 2 - 2,5 cm to the "clasp".
Please note that the shelf is laid on the fabric in a turn. You can cut out one piece or two if the fabric is very sheer.
For the underskirt, the fabric is folded in half along the width of the skirt (Fig. 2 below).
 Having cut out the main details, we return to the “upper” skirt (Fig. 3) - we cut off the edges at an angle.
Then we take one part, which will play the role of the front half of the skirt - PP - and, folding it in half, we make a cut (Fig. 4).
You can stop there, but you can also make roundings, as shown in Fig. 5.
After that, you can start sewing.
 We start by processing the "clasp" on the back. The easiest option is a seam in a hem with a closed cut using a device for processing the bottom. With the same seam, you can then process the bottom of the “lower” skirt.
See about these seams and fixtures link article.
Another hemming attachment suitable for household sewing machines is shown in video master class for beginner couturiers (at the end of the video, see from 5:45).
After the "clasp" on the back, we collect the bodice, processing the shoulder and side seams. It is desirable to place a zipper in the left side seam, so we do not grind it completely.
 Then we process the sleeves. You can see in detail how to sew sleeves with cuffs in a series of video tutorials on sewing.
Further references to master classes are given in the sequence required by the technology.
Stitching, overcasting and ironing the seam, making a sleeve.
Then, we process cuffs.
How to Sweep and Sleeve there is an article + video tutorial for beginners.
We process the neck with an oblique trim made of the same fabric as the dress.
I know three ways of processing the neck with an oblique trim, which are suitable for this style.
The first method, which does not apply to edging described here (photo 1 and fig. 1-2 at the link).
Method two - edging without tools - you can see in the next video tutorial on sewing.
Method three - edging with fixtures. I made two videos on this topic, since I have two different binders for household sewing machines.
So, watch the video about edging the neck with fixed tilter, which I only recommend for machines that can adjust the needle position.
And edging with adjustable tilter (Second video at the link).
Having finished with the bodice, proceed to the skirts.
In the “bottom” we grind tucks (or soft folds instead of tucks, if the fabric is very thin) and the middle seam, we overcast the cuts of the seam and the bottom. At the left side we grind only the top, the rest we notice.
We iron the middle seam, and iron the tucks on the pillow. In conclusion, we overcast the cut of the waist. If the skirt is worn separately, then it is not necessary to overcast the upper cut, you can simply turn it over and make an air loop instead of a fastener.
In the “upper” skirt, we also grind, overcast and iron the side seams, leaving an unstitched fragment under the “zipper” in the left.
The bottom can be pickled, edged or processed with a seam with a rudder.
Read and watch about piping and a seam with a steering wheel, as well as other machine seams - article + video.
So, when you have the bodice and skirts ready, they can be connected.
First we connect the bodice with the "top" skirt, slightly picking up the bodice. The assembly is carried out in the same way as we did when we connected the cuffs with the sleeve.
We process the seam of the connection of the bodice and the skirt and stitch the braid-"zipper".
See also the video master class on how how to process a zipper.
Lastly, we sew the petticoat, if you want it to be one with the dress. In the place of the fastener, you can not connect.
That's all!
Remember that patterns of women's dresses, are constantly replenished, and you can download dress patterns for girls absolutely free of charge, without subscribing and registering on the website of Vera Olkhovskaya.
Download this pattern pdf:
Dress pattern "Peach"
$1.30 (52 hryvnia)
Bank cards of the Russian Federation are not accepted for payment!
Size charts What is the height of the pattern Payment methods Ask a question Reviews
Vera Olkhovskaya in social networks:

See similar clothing patterns and how to sew on them


-
Any pattern for free for a review of a previously made order
More...
Lifetime promotion for buyers of patterns!

Leave a review about my store of patterns for an order that you made before, and you will receive any paid pattern of your choice Free!
Catalog:
New patterns on the site


Most readable articles
- How to print patterns in full size on sheets of any format? Category: F.A.Q.
- Pattern of a dress for a babydoll girl Category: Dress patterns for free
- How to take measurements for sewing Category: Sewing: general questions
- How to sew a skirt without darts and without a pattern: "Tatyanka" Category: How to sew...?
- How to learn to sew from scratch at home for free? Category: F.A.Q.
- Skirt with a belt - how to sew a belt to a skirt and processing the belt when sewing a skirt for beginners Category: Waist section processing with and without belt
- How to choose a pattern size? Do Olkhovskaya patterns require a fit? Category: F.A.Q.
- Do-it-yourself parsley, Cossack and Gnome according to free patterns by Vera Olkhovskaya Category: How to sew a New Year's costume and costumes for the holidays with your own hands
New lessons and reviews
-
I sewed a boho trapeze dress size 42 according to your pattern
Category: Patterns - photos and reviews from users

-
I made two dresses with this pattern.
Category: Patterns - photos and reviews from users

-
Thanks for the fast order processing.
Category: Patterns - photos and reviews from users

-
When sewing, I slightly deepened the front neck
Category: Patterns - photos and reviews from users
