1. Why is the sleeve cut out after trying on?
Let me clarify: after trying on the sleeve should only be cut out in products that are sewn with two or three fittings.
At the first fitting, the position of the shoulder and side seams, as well as the total volume of the product, are specified.
After that, the length of the armhole becomes known, therefore, the task of making (or selecting) a pattern is simplified, taking into account the height or length of the armhole of the product.
But, for example, when sewing outerwear or a dress in which the height of the armhole is not important, the cutter can choose a pattern that matches the width of the sleeve. For large sizes and disproportionately thick arms, a piece should be made to measure the girth of the shoulder.
And one more answer: the sleeve on the first fitting of a lady's jacket is not yet needed, since the balance, fit, shape of the lapel and bead are being clarified. If you are sewing several products in parallel, then it makes no sense to cut out the details before they are needed. On the second fitting, the volume of the product on the lining, the length of the sleeve and the position of the highest point of the ridge relative to the shoulder seam are specified. The shape of the collar can be adjusted if it is similar to the English one.
2. How to tuck in the sleeve correctly? Amateur mistakes.
 Let's start with the fact that the sleeves can differ not only in shape, but also in the way they are connected to the armhole. Let's focus on the three main types of sleeves.
- Sleeve to fit, when connected to the armhole (picture 1). The length of the curve of the upper and lower folds of such a sleeve should be 5–7 cm longer than the entire curve of the armhole (figure 5 b).
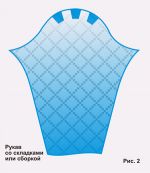
- Sleeves with gathers or pleats (picture 2) are derivatives of the patterns depicted on 1 drawing. After such a sleeve is assembled, the total length of the eyelet should exceed the length of the armhole by 2-3 cm.
- Non-stop sleeve - a sleeve that does not require landing. It is used in products sewn with one fitting or without it at all. Examples are reaper dresses and blouses, men's shirts and knitwear (picture 3).
 It should be noted that professionals do not pay attention to matching the length of the armhole to the length of the grommet. As a rule, the craftsmen keep several patterns for the sleeves. When cutting, only the length and girth of the shoulder are taken into account. If necessary, the pattern is widened or narrowed.
If the length of the grommet is greater than the required one, when embedding the armhole is deepened somewhat, or rather, the section of the lower edge is embed in below the corresponding cut of the armhole. To the comments of young tailors like “my sleeve doesn’t fit in”, the cutter usually replies: “Go deeper!”.
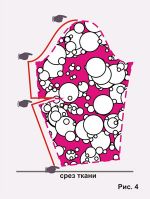
Council 1. If you need to expand the finished pattern by a couple of centimeters, circle its outlines on one side, then slide the pattern parallel to the fabric cut to the required distance and circle the other side (picture 4). Add seam allowances to the stroke line. If you need a sleeve that requires an increase in pattern by more than 4 см, it is better to build a new drawing and save it for the future.
Council 2. At first, it is difficult for beginners and sewing enthusiasts to distribute the fit. Therefore, it will be better if they begin to train on sleeves that have an okata length strictly necessary for a particular armhole.
- Incorrect landing distribution.
- Incorrect fit of the sleeve to the armhole with the correct distribution of the fit.
- Incorrect fit of the sleeve to the armhole with an incorrect distribution of the fit.
Let us dwell on each of these points in more detail. But first, let's define the fit.
Definition Landing this is a special ratio of the lengths of the connected sections of the sections of the parts. For example: a certain section of the cut of the sleeve is longer than the corresponding section of the cut of the armhole. If the difference between the lengths of the sections is more than 1,5 times, then this is no longer a landing, but assembly.
 Rule 1: landing distribution should not be uniform. The area of greatest landing is located in the area of the upper rim, while most of it is to the front roll of the sleeve (figure 5 in). The area of the smallest is landing in front at hand. At the same time, it should be understood that clear boundaries between these conditional sections of the eye are undesirable.
3. The first method of sewing in the boarding sleeve
When stitching the sleeve into the armhole, turn the sleeve right out (figure 5 in), and the product inside out (figure 5 a) and insert the sleeve into the armhole. Then align the shoulder seam with the highest point of the collar, and the borders of the conditional areas of the armhole with the corresponding points on the armhole, that is, distribute the fit by eye. After that, if there are difficulties, you can add a few more pins and lay a basting line. It is desirable that the stitches be the size 1 см for fine fabrics and 1,2 см - for loose or thick. After completing the first basting line, if you consider it successful, lay the second same line in such a way that the "gaps" of the first line are closed stitches of the second line. This will allow the fit to not shift when the sleeve is machine sewn.
By the way, the machine line should be laid, deviating from the basting 1 - 2 mm inside the armhole. The main mistake of this stage is the line that tightens the armhole.
3 Tip: when sewing in a sleeve, which must be done after careful tucking in, you need to slightly stretch the machine seam so that the line does not burst when worn. If the first machine line turned out well (it should be conditionally straight and not burst when the product is stretched) at a distance 1 - 2 mm Lay the second line inside the armhole, also slightly stretching the fabric.
4. The second method of sewing in the boarding sleeve
There is also the second way to insert the landing sleevecalled circular assembly method. It may seem simpler to many. Unlike the first, it involves the preliminary distribution of the landing on two small basting lines laid along the entire okat. Stitch length - 2 mm. For the first line, step back from the edge of the eyelet 8 mm. After laying it, pull the okat to the desired length. Lay the second line closer to the edge by 3 mm and also pull off the cap. Then repeat the first method.
In case of incorrect pairing of armholes and sleeves (if the fit is distributed correctly) unaesthetic “creases” may appear on the sleeve or the product will turn out as if “with dislocated arms”. To avoid this error, when trying on, putting the product on the customer (customer) and making the necessary adjustments, put a sleeve on the customer’s right hand. Attach it with three pins, marking the highest point of the eye and the boundaries of the landing areas. On the figure 5a the location of the pins is indicated by crosses. After this operation, apply connection marks on the pins on the sleeve, shelf and back. It is very important that after trying on these marks remain on the armhole and on the sleeve, therefore, after trying on, small (5 mm) notches can be made at their locations.
Note: in some cases, the highest point of the collar of the sleeve may be in front of or behind the shoulder seam, but the sleeve will “sit” well.
Non-stop sleeve can be stitched without tucking in. In this case, the side seams of the bodice are processed after the sleeves are sewn in. The highest point of the armhole is combined with the corresponding point of the armhole (this is not always the shoulder seam - it depends on the figure and style), and the end points of the armhole with the end points of the armhole (picture 6).
Rule 2. All sewing operations should be carried out in parallel for the right and left sides of the product.
For example: when sewing a men's shirt, the processing sequence may look like this. We start with the processing of small details: right patch pocket, left patch pocket, right cuff, left cuff. Then we process the side of the right shelf and the side of the left shelf. We adjust the pocket to the right shelf, then to the left shelf. After that, we grind the shoulder seams - right, left and overcast the right, left. We process slots on both sleeves, then folds. Stitch both sleeves, then overcast the stitching seams. We grind the side-sleeve seams (picture 6) and wrap them around. We grind the cuffs, make a collar and stitch it. Only the bottom and buttonholes remain.
1. See additional
video master class on tucking in sleeves with landing
2. Video
How to sweep in and sew in a sleeve with an assembly
3. Video
How to sweep a short sleeve to the floor of the armhole
4. Video by
sewing in a non-stop sleeve without stitching
Free download:
 1. Super stretch sleeve pattern - Approximate measurements 38-54
5. Sets of ready-made sleeve patterns in PDF files


 Join my community on Viber...


