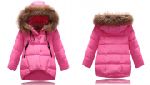
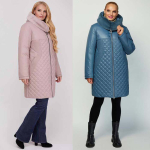
As you guessed, a fur coat and a short fur coat can be sewn in one pattern.
In fact, everything is very simple: first we “collect” the fur “top”, then the “lining” and connect them together.
Attention! Products from natural and artificial fur NEVER IRON!!!
 Free download instructions on how to sew to a pattern
Ready-made pattern to sew a fur coat and how to cut it correctly
In this article, we will consider only the technology of sewing according to my finished pattern.
You can download the finished fur coat pattern for this article here ...

How to cut according to the finished pattern, read here ...

How to sew a long or short fur coat with this pattern with your own hands
First, prepare the cut parts for assembly.
On the 1 drawing we are looking at a model of a fur coat made of faux fur.
The shaded fragments are duplicated with calico and non-woven linings.
 Thanks to them, the sides of the fur coat do not deform, the loops hold well (air or special fittings are preferred).
Of course, in this case, we duplicate without an iron.
We fasten the entire dubbing with oblique stitches, just like in a fur vest.
Attention! The edge of the pads do NOT need to be hemmed.
Position the extreme lines of oblique stitches 0,5 - 0,7 from the dubbing cuts.
We strengthen the sprout and shoulder of the back with an edge or facing from coarse calico or beading.
The same dense dubbing is necessary for the pocket. Processing a pocket for a fur coat is discussed in a separate article.
Why is this duplication necessary?
Faux fur in most cases has a knitted basis. The base can be impregnated with "glue". But it always expands. Therefore, the most worn out places - sprout, shoulder, collar and pockets - we strengthen with dense pads.
The stand (only parts that are sewn into the fur "top"), the upper part of the side, the bottom of the sleeves and the bottom of the product can be reinforced with ordinary interlining.
The technology of sewing a sheepskin coat or a fur coat with your own hands according to a pattern
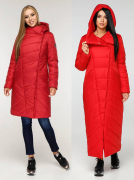
For sewing a fur coat made of natural fur, it is desirable to increase the amount of dense dubbing (picture 2).
The purpose of duplication is the same - to increase the period of wear of the product. Subject to technology, a quilted fur coat will last more than 10 years without major repairs.
 We quilt the product in the same way as a vest. Attention: NO IRON!
Pay attention to the fact that the pocket falls into the dubbing area of the shelf.
It is necessary.
We leave a gap of 0,5 - 0,7 cm between the dubbing of the shelf and dubbing of the one-piece selection - this will allow you to process the board simply and efficiently.
The upper part of the shelf selection, fragments of the rack, the bottom of the product and sleeves are duplicated with non-woven fabric.
After that, you should process the pockets and collect the "top", including the collar. Gather the “top” of the sleeves separately and DO NOT roll the sleeves in.
When sewing fur parts, do not forget to guide the fur between the parts (inside the seam) and make a notch, as shown in fig. 1.
Assembling the "lining" is not difficult. Each detail of the lining is pinned or basted on batting or woolen knitted fabric, and then quilted on a typewriter with any pattern.
Sintepon is undesirable to use.
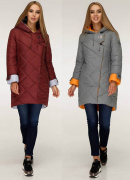
The flyaway “lining” can be narrowed along the side seam (picture 3). This will not lead to material savings, but it will make the fur coat a little warmer.
After stitching on the lining of the left shelf, the pocket should be processed and sew a loop to the sprout.
 The lining of the sleeves is not quilted, but is ground together with a heater and assembled separately, and then stitched to the sleeve blank along the lower cut.
The bottom of the fur sleeve is folded along the edge of the dubbing and swept up. After that, you can hem it with blind stitches and fasten the lining with a slight overlap at the seams at about elbow level.
Before connecting the "top" and "lining", trim the lower cut of the fur coat with an oblique trim.
Connecting the "lining" and "top" of the fur coat is also quite simple - the main thing is to combine the middle of the sprout and the shoulder seams.
Note: you can edging both with the help of a edging (photo on the right), and without it (link article).
Of course, it is better to sweep the seam of the connection beforehand and only after checking the correctness of the basting, sew.
Then we sweep the already edged bottom and process the bottom of the bead manually or by machine, not forgetting to carve (cut out) the excess fur in the corner.
And now you can make air loops from the cord: insert them into small holes and sew them firmly to the bead. Not to the fur, but to the sideboard!
After that, we put the product on the mannequin and check the quality of the previous operations: the sides must be of the same length and they must not diverge or deform.
After checking the quality, we outline the bottom line on the lining. It should be located 2 cm higher than the bottom of the fur coat.
 The bottom of the lining is processed into a hem with a closed cut: tuck and sew with a zigzag or any decorative stitch (see the article "Machine seams").
A straight line in this case is undesirable.
The next operation is to fasten the stand along the line of stitching into the sprout and attach the edge of the bead to the “top” of the fur coat.
We sweep the product 1 cm above the seam of the sprout and go on board, stepping back from the edge of the collar to the edge of the board 1 - 1,5 cm. "top" of the item. We do not reach the bottom 15 - 20 cm.
On the bottom, the “top” and “lining” are fastened with thread legs 1–1,5 cm long at the edge of the band and at the side seams.
We complete the sewing of a fur coat by processing the armhole
Before tucking in the sleeves, it is advisable to check the depth of the armhole and, if necessary, trim it.
- After putting the product and the sleeve (starting with the right one) on the customer or mannequin, pin the sleeve with three tailor's pins to the armhole.
- In this case, the sleeve is superimposed on the armhole and its entry is 2 - 3 cm, that is, a double allowance for the seam of the sleeve.
- The first pin connects the top of the sleeve (on the seam) and the shoulder seam.
- The second pin is the front roll of the sleeve and an arbitrary point on the armhole of the shelf so that there are no creases on the sleeve.
- The third pin is the elbow roll of the sleeve and an arbitrary point on the back - there should also be no creases.
- Then we look, admire and, if necessary, change the position of the pins.
- We repeat the same operation with the left sleeve.
- Having finished with the pins, we put thread marks in the places of chipping along the sleeves and along the armholes of the fur coat.
- Now we stitch the sleeve in the usual way, combining the corresponding marks.
- We sew the sleeve, slightly stretching, with two lines.
- From the side of the sleeve we put a batting pad - a rectangle 5 by 25-28 cm.
- It should be located between the front and elbow rolls of the sleeve, that is, from above.
- We sew in the podkatnik from the side of the shelf-back.
- Attention! We put it from the side of the sleeve, combining the cuts, and we sew it on the other side - from the side of the back shelf.
- Thus, the podkatnik should fill the volume formed by the fit of the sleeve.
- It remains only to attach the shoulder pad and close the armhole with a lining.
Other patterns of fur coats and short fur coats, coats and how to sew them with your own hands
Women's coats Fur coats Jackets Capes