In fact, the technology of sewing a coat is no more complicated than the technology of sewing a dress.
Simplification has come with the advent of “new generation” fabrics and applied materials that do not require laborious ironing operations and highly skilled sewing skills.
In a word, even if you are a home couturier, it is worth sewing yourself.
The advantage of a tailored coat was covered in my article "10 questions about winter coats".
How to cut and sew a coat according to patterns
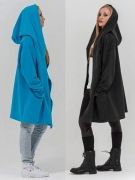
In this article we will look at how to cut and how to sew three models of a demi-season coat with reliefs from the shoulder seam and a one-piece stand.
Styles with a one-piece stand were deliberately chosen, since the processing of the set-in collar causes difficulties for novice couturiers.
These styles can serve as a wonderful example of the first self-sewn coat.
 You can download electronic patterns for free and almost free of charge at the links:
Coat for children. Sizes 34 – 44.
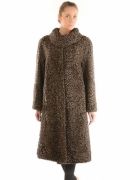
Coat pattern with flounce, reliefs and one-piece stand 42 - 62 (photo)
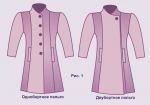
Coat pattern with reliefs and a one-piece stand (without flounces) 42 - 62 (Fig. 1)
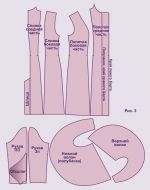
What patterns are included in the kit is shown in fig. 2.
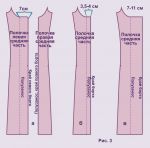 There is only one difference in cutting - the distance between the semi-skid (the middle line of the shelf) and the line of the edge of the side (Fig. 3).
For the model with a shuttle, these distances are different (Fig. 3a): the left shelf, the "lower" side - between the half-skid and the edge of the side - 7 cm, and the right shelf, the "upper" side that goes into the upper shuttle, has a side edge along the line of the half-skid .
In other words, the lines of the half-skid and the edges of the side coincide.
For a single-breasted coat (Fig. 1 and Fig. 3b) between the half-skid and the edge of the side is 3,5 - 4 cm, and for a double-breasted coat (Fig. 1 and 3c) - 7 - 11 cm.
It is important to note that in all cases the selection is one-piece.
Download patterns of fashionable coats
Women's coats Fur coats Jackets Capes
made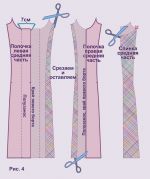 coat patterns
Treat this issue carefully: according to these patterns, you will cut both the details of the top and the lining.
To avoid confusion, I recommend making a template for the middle part of the shelf double with a fold along the line of the edge of the board and two templates for the middle part of the back.
For beginners, I remind you that applying a half-skid vertical to patterns and cut details is a must.
And moreover, the marking of the semi-skid should be preserved until the completion of work on the product.
For a coat with a frill (Fig. 4), the left and right middle parts of the front are different.
In the future, these double parts can be completely cut out of the fabric of the top.
 This is a good solution for small sizes, but for large sizes, double details can greatly increase fabric consumption.
Therefore, part of the "selection" can be cut off and cut out of the lining fabric.
You should be guided by the position of the half-skid on the line - the latter should be wider than the distance between the edge of the side-half-skid by 2 - 4 cm.
Down from the waist, the vertical of the edge of the band (the line of cutting the pattern) should be parallel to the half-skid.
The double pattern of the back is cut into two parts: the facing of the stand and the lining (color shading).
The width of the facing of the rack is arbitrary, but the wider it is, the better.
To simplify the task, you can focus on the upper point of the relief line of the back in Fig. 4 is marked with a red cross.
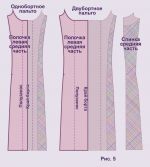
On fig. 5 shows the patterns of the middle details of the shelf for a single-breasted coat, double-breasted and a double pattern of the middle part of the back.
 Most importantly, keep the distance between the semi-skid and the edge of the side.
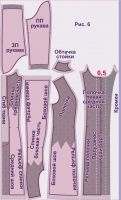
Cutting, if performed according to patterns, is quite simple (Fig. 6).
I will tell you about a common mistake that both beginners and experienced tailors make.
There are a lot of drapes and semi-drapes with a ratted surface on sale now.
It is this fact that is being overlooked.
Attention! Ratin is a pile fabric and should be cut like a fur coat, that is, all parts must have the same pile direction.
For the rest of the coat fabrics, the “jack” layout, as in fig. 6. Flounces (if it is a coat with a flounce) fit randomly, but in the most economical way.
Let's focus on the seam allowances.
Since these models have an almost straight silhouette, I recommend making a storage slot along the middle seam of the back.
Slot allowance - 5 - 7 cm. Bottom 3,5 - 4 cm.
Reliefs, shoulder, side, upper cut of the rack - 1 - 1,5 cm each.
The armholes and sleeve hem are cut out beyond the outline of the patterns.
Using the same patterns, without seam allowances, we cut out dubbing.
Please note: the middle part of the shelf is cut out entirely and the dubbing is cut along the line of the edge of the bead.
This cut is necessary in order to stick these dubbing fragments in the future at a distance of 5 mm and get a natural line of inflection of the part.
I will add that such a board is “not afraid of either rain or wind” and it is much easier to iron it.
We duplicate the shelf in such a way that pockets fall on the duplicated area, that is, approximately to the level of the hips, and the back is slightly below the level of the shoulder blades.
We cut out the lower sections of the dubbing of the barrel of the shelf and the details of the back in a zigzag pattern so that the cut “does not beat off on the face” of the coat.
We duplicate the facing of the rack in its entirety, leaving only the seam allowances free.
We glue the slot with two rectangular fragments of dublerin, between which there should be a distance of 0,5 cm at the fold, as in the case with the edge of the board.
The bottom of the sleeve and the bottom of the coat can be duplicated later.
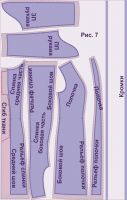 We have already prepared for cutting the lining, making duplicates of the middle part of the shelf and the middle part of the back.
Now we use them (Fig. 7).
The allowances are the same, except that 5-7 cm can be added along the bottom instead of 4. It's for closed-cut lining hem.
Concluding the description of the cutting, I would like to say separately about the dual purpose of a wide allowance along the middle seam of the back.
It is necessary not only for expansion on the slot, but also for another slot in the area of the blades.
This trick significantly increases the wear resistance of the lining, although it is rarely used in women's products.
I highly recommend the spatula for medium to large ladies.
How to sew a coat according to patterns
So, the most interesting: how to sew the coat itself, after the cutting is done.
The sequence is very simple:
Processing the "top" - we duplicate, iron the sides, sweep, grind, iron the shelf and back; side-shoulder seams are swept away and separately we collect the "top" of the sleeves.
- Processing the "lining" - in this case, the back is ground with a facing, we process the inner pocket, we sweep the shoulders, we do not touch the bottom, and the sleeves are assembled separately.
- Trying on - we put on the “lining”, then the “top”, refine the fit and, if necessary, cut the armhole. We outline the pockets and the position of the hidden fastener, if any.
- We process pockets and a hidden zipper.
- We process the shoulder and side seams of the “top”, we connect the “top” and the “lining” first along the pick-ups, then along the upper cut of the rack. We process the bottom of the “top” and the bottom of the sides, and do not touch the bottom of the lining yet.
- We connect the "top" and "lining" of the sleeves.
- We roll up the sleeves (see. Master class on sewing online on the topic of changing sleeves and read the article "How to Sweep a Sleeve").
- Second sample. Don't forget to add shoulder pads. Your task is to check the correct stitching of the sleeves and beat off the length of the lining.
- Processing of the armhole, the bottom of the lining.
10. Fastening the lining, buttonholes.
Done!




 Join my community on Viber...


