Of course, every woman has her own idea of a little black dress. If we talk about the author of this idea, Coco Chanel, then she may have had in mind the dress that she had in the orphanage - as simple as possible without complicating elements.
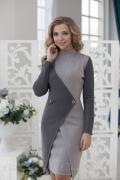
Perhaps a more accurate translation of "la petite robe noire" would be "little black dress."
In my opinion, only a sheath dress fits this idea.
In this article we will look at the minimalist version of the little black
dresses according to the finished pattern-base

semi-adjacent silhouette with a tuck from the armhole.
✂ Content:
- Cut dresses with your own hands:
- Instructions on how to sew a dress with your own hands for beginners step by step:
- Other patterns of sheath dresses.
Open dresses with your own hands
 I note that the sleeve template has three length markings: for short, three-quarter and long sleeves.
In accordance with fashion trends, this model can be supplemented with a narrow or wide belt of any contrasting color. pattern corset belt can be downloaded here almost free.
Cutting dresses according to the finished pattern is very simple.
Open dresses with a middle back seam
 The first cutting option assumes the presence of a middle back seam (Fig. 1).
О middle seam Much has already been written, including by me, so we will not dwell on it.
- The fabric is folded in half face inward along the width of the layout (the width of the front at hip level with a seam allowance + the width of the back at hip level with seam allowances).
- The edges are parallel to each other and to the edge of the table. The scheme of fabric folding is shown in the “bubble” in Fig. one.
- The sleeve is laid in such a way as to minimize the length of the cut.
- In this case, it can be laid both along the shared and oblique threads (green dotted line).
- Seam allowances - in accordance with the rules of dress sewing technology:
- Side, shoulder shelves and backs, front and back seams of the sleeve - 1 cm.
- The neckline, sprout, armhole, sleeve hem - beyond the line of the outline of the patterns.
- The bottom of the dress and the bottom of the sleeve - 2,5 - 3 cm.
Open dresses without middle back seam
 If you intend to cut a dress without a middle back seam, cutting should be done in two stages (Fig. 2):
- First, we fold the fabric, as shown in the diagram in the “bubble”: we bend along the width of the back on one side, along the width of the shelf on the other. The "face" of the fabric, of course, should be "inside", and the edges are parallel to each other, parallel to the folds of the fabric and the edge of the cutting table.
- We lay the back and the shelf with the “middle” on the fold. For the front, this is a half-skid line; for the back, the “fold line” is indicated on the finished dress pattern (see drawing).
- Having laid the patterns of the shelves and backs in the manner described above, we add allowances for the seams. Side, shoulder shelves and backs - 1 cm. The bottom of the dress is 2,5 - 3 cm.
- Then we cut out these details.
- Fold the fabric for the sleeve as shown in Fig. 1, that is, along the width of the sleeve with seam allowances. In this case, it is also possible to cut out the sleeve, placing the pattern both along the equity and along the oblique thread.
Step-by-step instructions on how to sew a dress with your own hands for beginners
But before you start sewing the dress, you must decide in which seam the zipper will be located and how it will be connected to the dress.
So, we start with the processing of sections on the overlock: we overcast the sections of the middle seam of the back, side and shoulder seams.
Then we process (grind and iron) the darts of the shelf and the tuck of the sleeve.
If the "lightning" is located in the middle seam of the back, we process it taking into account the method of processing the fastener.
We grind the middle seam to the place where the "lightning" will end.
Further processing is different. We start by considering the stitched method for a hidden zipper.
Hidden zipper for little black dress
 The rest of the seam is swept and ironed. We remove the sweep and we take the lightning. We check the correctness of the operation - the fastened zipper should not warp, “waves” are also unacceptable. Attaching is desirable to produce any special foot (see photo and video).
Now the invoice method of processing such a fastener has become widespread. The section of the seam where there will be no lightning, we grind and iron, as in the case of a hidden "lightning". Then we cut off the allowance along the middle seam and another 0,5 cm of the back in the area where the “lightning” should be. After that, the “lightning” should be applied, basted and stitched.
And we move on to the next step.
Grinding and ironing of side seams, fitting and fitting.
The seams of the sleeves should also be stitched and ironed, after overcasting.
Fitting.
We put on a dress on the figure. Since our silhouette is semi-adjacent, we DO NOT consider fitting.
Our task is to cut the armhole and choose the shape of the neckline that suits the face and build of the customer.
For details on how to cut the neck, see here.
When the neckline and armhole are cut properly, we put on the dress on the customer and put on the sleeve. Our task is to apply marks that will facilitate the knitting of the sleeve.
We put the highest point of the eyelet on the shoulder (the approach is equal to a double allowance, that is, about 2 cm) and we cut off the sleeve and dress with a tailor's pin.
Then we put the sleeve on a point from the area of the base of the tuck for the chest (setting 2 cm), and on the back at the level of the shoulder blades.
Please note: the sleeve should “sit” on the arm without creases and folds. If necessary, move it at the second and third points.
When the desired fit is achieved, apply chalk or soap marks at the same three points on the dress and on the sleeve to align them when tucking in.
The sleeve should be sewn in from the wrong side, putting it into the armhole and chipping with it at the very three points that you outlined during the fitting. chipped off? You can chip in a few more places, smoothly distributing the fit at the top of the eyelet.
If the bottom collar does not line up with the bottom of the armhole, you can lower or raise it a little. The main thing is to get it symmetrical.
After that, we sew the sleeve with two lines so that the landing does not move.
I remind beginner couturiers: we repeat each operation in a mirror image before proceeding to the next one!
That is, they swept in one sleeve, swept in the other immediately, and only then proceed to the landing.
The suturing of the sleeve fit should be done very carefully, going with an iron only 1 - 2 cm behind the stitching line.
After that, the sleeve can be stitched.
How to sweep up a dress sleeve video
Sleeve sewing also has its own characteristics: we sew it in, stretching the line so that it does not tear; we lay the first machine line behind the stitching line and after that we remove the mark; we lay the second machine line at a distance of 1 mm from the first, also stretching.
After this, the armhole is overcast.
The neck is processed with turning
is the most suitable way for "la petite robe noire".
We complete the tailoring bottom processing and finishing iron.
Download the pattern of this dress
Other patterns of sheath dresses
Sheath dresses | Turtleneck dresses