To decide on sewing outerwear with your own hands, you need a certain courage or skill. Therefore, beginner couturiers sew a fur vest much more often.
Indeed, sewing it is not difficult and much easier than cutting it, even with a ready-made pattern.
At the same time, the tailoring of an already cut vest made of natural and artificial fur differs slightly, if you followed my instructions when cutting.
Incidentally, you can download a pattern of a women's vest made of fur “almost” for free here.
Let me remind you of the need to use a furry stitch when sewing natural fur.
If you sew by hand, you can sew with a regular buttonhole stitch. If you "break technology" on a universal machine, use at least Teflon foot or a foot with rollers and a leather needle (with spatula-type sharpening).
 When starting to sew a product from any fur, you should remember that you cannot use basting or notches. In order not to skew the product, apply control marks with a marker. And when grinding, carefully fill the fur between the sections of the parts.
To give strength to the shoulder seams, they can be sewn together with any thin non-stretch tape or even a narrow nylon ribbon.
And if you use old worn fur for sewing, it is advisable to strengthen it with a bead.
To do this, after assembling the fur "top" of the vest, when only the shoulder sections are not processed, it is connected to the side, cutting it out exactly along the vest, that is, with the same allowances for the seams. They connect the bead with the fur, quilting the product with oblique stitches 1,5 - 3 cm long, while the optimal distance between the lines is 3 - 7 cm. That is, the stronger the fur, the greater the stitch and the distance between the lines. After the vest is quilted, seam allowances are cut off (cut out) on the side. This sequence provides maximum accuracy (Fig. 1).
With faux fur, everything is simpler - fur with a glued base is ground with a Teflon foot or a foot with rollers on a conventional universal machine. If these devices are not available, you can also sew through a newspaper. Fur with a non-glued base can be sewn with a regular foot. In any case, remember to increase the stitch length.
Dart processing: the allowance is completely cut out for the furrier seam, and for the machine we leave 0,7 cm, then the tuck is grinded.
Now about the "lining". Mo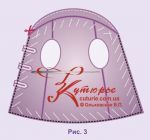 th tip: choose a satin lining or thick satin non-stretch satin, quilt the lining yourself.
With the seeming simplicity of processing this knot of the product, there are several questions that do not even arise for some novice tailors. Let's dwell on them.
Why do I recommend quilted lining? If you take the usual one, all the seams and flaws of natural fur or the glued base of artificial fur will be felt through it. Therefore, it is better to take a thin quilted lining. Of those that are on sale, choose not quilted with threads, but with a thermal method, since the factory stitch is usually quickly pulled out of the seams.
Why do I think it's better to quilt the lining yourself? There are several reasons for this.
Firstly, all ready-made quilted linings are of poor quality and are quilted on synthetic winterizer. It is better to buy a satin lining, and even better a dense satin.
Secondly, as a heater it is better to take thin batting or a thin pure woolen cloth (for example, a well-worn woolen scarf). These insulations are not only warmer, more importantly, they can be ironed and do not “pass” through the lining with “nasty white balls”.
Thirdly and fourthly, the "homemade" stitch does not pull out of the seams and you can choose any wonderful pattern.
Attention! Lining quilted with padding polyester cannot be ironed! Therefore, the stitching seams should be unstitched. And the lining quilted with batting or wool knitwear can and should be ironed, so we iron the stitching seams.
 Having considered the main nuances of tailoring fur vests, we proceed to the description of the sequence of work.
There are two ways to sew a fur vest - edging and turning.
Patterns of vests, blouses and corsets
Piping in a fur vest
Attention! For this method, other allowances for the departure of the upper and lower collar are needed! On the departure of the upper collar, 2 cm is added, on the departure of the lower collar, the allowance is NOT added, because otherwise it will have to be cut off.
We assemble the fur “top” of the fur “top” product: we grind the shoulder and side seams: we grind parts of the upper (fur) collar and stitch the upper collar, we sew “air loops from braid or from the same material as our edging.
We collect the quilted lining: we grind the shoulder and side sections, and then iron or bore the seam allowances, depending on which insulation you use.
We sew the lower collar along the middle seam and sew it into the neck of the “lining”, having previously placed a loop under the collar so that the vest can be hung on a hanger.
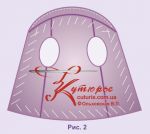
Then, you just have to fold the assembled “top” and “lining” inside out to the wrong side, sweep with large (6–8 cm) oblique stitches (Fig. 2) and stitch, stepping back from the edge 0,7–1 cm. In fig. 3 the sweeping of the “top” with the “lining” is shown with white strokes, the machine line is shown with a black dotted line. Under this machine stitch, you can put pre-prepared "air" loops from any suitable braid or from the same material as the edging.
Pay attention to the fact that the upper and lower collars are swept with a regular running line, then, at the lower collar, the departure allowance is cut off, if it was added during cutting.
After that, the product is edged with leather, satin or any other inlay. Satin trims that are sold in the store are NOT suitable for this purpose, since we need a wider and stronger one. How to make bias binding at home, see here.
 In conclusion, the allowance of the upper collar is folded over the open cut of the lower collar, folded over and sewn with small oblique stitches. The fur will hide them, so a hidden line is not needed here. It is very important at the end of the collar to hide the ends of the edging under the allowance, and then connect the “top” and “lining” along the seam of the collar.
Turning is a less complicated way.
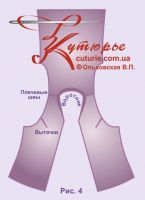
First, process the darts, stitch the shoulder sections of the fur “top” and the quilted “lining” and sew in the upper and lower collars, respectively (Fig. 4).
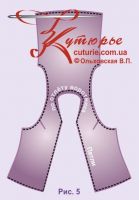
Fold the “top” and “lining” of the product face to face, pin it with pins, laying the pile inside. Place "air" loops under the seam of the side of the right shelf. Stitch, stepping back from the edge of 0,7 - 1 cm (Fig. 5).
Turn the product inside out through the open side cut.
Stitch the side seams of the "top", then one side seam of the lining. Partially stitch the second side seam of the lining as far as possible, sew the rest of the seam with blind stitches.
The final stage is flaring - attaching the “lining” and the “top” of the vest with hidden stitches around the entire perimeter of the product.





 Join my community on Viber...


