The need to make a bias trim with your own hands at home has three reasons.
Firstly, the inlay offered by stores is made from very thin, low-quality satin.
It wears out quickly, therefore, it should not be used in the processing of expensive products and in places subject to rapid wear.
Secondly, for processing open sections of products made of thick fabrics or fur, the width of the inlay may not be sufficient.
Thirdly, sometimes you need an inlay from the fabric that the product is sewn on.
How to make bias tape at home?
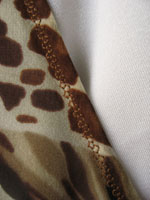
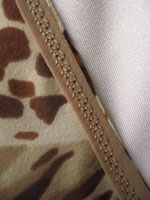
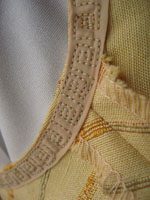
The photo shows examples of processing the neck and armholes with a double chiffon trim using finishing machine seams.
So, to make an inlay, on any sufficiently large lunge of fabric, draw parallel lines at an angle 450 to the edge.
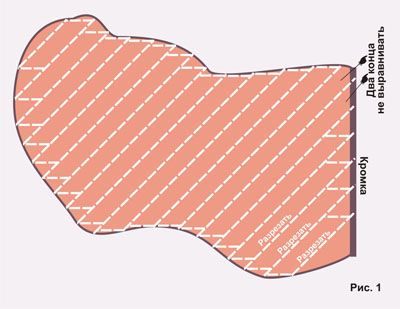 The optimal distance between the lines is 3 cm (Fig. 1).
After cutting the fabric into strips, align the short cuts strictly along the transverse thread.
On fig. 1 the two ends are not aligned as they are planned on the edges.
Sew the strips, folding them face to face, the width of the seam - 0,5 см and don't forget about bartacks at the beginning and end of each seam (fig. 2 a).
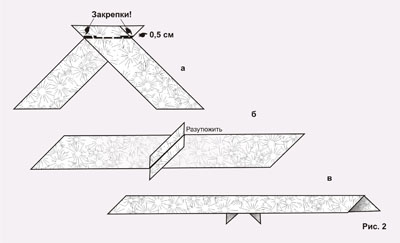 After grinding, the allowances should be ironed out (expanded and pressed with an iron), as in Fig. 2 b.
The final operation is to iron the finished combined strip in half (Fig. 2 c).
To edge a cut, lay the finished inlay on the wrong side of the part, aligning the cuts.
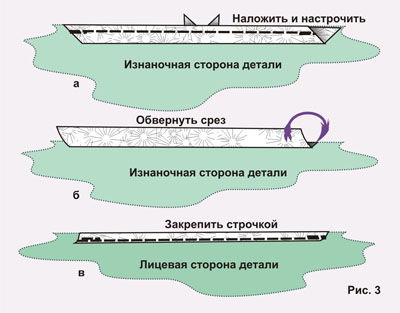 Lay the machine line, stepping back 0,4 - 0,5 cm from the edge (Fig. 3a).
Having wrapped the cut with an inlay (Fig. 10 b), turn the part face up and lay a fixing and finishing line, stepping back from the ironed fold of the inlay 0,1 cm (Fig. 3 c).
The disadvantage of this edging method is that sometimes the seam is quite thick.
If you are working with thick enough fabrics, then the inlay is not folded in half, but overcast on one side.
For edging, place the raw edge of the inlay on the front side of the part to be edged.
Lay a connecting machine stitch, stepping back from the edge 0,4 - 0,5 cm (Fig. 4) and tightly surround the edge to be edged with the inlay.
It is important that the swept cut of the inlay goes under the part by at least 0,7 cm, since the fixing and finishing line should be laid along the front side.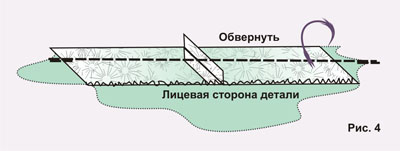
If the swept cut of the inlay does not go under the part enough, then you will have to fix it manually.
How to calculate the width of the inlay?
If the inlay is double, as in fig. 3 and on all photos, then
(3 stitch widths + fabric thickness + 0,2 cm) x 2,
it equals
(3 times 0,4cm + 0,1cm + 0,2cm) times 2 = 3cm
If the inlay is single, with one swept cut, then its width is equal to
3 stitch widths + fabric thickness + 0,2 cm
Let's say that we are edging a thick, loose fabric, for example, a drape, the thickness of which is about 0,4 см.
3 times 0,4 cm + 0,4 cm + 0,2 cm = 1,8 cm.
If you need to turn over a thick fabric with a thick fabric, then the "fabric thickness" in the formula must be doubled:
3 stitch widths + 2 fabric thicknesses + 0,3 cm
For example, a double-sided furniture tapestry is to be edged (vests from it are the last squeak!) And the edging should be made from the main fabric with the inside replaced with a face.
Tapestry thickness approx. 0,2 см, but it is quite hard and loose, so it is worth increasing the width of the seam to 0,5 см.
3 times 0,5 cm + 2 times 0,2 cm + 0,3 cm = 2,2 cm
Whether it is worth sticking to such calculations exactly is another question.
In most cases, the width of the double oblique inlay is equal to the turn 3 - 3,3 cm, but single 2 - 2,5 cm.
Sets of patterns for collars and sleeves