Size charts What is the height of the pattern Payment methods Ask a question Reviews
Electronic pattern for printing in full size on a home printer or plotter. Can be printed on sheets of paper from A4 to A0. Paperless cutting through the projector is possible.
Free download Instructions on how to sew a dress - jumpsuit for this pattern
How to sew a dress silhouette jumpsuit with your own hands - a boho-style trapezoid according to patterns at home

Contents of the instruction:
- Description of patterns.
- What patterns are included in the set of patterns for the overalls of the dress.
- Description of the design of the style and what to sew the dress-overalls from, fabric consumption.
- How to buy, download and print ready-made patterns in full size.
- How to cut a trapeze jumpsuit dress according to a pattern.
- How to sew a do-it-yourself jumpsuit at home.

1. Description of patterns
According to these patterns, you can sew:
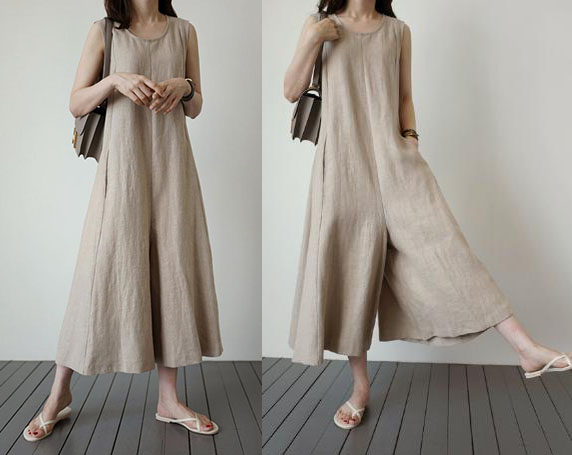
semi-adjacent jumpsuit dress silhouette trapezoid in boho style. Sizes: 40 - 52 or 52 - 64 (the whole range of sizes in one file).
Free jumpsuit dress silhouette trapezoid in the style of boho (as in the photo). Sizes: 40 - 52 or 52 - 64 (the whole range of sizes in one file).
File Format: PDF full size and no seam allowances.
After paying for the order, you will receive links to download two files patterns of overalls-dress trapeze boho gradation of sizes from 40 to 52 or from 52 to 64:
- PDF file A4, adapted for printing patterns on sheets of A4 paper in any program on any device, including mobile phones.
- Multi-format PDF file for printing on sheets of any size from A0 to A4 on a printer or plotter using Adobe Reader.
 Sewing Difficulty Level: Easy, but basic cutting and sewing skills are required.
The style of the jumpsuit is suitable for all types of figures of various fullness.
There are two versions of the model with different degrees of fit, more precisely, the "degree of freedom" - semi-adjacent overalls and loose overalls (picture 1).
2. What patterns are included in the set of patterns for a jumpsuit for a boho-style a-line dress
A complete set of patterns for a dress of a jumpsuit of a silhouette of a semi-adjacent silhouette
- Back patterns - middle part and side.
- Shelf patterns - the middle part and the barrel.
- Burlap pocket.
 Complete set of patterns of a dress of overalls a-line of a free silhouette
- The back in this case is solid, without relief.
- Shelf - the middle part and the barrel.
- Burlap pocket.
Patterns of details for processing armholes and necks are not included in the kit, as the shelves and backs are cut out according to the patterns (picture 2).
3. Description of the design of the style and what to sew the dress-overalls from, fabric consumption
 This is a laconic hybrid model with vertical reliefs and an extension to the bottom.
Pockets - in the seams of the relief.
The jumpsuit can be worn over a T-shirt or turtleneck.
What to sew and how to calculate fabric consumption
Traditionally, boho-style jumpsuits and dresses are sewn from natural linen or cotton fabric.
Natural linen, chintz or thin jeans are ideal.
Using other fabrics, you are unlikely to be able to stay within the boho style, but you can sew this product from them.
If you want to sew a warm version of the jumpsuit to wear on a turtleneck, you can use thin dress wool, tartan and even knitted fabrics with low or medium stretch.
Consumption with a fabric width of 150 cm will be from 260 to 290 cm.
 4. How to buy, download and print ready-made patterns in full size
How to choose a size without using tables and taking measurements ...
How to buy a ready-made electronic pattern ...
How to print a pattern at home life-size on A4 sheets or on sheets of any other size.
How to assemble a pattern after printing ...
Simple patterns of dresses, sweatshirts, skirts and trousers in full size free download...
5. How to cut a trapeze jumpsuit dress according to the pattern
 Cutting is not difficult, but before you start, you should decide how you will process armholes and necks.
In this case, three options are obvious:
1. Turnings or double bodice.
2. Bias binding.
3. Oblique binding
If everything is clear with the opening of the oblique inlay, these are oblique strips 3,5–5 cm wide (depending on the task). The strips for the inlay are cut out from the remnants of the fabric along the oblique.
 bodice") And cutting the “lower” (lining) bodice requires compliance with only the same seam allowances that are necessary for the parts of the jumpsuit of the same name (picture 2).
And cutting the “lower” (lining) bodice requires compliance with only the same seam allowances that are necessary for the parts of the jumpsuit of the same name (picture 2).
The length of the bodice is arbitrary - below the level of the chest or to the waist, or 4 - 5 cm below the armhole.
In any case, the cutting turns out to be uneconomical, with large lunges of the fabric, so the length of the lining bodice depends only on the desire of the couturier.
Seam allowances - 1 - 1,2 cm. The exception is curved armholes and necklines, seam allowances are not added to them.
We do not add allowances to the burlap of pockets.
We add 4-6 cm along the bottom of the jumpsuit-dress. This is taking into account the alignment of the bottom of the product during the fitting.
For a hem with an open cut (single hem), 2,5 cm is enough for us.
For a hem with a closed cut - 4 - 5 cm.
 The share thread should be located along the details, so you can not stick to it very strictly (drawings 3 - 4).
To cut a semi-adjacent silhouette jumpsuit dress, fold the fabric in half along the edges (picture 3).
We combine the edges and place them parallel to the edge of the cutting table. Patterns are laid out in the most economical way.
First, the details of the shelf and back are cut out, then the details of the burlap.
Last but not least - the details of the double bodice or facings and slanting inlays.
The layout of the jumpsuit-dress of a free silhouette is shown in 4 drawing.
 In this case, the fabric is folded in half across, that is, perpendicular to the edges. This approach allows you to arrange the parts in the most economical way.
Immediately after cutting, notches should be made at the level of the waist and at the level of the pockets.
At the waist level, notches are made to facilitate the assembly process of the product, so as not to "skew" the seams. In other words, these notches are an alternative to chalk markings. Notch length - 0,5 cm.
Notches for pockets are necessary for processing, therefore, they must be 0,1 cm shorter than the seam width. That is, the length of such a notch is 0,9 cm.
 6. How to sew a do-it-yourself A-line jumpsuit at home

First, let's consider whether a clasp is needed?
You probably won't need a clasp. Just in case, you should measure the length of the neck without stretching.
If you are sewing a product from linen, then it makes sense to use a edging stitch instead of an overlock overcasting line and edging the open sections with a synthetic bias trim. This will give the cuts a little extra rigidity and the product will wrinkle a little less when worn. Especially the presence of the inlay will be noticeable on products made of thin linen.
Sewing sequence:
- Stitch pocket burlap at markings. The line should be strictly from notch to notch and with reliable bartacks at the beginning and at the end. Overcast and iron.
- Pull back the middle seam of the back in the area of the rounding of the seat, as is done in trousers, so that after sewing, the line does not tear. When you grind the middle seam, you will have to stretch it for the same purpose so that the line does not break. This is especially important if the fabric is stable, that is, it does not stretch.
- Stitch the reliefs of the front and back (if any), as well as the middle seam, overcast and iron. If you process with a lining bodice, then overcast not from the very top, but the overcasting line should go under the bodice by 4-5 cm. In the lower bodice, overcast only the lower cut.
3.a. If you need a fastener along the middle seam, then the middle seam of the back (or shelf) is not ground down by 10 cm from above. This also applies to the “top” and the lower (lining) bodice. - Treat the neckline and armholes of the shelf with the lower bodice, like a facing.
- Treat the sprout and armholes of the back with the lower bodice, as if turning.
5. a. If you are processing a clasp, then turn the sprout (back neck) and clasp with one line - first one half, then the other to or from the bottom point of the clasp. The bottom point of the zipper should meet the top point of the middle seam. - Further, the shelf is turned on the front side, the back is on the wrong side. Insert the shoulder sections of the shelf inside the shoulder sections of the spike, grind, turn out, iron.
- Stitch the side seams, turning the "top" and "bottom" bodice so that the line in the bodice area is then inside. Iron, overcast just above the border of the lining bodice.
- Baste the seam of the step.
- Try on. Check if the “saddle” is low enough so that you can sit in the overalls. If high - cut or stretch the seam with an iron, if low - slightly narrow the step. Then, level the bottom, taking measurements from the floor at several points.
- Sew, overcast and iron the crotch seam. Strengthen the middle seam of the back (seat) in the buttock area with the second line, laying the second line at a distance of 0,1 - 0,2 from the first, not forgetting to stretch it.
- Overcast the bottom, fold, sweep, iron and hem by machine or by hand.
Download this pattern pdf:
Patterns of overalls of a dress of a silhouette a-line in boho style
$2.00 (80 hryvnia)
Bank cards of the Russian Federation are not accepted for payment!
Size charts What is the height of the pattern Payment methods Ask a question Reviews
Vera Olkhovskaya in social networks:

See similar clothing patterns and how to sew on them


-
Any pattern for free for a review of a previously made order
More...
Lifetime promotion for buyers of patterns!

Leave a review about my store of patterns for an order that you made before, and you will receive any paid pattern of your choice Free!
Catalog:
New patterns on the site


Most readable articles
- How to print patterns in full size on sheets of any format? Category: F.A.Q.
- Pattern of a dress for a babydoll girl Category: Dress patterns for free
- How to take measurements for sewing Category: Sewing: general questions
- How to sew a skirt without darts and without a pattern: "Tatyanka" Category: How to sew...?
- How to learn to sew from scratch at home for free? Category: F.A.Q.
- Skirt with a belt - how to sew a belt to a skirt and processing the belt when sewing a skirt for beginners Category: Waist section processing with and without belt
- How to choose a pattern size? Do Olkhovskaya patterns require a fit? Category: F.A.Q.
- Do-it-yourself parsley, Cossack and Gnome according to free patterns by Vera Olkhovskaya Category: How to sew a New Year's costume and costumes for the holidays with your own hands
New lessons and reviews
-
I sewed a boho trapeze dress size 42 according to your pattern
Category: Patterns - photos and reviews from users

-
I made two dresses with this pattern.
Category: Patterns - photos and reviews from users

-
Thanks for the fast order processing.
Category: Patterns - photos and reviews from users

-
When sewing, I slightly deepened the front neck
Category: Patterns - photos and reviews from users
