
Size charts What is the height of the pattern Payment methods Ask a question Reviews
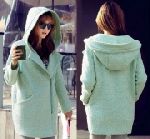
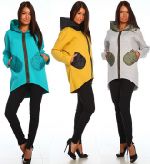
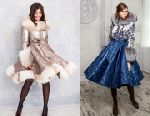
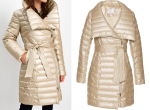
Electronic pattern "coat-down jacket trapeze with a hood" 40-64
 Sizes: 40-52 and 52-64 (the buyer receives ALL sizes of the selected gradation)
File format for download in order:
PDF in full size and without seam allowances.
After paying for the order, you will receive links to download two files coat patterns of your chosen size gradation:
- PDF file A4, adapted for printing patterns on sheets of A4 paper in any program on any device, including mobile phones.
- Multi-format PDF file for printing on sheets of any size from A0 to A4 on a printer or plotter using Adobe Reader.
Sewing difficulty level: medium. Despite the simple operations of cutting and sewing, as well as the absence of the need for serious wet-heat treatment, the down coat pattern is not suitable for beginners.
 This style of down coat is suitable for all types of figures of various sizes.
The consumption of the “top” fabric is, depending on the size, 210–270 mi with a width of 140 cm. The consumption of the lining is 180–250 cm.
Only raincoat fabrics with special windproof properties are suitable for sewing. There are no special requirements for the lining fabric, except for slip. As a warming pad, you can use a synthetic winterizer, holofiber or alpolux. The use of artificial down is also possible, but this complicates the sewing of the down jacket and adds fabric to the consumables for the "cover" for down, which should be quilted separately.
The set of patterns for a trapezoid down jacket includes (Fig. 1): patterns for the back, shelves, two-seam sleeves, stand-up collar and hood.
The lining is cut out according to the same patterns. Patterns of cuffs and other details in the shape of a rectangle are not included in the kit, but their cutting and size recommendations are given in the description of cutting and sewing below.
How to buy an electronic pattern
How to print a pattern life-size at home on A4 sheets
How to choose a pattern size without taking measurements and using tables
Download free patterns of dresses and coats for children
How to cut and sew a down jacket at home
 (detailed description with sequence)
The complexity of cutting and sewing a down jacket lies in a somewhat intricate sequence of very simple operations and the requirement for accuracy in performing each of them. The process is simplified due to the lack of WTO and duplication of parts, but becomes more complicated due to stitching.
The sequence of operations for individual tailoring of a "down jacket" at home is extremely important. And you should start with cutting the fabric of the "top".
But before cutting, you need to make sure that the length of the patterns corresponds to the length of the product you need. To orient absolutely accurately, it is worth measuring your favorite down jacket and comparing its length with patterns. Particular attention should be paid to the length of the sleeve. Please note that when determining the sleeve length, you need to take into account the thickness of the insulating pad, shoulder pad and cuff width, if you have one.
 Of course, the size of the down jacket pattern is selected taking into account the thickness of the insulation. Pg patterns - 12 cm.
Briefly about allowances for seams and equity.
Side, shoulder, half-slip (there will be a zipper), front and elbow sections of the sleeve, sections of the hood, sections of the collar - will require an allowance of 2 - 3 cm. cuffs will need 2 - 2 cm, without cuffs - 3 - 5 cm. At the bottom of the product, if any drawstrings are not provided, add 6 - 5 cm, if stitched drawstrings are provided, then 8 - 1,5 cm is enough, and if drawstrings will be one-piece with a shelf-back, then the allowance should be increased to 2 - 10 cm.
I’ll make a reservation right away that stitched drawstrings are more convenient to process and you can fit the product so that a small screed is already fixed.
The fabric, as usual, is folded in half face inward, the edges are combined. Layout - "Jack" - the details are stacked in the most economical way. When laying out patterns on fabric, it is necessary to take into account the placement of rectangular parts (Fig. 2 - 3), such as cuffs and a drawstring for pulling the cord and subsequent screed of the product.
The recommended cuff width in finished form is 6 - 10 cm. The calculation of the width and length of the pattern is as follows:
 2 finished widths + 2 seam allowances
Cuff length = hem length + 2 seam allowances
The width of the drawstring, into which the lace for the product tie is inserted, in the finished form is 2 - 2,5 cm. Therefore, the width of the workpiece for the drawstring
2 finished drawstring widths + 2 seam allowances
Length of the drawstring = length of the bottom of the product + 3 cm for processing the edges + for the seams of the connection of fragments of the drawstring
Please note that the "standard" allowance of 1 - 1,2 cm is increased and an allowance for the armhole is added, which in other products is considered a violation of the cutting and sewing technology. An increase in allowances is necessary, since after stitching the part may be deformed and, in order to avoid this, after quilting, it is recommended to adjust according to patterns, taking into account the usual allowances for seams.
On fig. 2 shows the layout for small sizes, in fig. 3 - for large.
After cutting the “top”, we proceed to cutting the insulation ...
But first about how many layers of insulation to do. Insulation for "down jackets" can be of various thicknesses from 1 to 3 cm. Due to its friability, it is quite difficult to measure the thickness, so manufacturers and sellers guide the buyer by weight, you can successfully use the brand "which one you bought" if you know the nuances.
If you bought a thick insulation, if necessary, you can divide it by thickness, and double the thin one.
So, we come close to the question of the number of layers.
Thesis one: for warmth, the density, windproofness and waterproofness of the upper fabric are more important than the thickness of the insulation.
The second thesis: for warmth, it is not necessary to make a double insulation of the “top” to the bottom of the coat - a double insulation to the hips is enough.
The third thesis: for better heat retention, it is better to separately quilt the “top” with a heater and separately the “lining” and then connect it.
The fourth thesis: the closer the stitch lines, the colder the product.
Leaving the choice of the type and brand of insulation at your discretion, I summarize the above, based on my own modest experience.
For stitching the “top” in a winter jacket, we take a thin or medium-thick insulation and quilt it in one layer or two layers, with the second layer applied only to the level of the hips. If the insulation was thick, then we separate half the thickness from below to the hips and cut it off.
There may be such an option: we quilt the “top” with a thin or medium insulation in one layer, apply a second layer of thin to the hips without stitching.
 In the cuff, the insulation can also be double or single - it depends on the design and thickness of the insulation.
For stitching the lining, we take a thin and preferably warmer insulation. For example, woolen batting (not synthetic, but PURE WOOL THIN batting) or knitted woolen fabric (you can take an old downy scarf) and quilt the lining.
 As for the hood, it can be sewn with or without insulation.
Having decided on the layers of insulation, we proceed to its cutting.
Attention! We cut the insulation for the “top” according to the details of the “top”, laying out the insulation in one layer and cut it out with additional allowances of 2–3 cm. This is necessary for stitching.
We place the details of the top on the insulation in an economic way, since the shared direction does not matter (Fig. 4). Then you should fasten the details of the "top" and the insulation with tailor's pins or baste with large oblique stitches. The length of the stitches is 7 - 8 cm. The indent of the basting line from the cut of the "top" part is 3 - 7 cm.
Having outlined or pinned the “top” on the insulation, you should cut out blanks with allowances of 2–3 cm and proceed with drawing the pattern and stitching.
It is worthwhile to carefully approach the choice of marking tool and try to put a few lines on the rest of the fabric.
 It is advisable to use soap for marking with caution, as it can leave greasy marks, and chalk does not rub off well. A disappearing marker is a good option, but it also needs to be tested on the fabric.
When the stitch is completed, all the quilted details of the "top" are based on the existing patterns. When basing (in this case, when re-cutting), technological allowances for the seams should be left.
Shoulder, side seams of the shelf, semi-skid, front and elbow seams of the sleeves, collars and hood - 1 cm. Armholes, neck, sprout, okat - without allowance. Bottom - depending on the processing.
The lining is also cut out according to the adjusted parts with allowances of 2 - 3 cm, according to the details of the lining - we cut out the insulation, again adding allowances for lining and stitching. And, having quilted the lining, it needs to be based on the “top” blanks, no longer adding allowances, since they are added on these same “top” blanks.
Next, we collect the "top" and assemble the lining, the top and the hood lining - separately. If the canopy will be without insulation and you plan to hide it in the collar under the zipper, then it must be sewn completely, before the collar is turned. In other words, we sew the hood under the zipper and connect it to the “pocket” immediately after stitching.
We make pockets on the shelf.
Top pockets can be either with or without a zipper.
An example is very simple zip pocket
See how to sew a quilted lined pocket
Then, we sew the zipper to the “top”, fasten the shoulder pads, sew the drawstrings and connect the “top” with the lining. Everything!
Download this pattern pdf:
Pattern "coat-down jacket trapeze with a hood"
$2.50 (100 hryvnia)
Bank cards of the Russian Federation are not accepted for payment!
Size charts What is the height of the pattern Payment methods Ask a question Reviews
Vera Olkhovskaya in social networks:


-
Any pattern for free for a review of a previously made order
More...
Lifetime promotion for buyers of patterns!

Leave a review about my store of patterns for an order that you made before, and you will receive any paid pattern of your choice Free!
Catalog:
New patterns on the site


Most readable articles
- How to print patterns in full size on sheets of any format? Category: F.A.Q.
- Pattern of a dress for a babydoll girl Category: Dress patterns for free
- How to take measurements for sewing Category: Sewing: general questions
- How to sew a skirt without darts and without a pattern: "Tatyanka" Category: How to sew...?
- How to learn to sew from scratch at home for free? Category: F.A.Q.
- Skirt with a belt - how to sew a belt to a skirt and processing the belt when sewing a skirt for beginners Category: Waist section processing with and without belt
- How to choose a pattern size? Do Olkhovskaya patterns require a fit? Category: F.A.Q.
- Do-it-yourself parsley, Cossack and Gnome according to free patterns by Vera Olkhovskaya Category: How to sew a New Year's costume and costumes for the holidays with your own hands
New lessons and reviews
-
I sewed a boho trapeze dress size 42 according to your pattern
Category: Patterns - photos and reviews from users

-
I made two dresses with this pattern.
Category: Patterns - photos and reviews from users

-
Thanks for the fast order processing.
Category: Patterns - photos and reviews from users

-
When sewing, I slightly deepened the front neck
Category: Patterns - photos and reviews from users
