Size charts What is the height of the pattern Payment methods Ask a question Reviews
Electronic pattern for printing in full size on a home printer or plotter. Can be printed on standard sheets of paper from A4 to A0. Cutting through a digital projector is possible.
 Free download Instructions on how to sew a down jacket for a pattern
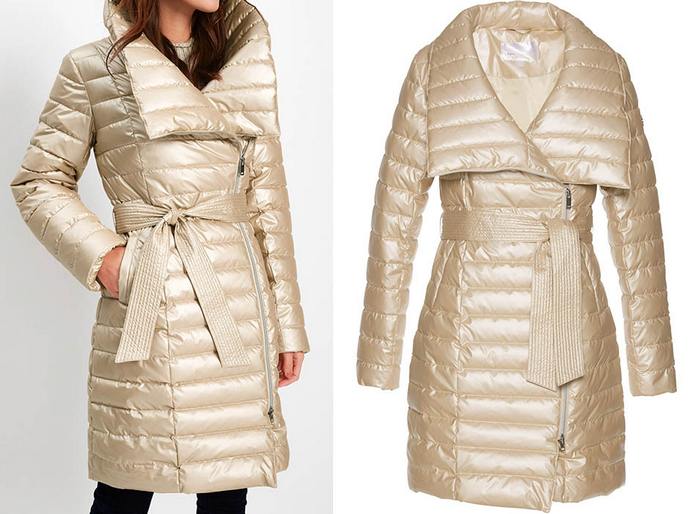
How to sew a coat pattern - do-it-yourself down jacket with a large collar and reliefs
 Contents of the instruction:
- Description of a simple coat pattern - a down jacket with a large collar and reliefs.
- What is included in the set of coat patterns and style design.
- What to sew a down jacket from and how much fabric is consumed.
- How to cut a coat according to a finished pattern - a down jacket with a hood.
- How to sew a coat - a down jacket with your own hands step by step.
1. Description of a simple coat pattern - a down jacket with a large collar and reliefs
1.1. Pattern file format and coat sewing difficulty level
 Electronic coat patterns - down jacket with a large collar and reliefs 40 - 64
Sizes: 40-52 and 52-64. The entire size range is printed from one file.
File Format: PDF full size and without seam allowances
After paying for the order, you will receive links to download two files patterns of a coat - a down jacket with a large collar and reliefs from 40 to 52 or from 52 to 64 sizes:
- PDF file A4, adapted for printing patterns on sheets of A4 paper in any program on any device, including mobile phones.
- Multi-format PDF file for printing on sheets of any size from A0 to A4 on a printer or plotter using Adobe Reader.
1.2. Coat pattern assembly scheme when printing on a home printer
For a PDF file of a coat pattern for sizes from 40 to 52:

The pattern is assembled on 1 large page of patterns from 30 sheets of A4 paper.
5 rows of 6 sheets in a row.
For a PDF file of a coat pattern for sizes from 52 to 64:
The pattern is assembled on 1 large page of patterns from 35 sheets of A4 paper.
5 rows of 7 sheets in a row.
Sewing difficulty level: professional - requires skills in cutting and sewing outerwear. The pattern is designed for individual tailoring at home on household sewing machines.
2. What is in the set of coat patterns and style design
2.1. A set of simple patterns for a coat - a down jacket with a large collar and reliefs
 (picture 1):
- Back patterns - middle part and side.
- Shelf patterns - the middle part and the barrel.
- Collar pattern.
- Two-seam sleeve patterns: upper half and lower half.
- Patterns of burlap for a welt pocket such as a leaflet or a pocket with a zipper.
Pocket parts are not included as they are rectangles. See below for cutting instructions.
Lining and selection patterns are also not required, since the lining and selection of the part are cut out according to the details of the "top".
2.2. Description of the design of the coat pattern - down jacket with a large collar and reliefs
 Reliefs are present on the back and shelf.
The relief of the back combines the shoulder and waist darts, the relief of the shelf - chest and waist.
Coat - down jacket slightly expanded to the bottom along the side and embossed seams.
The sleeve is classic two-sutural.
Collar type collar.
3. What to sew a down jacket from and how much fabric is consumed
The “top” of a down jacket is traditionally cut out of raincoat fabric, which may already be quilted in advance.
The consumption of raincoat fabric will be from 250 to 310 cm with a width of 150 cm.
Lining fabric consumption - 170 - 200 cm with the same width.
The lining fabric can also be ready-stitched.
The approximate consumption of insulation for one layer is from 280 to 350 cm with a width of 150 cm.
Please note that you can use insulation of various thicknesses and qualities. It is worth paying attention to the temperatures for which this or that insulation is intended, as well as the ability to choose a heater with wind protection.
Instructions on how to buy, how to print yourself and others
How to choose a size without using tables and taking measurements
What height are the patterns for?
How to buy a ready-made electronic pattern
How to print a pattern at home in full size on A4 sheets or on sheets of any other size
How to assemble a pattern after printing
Simple patterns dresses, sweatshirts, skirts and trousers in full size Free
 Buy and download this coat pattern - down jacket
4. How to cut a coat according to a finished pattern - a down jacket with a hood
 After choosing the size of the pattern, which depends on the thickness of the insulation, you can cut the "top" (picture 2).
If you are going to quilt the down jacket yourself, then it is better to cut it with a small margin and increase the standard allowances by 1 cm. This is necessary in order to cut the part again after stitching, already with the usual allowances.
So, if the seam allowance is 1 cm sufficient for sewing, then when self-quilting with subsequent shaping, it should be increased to 2 cm. As always, cuts of armholes, necklines and roundings fall into exceptions - they are without allowances, respectively, for stitching increase them to 1 cm. On the bottom - 4 cm or 5 cm.
If the fabric of the “top” is already quilted, then we cut it with the usual allowances - 1 cm, do not add allowances along the armholes, neck and hem, and 4 cm along the bottom.
On the 2 drawing an example layout is shown.
Pay attention - we cut out the selection according to the pattern of the middle part of the shelf.
The upper collar is the middle line on the fold of the fabric, and the lower one so that all cuts are oblique.
Details of the leaflet pocket can be trimmed later - after quilting the "top" and basing the quilted details.
Width of the leaf in cutting = 2 width of the leaf in finished form + 2 cm
The length of the leaf in the cut = the length of the leaf in finished form + 4 cm (it is more convenient to process it this way, then cut off the excess)
Width of the gap in the cut = the width of the leaflet in finished form + 2 cm
The length of the gap in the cut = the length of the leaf in the cut
After cutting the details of the top, notches should be made along the waist and along the highest point of the sleeve eye, mark the semi-skid with a thread.
The pocket can be marked immediately or on fitting - as desired.
Belt - a strip of fabric up to 150 cm long.
Belt width in cutting = 2 widths in finished form + 2 cm
 We cut out the details of the lining with the same allowances as the details of the "top" (picture 3). If you are quilting, then it is also desirable to increase the seam allowances.
The lined pocket is a rectangle with one rounded edge, since one of its vertical sides must enter the seam of the relief.
After cutting the "upper" and "lower" layers of the down jacket, you can cut out the insulation.
But at home, with individual tailoring, when cutting with flooring is excluded, this process includes preliminary basting with large stitches of cut details on the insulation.
The cut is pre-ironed and laid out on a heater in the most economical way - the share is not respected. The details of the cut should be secured with pins, and preferably with large oblique stitches (7 - 8 cm), and then cut out with a margin of 2 cm.
An example of cutting insulation shown on 4 drawing in the description of the model "Coat - down jacket trapeze with a hood".
5. How to sew a coat - a down jacket with your own hands step by step
- Stitch the details of the "top" and, if necessary, the details of the lining with insulation.
- After stitching, trim (cut) the quilted blanks according to the patterns, leaving standard allowances for the seams.
- Cut out the details of the pockets, attach a heater to them with 1 - 2 lines or quilt.
- Collect the "top" with the top collar. Lightning is sewn between the sections of the left relief and to the starboard side. Make shoulder pads from insulation. Sleeves (top) should also be processed.
- After that, the down jacket can be tried on with shoulder pads and, if necessary, adjust the armhole, mark the junction points of the sleeve and armhole, tuck in and sew.
- Process leaflets or a pocket with a zipper.
How to handle leaves...
How to make a pocket with a zipper... - Assemble the lining with the hem and lower collar. You will need a hole in the seam of the sleeve for a clean connection between the "top" and the lining.
- Work on a lined pocket...
- Connect the lining and the "top" of the down jacket along the edge of the side and along the cut of the collar, then along the bottom of the product and along the bottom of the sleeves.
Download this pattern pdf:
Coat patterns - down jacket with a large collar and reliefs
$2.50 (100 hryvnia)
Bank cards of the Russian Federation are not accepted for payment!
Size charts What is the height of the pattern Payment methods Ask a question Reviews
Vera Olkhovskaya in social networks:


-
Any pattern for free for a review of a previously made order
More...
Lifetime promotion for buyers of patterns!

Leave a review about my store of patterns for an order that you made before, and you will receive any paid pattern of your choice Free!
Catalog:
New patterns on the site


Most readable articles
- How to print patterns in full size on sheets of any format? Category: F.A.Q.
- Pattern of a dress for a babydoll girl Category: Dress patterns for free
- How to take measurements for sewing Category: Sewing: general questions
- How to sew a skirt without darts and without a pattern: "Tatyanka" Category: How to sew...?
- How to learn to sew from scratch at home for free? Category: F.A.Q.
- Skirt with a belt - how to sew a belt to a skirt and processing the belt when sewing a skirt for beginners Category: Waist section processing with and without belt
- How to choose a pattern size? Do Olkhovskaya patterns require a fit? Category: F.A.Q.
- Do-it-yourself parsley, Cossack and Gnome according to free patterns by Vera Olkhovskaya Category: How to sew a New Year's costume and costumes for the holidays with your own hands
New lessons and reviews
-
I sewed a boho trapeze dress size 42 according to your pattern
Category: Patterns - photos and reviews from users

-
I made two dresses with this pattern.
Category: Patterns - photos and reviews from users

-
Thanks for the fast order processing.
Category: Patterns - photos and reviews from users

-
When sewing, I slightly deepened the front neck
Category: Patterns - photos and reviews from users
