Vera Olkhovskaya
As mentioned above, we start processing the belt when the fastener is ready.
In addition to the two parts (halves) of the belt, we need a corsage ribbon, ready-made belt loops and, if the trousers are sewn on a figure with a protruding belly, a loop for the peg.
For the dimensions of the waistband and belt loops, see the section “What small parts are needed to process trousers”.
So, the cut out details of the belt should be duplicated with a special adhesive tape (tape) for the belt or with an ordinary doubler.
The width of the dubbing, in this case, should be 2 cm narrower than the part of the belt (Fig. 29).
That is, dubbing should deviate from the long sections of the belt by 1 cm. This is necessary in order to iron one of the allowances.
Making belt loops
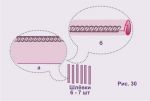
Overcast one of the cuts of the workpiece (Fig. 30 a), fold the workpiece as shown in fig. 30 b and continue with the front side one or two lines.
After that, the workpiece is ironed and cut into the required number of pieces of the required length.
The width of the blank depends on the style and desire. One of the best options is 3 cm.
The length of the loop is:
Finished belt width + 4 cm
If send Vki are made by turning (grinding the edges and turning out), then you can cut the workpiece into pieces before processing, so that it is easier to turn inside out later.
And in any case, ready-made belt loops should be ironed.
When the details of the belt and belt loops are prepared properly, you can proceed directly to connecting them with trousers.
Let me remind you that by this moment the readiness of the product should be as follows: the side and step seams are stitched and ironed, the fastener is made, the seat cut is NOT stitched and NOT swept, but swept over on an overlock or in another way (Fig. 31).
Loops are attached to the waist section of the trousers (Fig. 31)
- to the place of the first fold or tuck, which goes into the ironing line;
- on the side seam;
- between the darts of the RFP, approximately in the middle of the pocket;
- the last, seventh loop is attached after fitting to the seam of the seat.
Loops can be sewn with one solid line - a line on the left half, a line on the right half.
 But, in lu
 otherwise, each belt loop must be carefully secured.
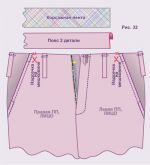
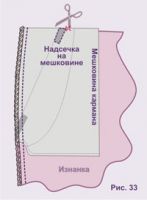
The next operation is a notch on the burlap (Fig. 32, 33).
Notch length 0,7 - 1 cm, location - near the top fastening of the pocket.
It is carried out vertically, parallel to the fastener, while both layers of burlap are captured.
This notch allows for more wear-resistant processing of the belt.
After making a notch on the burlap, you can proceed to stitching the belt.
Attaching a waistband to pants
So, we sew the halves of the belt, cut out of the “top” fabric and duplicated, as shown in Fig. 29.
Trouser patterns
To do this, fold the half of the belt with the half of the trousers face to face, combining the top cut of the half of the trousers and the unfinished section of the belt.
Please note that the belt in classic men's trousers should extend 6 - 8 cm beyond the fastener, so that the so-called transitional part can be made later.
And, most importantly: burlap SHOULD NOT fall under the belt.
To fulfill this main condition, we made a notch on the burlap.
 It is the failure of the burlap under the belt (it will only fall under the corsage) that will provide your trousers with additional strength: the belt will not come off from the weight of the filled pockets.
If anything comes off, it will be a corsage.
But in this case, the repair will take less time, since nothing will need to be ripped apart.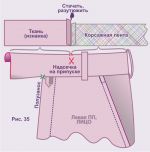
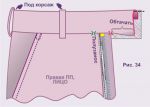
Of course, the same operation of attaching the belt is repeated with the second half of the trousers and the second half of the belt. See the result in Fig. 34, 35.
After stitching the details of the belt, stitch the free ends of the belt loops to them.
It should be stitched directly to the ironed allowance and in such a way that the belt loops form an overlap of 0,5 - 0,7 cm.
This is clearly seen on the loop in the side seam in fig. 34 and 35.
Of course, beginners can pre-sweep belt loops with the desired overlap.
Processing the wrong side of the belt of trousers
When the belt loops are fixed, we sew the corsage, that is, we process the wrong side of the belt.
The bodice is superimposed on the ironed allowance with an indent from the ironing line by 0,1 - 0,2 cm towards the cut edge and adjusted.
This is what we do with the right half of the trousers (Fig. 34), and for the left half, you must first sew a small, 12–15 cm, rectangle of fabric to the corsage, equal in width to the belt blank (Fig. 35).
Then, the stitching seam is ironed out and the workpiece is stitched to the ironed belt allowance.
For ease of processing, a notch can be made on the ironed allowance (from the inside).
 And, in conclusion, the ends of the belt should be turned. The left end is more demanding than the right end.
The right end of the belt is first turned only from below (Fig. 36), then turned inside out, ironed and folded along the face inwards, as shown in the figure.
The free end is sewn up, while the line is parallel to the open cuts (loops, clasp).
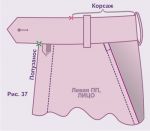 The stitched end is turned inside out, ironed and hemmed.
The result is shown in the bubble in Fig. 36.
The left end of the belt is turned like a strap, that is, according to the markings at the end.
There are unstitched sections of the corsage on each side.
Beginners can take them.
Attaching is done from the face and the loops are bent towards the belt.
After ironing, loops are sewn at both ends of the belt, preferably with an eye, and buttons “for 4 punctures” are sewn on.
The last operations before trying on are overcasting the ends of the belt from the side of the seam of the seat and removing the basting threads.







 Join my community on Viber...


