Vera Olkhovskaya
This chapter gives a detailed description of the creation of patterns of a skirt from four figured wedges with a low waist and two styles of cropped trousers - breeches with a belt and breeches "combi". Pants are also given with a detailed description of the construction of the drawings.
In addition, the features of sewing and cutting waist products with a low waist are considered, which will undoubtedly be of interest to home couturiers and novice fashion designers who want to create patterns for women's clothing on their own.
The chapter begins with a brief description of the rules (patterns) that determine the visual proportions of the figure.
And further in this passage, a skirt of four figured wedges with a low waist is considered ...
Belt products
Having studied the types of figures, let's move on to considering the proportions of clothes that change the visual impression of the figure. In this chapter, we will focus on belt products.
If we summarize everything that will be said below, then we can identify a number of patterns that determine the visible proportions. Please note: "apparent" proportions can often distort real ones.
So, first rule and most importantly:
Low-lying coquettes, belts and pockets visually shorten the legs. Accordingly, the relatively high location of these parts, as well as the overestimation of the waist or the upper cut of the waist product, lengthens the legs.
Second Rule:
Short blouses and tops that do not reach the waist visually lengthen the legs. Therefore, jumpsuits or turtlenecks tucked into a skirt or trousers have the opposite effect, of course, if the waist of the belt products is understated. In other words, the lengths and proportions of all parts of the costume affect the perception of the proportions of the figure.
Rule three:
The length of the skirt and trousers should be chosen carefully. Brachymorphic figures in most cases should avoid "medium" lengths.
Rule four:
Blouses of large volume and length (up to the inguinal fold) - shorten the legs.
Rule fifth:
Fanciful bends, constructive lines and other non-standard solutions in most cases give the figure heaviness and distort the perception of true proportions for the worse.
In this chapter, we will not talk about the correction of perception due to the height of the heel and the presence of a platform, since every woman knows that a high elegant heel will make her legs longer, and all kinds of ankle straps will make her shorter.
Before proceeding to the description of the models, let us dwell on the issue of the length of the products. As you know, in fashion magazines there are only three concepts of length: "mini", "midi" and "maxi". I did not find reasonable definitions for these values, therefore, I offer my own.
Definition of maxi, midi, mini
The concept of the length of clothes is associated with etiquette and decency, that is, the word that determines the length of a skirt, trousers or dress tells us which part of the lady’s legs is covered by clothes.
“Legs” in this case is the distance from the inguinal fold to the floor level, and it does not matter what the height of the heel is. When determining the length of the product, the heel is included in the "leg length". This implies:
"Maxi" - the legs are completely closed.
"Midi" (middle) - the legs are closed half the length, that is, up to the knee.
The definition of the concept of "mini" cannot be so unambiguous, since it is more related to national culture, social taboos and permissibility for certain groups. But, based on the fact that society continues to move towards the emancipation of women and sexual freedom, the definition of the minimum length can be proposed as follows.
"Mini" - the legs are completely open, the bottom of the product is located 2 to 4 fingers below the subgluteal or inguinal fold.
Based on the foregoing, and taking the length of the legs as a “unit”, the intermediate lengths can be called as follows: the length reaching the middle of the lower leg is “three quarters”, to the ankle is “nine tenths”, and to the middle of the thigh is “one quarter”.
Low-waisted XNUMX-piece pleated skirt
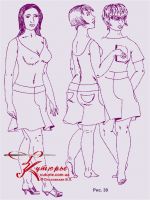
Consider Fig. 30. The leftmost figure depicted on it is clearly of a dolichomorphic type. That's why she looks 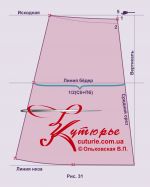 proportional, despite the low waist, wide belt and tucked-in shirt.
The middle figure belongs to the brachymorph type: the buttocks are low and the length of the legs is less than three heads. A clear example of the wrong selection of clothing proportions.
The figure on the right has the same proportions as the middle one, but the wide belt raises the waist and therefore the figure looks long-legged.
As for the shape of the individual wedges of the presented model of the skirt, it contains one secret: the perception can be corrected by changing the proportions of the curly side of the wedge. That is, if the corner that completes the bend is located higher than in the middle of the wedge, then the legs will appear longer.
The model is cut using patterns.
Basis pretty simple. We begin its construction from top to bottom with horizontal lines: the original, hips and bottom. As shown in fig. 31.
Draw a line across the top of the paper. Let's call it original. To find the line of the hips from the original horizontal, lay down 18-19 see and again from the original down DI + 3 cmto draw the level of the bottom.
Note 1 for newbies. The initial horizontal may coincide with the top horizontal cut of the paper and, if the corner of the sheet is straight, then the vertical line may coincide with the vertical cut of the sheet.
Then, strictly perpendicular to the horizontal lines, draw a vertical line at the right edge of the sheet on which the pattern is made. This will be the only vertical in the drawing.
From the top of the right angle formed by the vertical and the original horizontal, set aside 5 - 7 cm. Connect the resulting point to the top of the right angle formed by the vertical and the bottom line. This is the middle section of the wedge.
The width of the skirt along the hips is calculated by the formula:
1/2(Sat + Fri)
Of course, the value obtained should be postponed along the line of the hips from its intersection with the inclined midline.
And the width of the skirt at the waist - at the level of the waist:
1/2St + 0,5cm
Connect the points obtained along the lines of the waist and hips with an inclined straight line - this is the side cut of the wedge.
Waist cut. For a better fit, shorten the midsection of the wedge by 2 см for front wedges and on 1 см - for the rear. Points "1" and "2" connect smoothly with the top point of the side cut.
Note 2 for newbies. In practice, in order to save time and materials, both options for cutting the waist are applied to the drawing. First, wedges are cut along the upper cut, that is, along the waist cut of the rear wedge, the pattern is adjusted and the front wedges are cut. But for this model, all four wedges should be made of paper.
After the performed operations, it remains to equalize the lengths of the side and middle sections. To do this, measure the length of the middle cut from point "1" (the middle point along the waist of the rear wedge) to the bottom and set aside its value along the side cut from the highest point.
bottom cut coincides with the horizontal of the bottom in the area from the middle cut to the middle of the wedge and smoothly bends from the middle to the side cut.
1 Tip: if the difference between St and Sat is greater 10 см, then the formula for the width of the wedge at the waist may look like this:
In this case, you can place a tuck on each wedge or two tucks only on the back wedge if the buttocks protrude too much or the lumbar deflection is too large.
With a deflection in the sacrum, the middle seam of the back wedge can be slightly bent, but this is best done at the fitting.
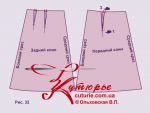
If darts are needed, divide the waist segment of the wedge in half (Fig. 32).
To build one tuck, step back from the division point towards the side cut 3 - 5 cm and draw the middle line of the tuck with a length 8 -10 cm. Tilt the top of the tuck to 0,7 - 1 cm towards the side seam. Measure the tuck solution along the cut of the waist in half on both sides of the middle line of the tuck. Draw the tuck with smooth lines and level the sides.
If there are two tucks, then the middle line of the first tuck starts from the midpoint of the waist cut, the middle line of the second tuck divides half of the waist cut in half again. Pay attention to the fact that the tucks are fan-shaped and their tops are marked with horizontal lines.
Don't forget to check, especially if you are making patterns with darts: fold all the waist pieces of the front and back wedge, excluding the gaps of the darts. The sum of the lengths of these segments should be equal to st + 1cm.
wedge bend. To simplify the task, we will attach a bend shape to one of the wedges, and then add the same to each.
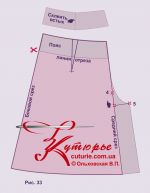 Divide the middle or side seam of one of the wedges in half and back up from the dividing point by 4 - 5 cm (Fig. 33). Return to the midpoint again and build from it a segment perpendicular to the cut line with a length 5 см. Up from the "five" there is a curve, smoothly turning into the middle line of the wedge, and down - a straight line parallel to the same middle line.
After that, cut out four parts of the wedge bend (the bend part is marked in gray in Fig. 33) and butt them with adhesive tape to each of the warp wedges on the corresponding side (Fig. 34).
Belt for low waist is not a rectangle, like a belt located at waist level.
To cut it, you need to circle the top of the front and rear wedges. If a tuck is built on the wedge, then, after cutting, glue the pieces of the belt pattern butt-to-butt with adhesive tape (Fig. 33).
Note 3. In fact, the belt for a low-waisted skirt is a duplicated facing, which 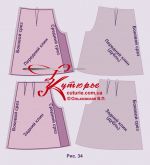 is laid inside out on the wrong side of the product and turned. At the same time, the lower edge of the facing is folded over, swept up, ironed and adjusted to the “face”.
To process the upper cut with a facing, it is laid on the wrong side of the skirt upside down and turned.
Seam allowances. We have already added to the hem and base of the bottom, so we cut the lower cut beyond the line. It remains to add to the rest of the seams, including the details of the belt along 1 or by 1,5 см. If the waist does not drop, then the waist cut is cut out beyond the line, above the darts - "houses". Exceptions will be seams with bends: the amount of their allowance depends on the method of processing.
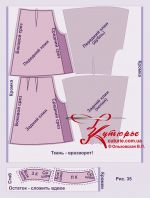 Layout is performed on the wrong side of the fabric, while the fabric is laid in one layer, the edge is aligned with one of the edges of the table (Fig. 35). The share thread is located along the parts, but is the same for all wedges. The butt joint lines of the wedges of the warp and the bend details (they are gray) should be transferred to the cut details. They will help to accurately complete the assembly. It is very important not to turn the patterns over like pancakes.
Rule 6. If the fabric is not folded in half when cutting, all the patterns are laid with the inscriptions up.
Rule 7. The dubbing of facings is strictly congruent to the pattern of the duplicated part. That is, the dubbing part repeats the outlines of the duplicated part, but without seam allowances.
Belts cut out 4 parts. Therefore, in order to reduce the time spent, you can first cut out the wedges, and fold the rest of the fabric in half and cut out the belt wedges according to the same patterns. Do not forget to sign which wedge the belt part belongs to and where it has side and middle seams.
Methods for processing seams with a bend.
 Overlay with an open cut: The seam with bends is overcast with a wide three-thread overlock stitch or edged with bias tape. The cut prepared in this way is superimposed on the straight cut of the same name (for example, middle seam left front wedge with a bend superimposed on the right middle seam front wedge without bending) and adjustable. In this case, no allowance is needed for the curved seam at all.
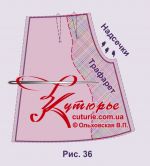
- Consignment note with a closed cut. For this processing method, the allowance will be 1 - 1 cm. The peculiarity of this type of processing is that a stencil is cut out of thick cardboard (Fig. 36), which very accurately repeats the contour of the ironed seam. Then, a wedge with pre-overcast side and middle seams is placed on an ironing place, a cardboard stencil is placed on it at a distance of the allowance from the edge. If necessary, the allowance is moistened and, having bent, ironed.
2 Tip. In order for the ironed allowance to lie well in the bend area, it must be cut, depending on the width on 0,7 - 1 cm, that is, without cutting to the bend line 0,2 - 0,3 cm.
 Overlay the parts on top of each other for connection should be, aligning the straight line of the seam with the straight line that you transferred to the cut parts.
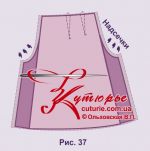
- Stitch seam with a warehouse: allowances are normal, but the bend detail is added on both sides of the wedge (fig. 37). The pre-overcast seam is ground to the bottom, exactly following the contour of the seam. Then the upper part of the seam is ironed out before the beginning of the bend, the corner is turned inside out, the bending allowance is notched, swept out with a piping from the upper part and pressed. The butt joint lines of the wedges of the base and the bending details are combined and swept away, the finished slot is bent and placed on the wedge, which is to the left of the seam. It remains to iron and fasten it. The layout for this method is different: the fabric is folded in half for all the details.
- Seam with open slot involves the most complex processing, therefore it is not recommended for amateurs.




 Join my community on Viber...


