
Vera Olkhovskaya
Continuation of the chapter that tells about the features of cutting skirts and trousers for figures with different leg lengths.
The patterns that determine the visual proportions of the figure, and the creation of a skirt pattern from curly wedges are discussed in the previous passage.
Below you can find the construction of a base pattern for tight-fitting cropped trousers (breeches) with a low waist. The cutting of small details is shown in detail: classic "denim" pockets "rounded cutting barrels" and patch pockets. And also with the modeling of trousers and the features of the technology of their tailoring ...
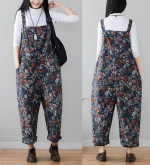
Belted breeches
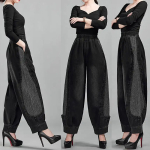
The breeches on the left figure (fig. 38) do not emphasize the length of the legs: the waist is understated, the belt is very wide, the length is “midi”, the shoes are quite high and visually “cut off” the legs. But, since this girl belongs to the dolichomorphic type, she does not have to think about the length of her legs.
The figure on the right is of a mesomorphic type: the length of the legs is 3 heads, the body is less than three heads, the arms are of moderate length. The model on this girl is classic. That is, horizontal pockets in front, coquettes in the back. By lowering the waist and a wide belt, pockets and yokes are shifted down. The "average" length, as mentioned at the beginning of Chapter 5, also does not contribute to the visual lengthening of the legs, so the figure is perceived as brachymorphic. To correct the impression and look long-legged, this girl had to at least lengthen her trousers to the middle of the lower leg and abandon the wide belt or pockets. But it would look even better on her full-length trousers with a high waist.
Both models shown in Fig. 38 should be made from a heavy stretch fabric such as stretch denim or stretch corduroy. But let's leave boring advice and clarifications. Let's move on to better trouser baseon which these models are made.
The peculiarity of the construction of the drawing of trousers, both women's and men's, is that the RFP is built directly on the PP. In models made of dense stretch fabric, special attention should be paid to the accuracy of taking measurements. According to the description of this basis, you can cut trousers and breeches of any length using patterns and without them, but if you have little experience, it is better to choose pattern cutting.
Tip 3. If you cut directly on the fabric, decide on the length of the product before buying a cut.
Note 4. Fabric consumption for breeches and other trousers is calculated as follows: for a small size (Sat no more than 50 cm) at the fabric width 1 m 40 см, the consumption is equal to: length of breeches (trousers) + 12 cm.
RџSЂRё Sat up to 58 cm consumption increases: db + 18 cm.
For Sat over 58 cm consumption will be one and a half or two lengths of the product.
 We start cutting by folding the fabric along, combining the edges and placing them parallel to the edge of the table where the cutter works (Fig. 39). Paper, of course, should not be bent. One of the cuts should be grounded, that is, trimmed. In this case, not only the evenness of the line is important, but also the right angle formed between the edges with a basic cut.
Building PP, as in a skirt, we start with horizontal lines. Draw a waist line (horizontal "T") on 1 см down from the base cut. Down from it, set aside the measurement Total and draw a horizontal line. This is the seat line (or the level of the buttocks - the horizontal "I").
The line of the hips (horizontal "B") in trousers is up from the line of the seat at a distance
1/3TYA or 1/3Sun
Now let's calculate the position of the level of the knee ("K"). Measure from the waist down the full length of the trousers, which is measured from the waist to the level of the floor (or the level of the heel, that is, to its highest point), draw a horizontal line of the bottom ("H") and halve the distance between the level of the hips and the level of the full length. Please note that the bottom horizontal line in the figure is below the conditional edge of the paper (fabric). From the received division point, rise to 5 см up and get the knee level.
BC = 1/2BN + 5 cm
So, the capital letters T, B, I, K denote the names of the horizontal lines of the drawing (waist, hips, buttocks, knees). The letter "H" is the level of the bottom or full length, which we will no longer use.
PP width along the hips
1/2 Sat (for stretch) or
1/2(Sat + Fri), where Pb \u2d XNUMX cm (for other fabrics)
Step Width
0,1Sat - stretch or
0,1(Sat+Pb) - other fabrics
To the right of the cut of paper (edges of the fabric), set aside the width of the step and draw a vertical parallel to it, and from the point of intersection of this vertical with the line of the hips, again to the right, set aside the width of the PP along the hips.
Bow tilt. From the point of intersection of the same vertical with the waist line, measure towards the main construction 1-1,5 cm and up 0,5 - 1 cm. This is the highest point of the bow, in the drawing it is indicated by a cross. In the bow corner, located at the intersection of the vertical with the line of the buttocks, build a bisector with a length 2 cm. Draw a bow cut with a smooth concave line.
To determine the location of the ironing line (the middle vertical of the PP structure), you need to add the values of the width of the PP and the step width and divide this sum in half:
1/2 (step width + PP width at the hips)
4 Tip: in order not to perform calculations on finding the ironing line, measure the length of the pitch segments and the width of the PP sequentially according to the drawing, that is, start measuring the width of the PP at the point of the centimeter tape where the measurement of the pitch segment ended. Then fold the measuring tape in half.
Definition 2: ironing line - the line of symmetry of the PP trousers is needed, first of all, for the correct orientation of parts on the fabric.
Rule 8: the share thread of the PP should be located strictly along the ironing line, the share thread of the ZP can be located at an angle to the ironing line, but the angle should not exceed 50.
Set aside the value obtained as a result of calculations using the last formula or measurements (tip 4) from the edge to the middle of the drawing and draw a vertical line strictly parallel to the edge and intersecting with all horizontal lines.
After that, calculate the width of the PP at the waist
1/2st + tuckWhere tuck = 2 cm
Set aside the resulting value from the highest point of the bow "1" towards the main building. Cut the waist and build a tuck, the middle line of which coincides with the ironing line.
Connect the side points of the waist and hips, shape the bulge 0,5 см.
On the knee line on both sides of the ironing line, measure
1/2(ok+pc) minus 1cmWhere Ok - knee circumference, and PC - an increase in the knee.
5 Tip: To avoid confusion and mistakes, simply measure the width of your favorite trousers at the knee level. Divide it by two and subtract 1 см.
1/2 ok minus 1 cm
Lateral points of the knee and hips (BC) connect with deflections 0,3 и 0,7 см, while the upper third of the above segment has a deflection 0,3 см outward, and its lower two-thirds - deflection 0,7 - 1 cm inside.
Connect the remaining step points (YK) with the deflection 2 -2,5 cm.
See video tutorial for cutting PP trousers on fabric


Construction of the RFP
 Cut out the PP pattern and lay it on the paper, as shown in fig. 40, while from the lateral femoral point to the cut of the paper there should be at least 0,1Sb minus 1 cm, this is usually 4 - 6 cm.
If you cut immediately on the fabric, add seam allowances to the PP: to the side and step - according to 1 см, to the bottom - 3 - 3,5 cm, cut out the waist for the line, bow - 0,5 - 0,7cm at the bottom and for processing the fastener - 3 см.
Circle the PP, excluding allowances and you can start building the RFP (Fig. 41).
The width of the SP along the knee line exceeds the width of the PP by 2 см. Set aside by 1 см on each side of the wrap  PP at the level of the knee.
From the side point of the hip line PP to the right, measure
0,1Sb minus 2 for stretch or
0,1(Sat + Pb) minus 2 for other fabrics
Connect the resulting point along the hips and the side point of the knee line and extend to the waist line. Side cuts PP and ZP equalize. On the area from the knee to the hips, make a deflection 0,7-1 cm.
Calculate the step width of the RFP:
1/4 Sat minus 2 for stretch or
1/4(Sat + Pb) minus 2 for other fabrics
Set aside the result from the top of the seat angle, which coincides with the corner of the bow of the circled PP, to the left. Connect the resulting point with the stepping point at the level of the knee and draw a deflection in 2,5 - 3 cm in the area from the buttocks to the knee. Then the lengths of the already curved step segments of the PP and ZP must be equalized.
Attention: the vertex of the seat angle of the SR in the drawing of this model coincides with the vertex of the bow corner of the PP. In other designs of shorts or trousers, the tops of these corners may not match.
Note 5. Very often, when constructing a ZP in a patternless way, several centimeters of the fabric width are not enough to accommodate the entire part. "Sacrifice" is the corner formed by the crotch seam and the seam of the seat. The easiest way to make an additional stitch to the RFP is to place a piece of paper under the fold of the fabric and draw on it a section of the drawing that does not fit on the fabric. At the same time, under the fabric, the sheet should go to double the width of the seam allowance, that is, to 2 смso that when the whole half with allowances is cut out, nothing should be added to the additional stitch, but simply circle it on a comfortable lunge, keeping the direction of the shared thread.
 Rule 9. The length of the attachment must not exceed 18 см.
The width of the RFP along the line of the hips (Fig. 42)
Sat minus PP width
It is postponed from the lateral femoral point of the RFP towards the construction. From the obtained point, a perpendicular segment with a height is restored
0,1Sb - 1,5 cm
The lateral point of the hips of the RFP and the newly obtained point form the line of the hips for the RFP.
To build a section of the seat, connect the femoral point along the line of the seat and the top of the corner of the seat. Extend the line up. Measure according to the PP the distance from the waist to the hips along the cut of the bow and set it aside along the cut of the seat from the newly formed point of the hips.
From the step angle, draw a bisector of length 2 см. Now decorate the sections of the seat and waist. Waist Width
(St: 2) + vytwhere is the tuck 2-3 cm
It is possible to build two tucks according to 1 or by 2 смif the buttocks protrude strongly.
Make the missing section of the side cut of the RFP with a deflection 0,7-1 cm.
 Seam allowances for RFP: side and step - by 1 см, bottom - 3 - 3,5 cm, waist - behind the line, seat - the width of the allowance is uneven - from 0,5 - to 3 cm (Fig. 43).
Waist drop
If you have little sewing experience, it is better to perform a fitting. Having put on a suitably prepared product, you just need to bend it so that the top line takes the desired position. Mark all the adjustments on the product and, if you cut with patterns, make changes to the patterns.
The technique of this operation is simple, but, given the peculiarities of the female figure, the lowering of the waist should not be uniform. The greatest understatement is best done along the bow, and the smallest - along the seat, especially if the buttocks are strongly protruding. An approximate version of the underestimation of the waist cut, see fig. 44.  When the drop line is ready, on the product, make a cut above it by 1 - 1,2 cm, and on the patterns - exactly on it.
See video tutorial about how to cut the RFP on the fabric
Belt cut out after the upper cut of the product is corrected. This detail can be cut according to the product or according to the patterns. If you have little experience, the second option will be the best.
The following describes the variant of working with patterns, since the undercut for the product requires a “live” display.
As you can see in fig. 38, the belt can expand (drawing in Fig. 44 a) or be the same width throughout its entire length (drawing in Fig. 44 b). After determining the contours, the details of the belts can be cut off from the patterns, the tucks on them can be closed, gluing the parts of the patterns end-to-end with adhesive tape. The belt is cut according to the same patterns, only wider by 0,5 - 7 cm and longer 15 - 20 cm.
Note 6. Belts for a low waist are essentially facings that process the upper cut of the product, but in about Unlike other facings (for example, used to process the neck or armholes), they remain on the front side of the product, while the wrong side is “clean”.
If you process the cut of the breeches with a piping belt, it is important that there is no confusion: the waist has been lowered - and no more lowering! The details of the piping belt follow the contours of the low waist section and the top of the side and crotch seams.
After closed darts, the expanding belt (model on the left) needs to be unmodeled (Fig. 45). To do this, fold both parts of the belt end-to-end and circle the top section, then move it down two widths and circle the bottom section. The side dots connect smoothly.
Pockets (model on the right) "Cut-off barrels" for low-waisted jeans are best made decorative. We transfer the PP tuck to the pocket line, of course, if there is something left to transfer after lowering the waist.
Coquette. If we turn to the history of jeans, then the coquette initially performed only economic and technological functions. Thanks to this detail, the cost of the product was reduced by 4 - 5 cm and tucks on the RFP were excluded, while the fit did not deteriorate. Modern fashion uses the yoke primarily as a decorative detail.
Council 6. The ends of the seams of the yoke of the RFP and the pockets of the “cut-off barrels” should not “meet”. Otherwise, the side seam will have an undesirable thickness in the place where extra centimeters are most undesirable (fig. 46).
Layout shown in fig. 47.
См. также video master class on the processing of pockets such as "rounded cutting barrels" and one more video master class on patch pockets.


