Vera Olkhovskaya
Sleeve patterns cause the greatest excitement among novice couturiers, since it is believed that it is the sleeve pattern that provides 100% success in tucking it in and processing the armhole.
This chapter discusses the construction of drawings of the most common patterns of sleeves that are available for understanding and mastering by novice tailors.
This is a straight sleeve that serves as a baseline for most sleeves and an excellent base for subsequent sleeves. Modeling.
In its "pure form" this sleeve is suitable for women's blouses and dresses.
See the pattern of the dress "case
Embossed sleeve - designed on the basis of a straight sleeve and is great for a coat. As an example, see
 The pattern of a two-seam classic sleeve is suitable for both women's and men's outerwear, especially for jackets and jackets.
And the last sleeve pattern-base is suitable for clothes of large sizes and owners of disproportionately full hands. It is performed by measuring Op (shoulder coverage).
(see how to take measurements and decipher their designations)
So, if you want to have patterns for free and use them without adjustments and alterations, then you will have to learn how to make them yourself ...
Sleeve straight
 First, let's determine the height of the eyelet, which is equal to the arithmetic mean of the heights of the armholes of the front and back. From the value obtained, you need to subtract 1-2 cm (Fig. 22 a).
To avoid confusion: the okat line is a curve along which the sleeve is tucked in and sewn into the armhole (Fig. 22 b). All other lines are straight. By tradition, we will call the upper horizontal the initial one (Fig. 23). Set aside from the original down
eye height minus 2 cm
Let's draw another horizontal line. Let's call it the eye level. It is extremely easy to calculate the level of the bottom - down from the original one should postpone the measurement Dr..
Let's move on to the verticals. The first of them passes through the middle of the construction - the middle line, the next two limit the sleeve in width and are called the front and elbow sections. Merck Shr is deposited in half in each direction from the midline at the level of the circle. The two remaining verticals also carry a very important structural load - the sleeve bends along them. Hence the name - front roll line и elbow roll line. They are located at an equal distance from the middle line and the lines of the anterior and ulnar sections.
Now let's start designing the curve of the eye. To do this, we outline several auxiliary points (Fig. 24). On the line of the elbow roll up from the level of the eyelet, we set aside 5-6 cm and construct a perpendicular to it of length 3,5 см. Along the line of the front roll from the level of the roll up - 4-5 cm. The next two points will be on the original line. The first point, marked with a cross, bisects the distance from the middle to the elbow roll, and the second bisects the segment from the middle to the front roll.
We connect the obtained points with auxiliary segments. You will get a broken circle.
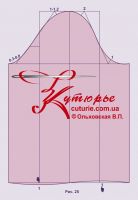
Let's move on to the next picture (Fig. 25). From the vertices formed on the original line of obtuse angles, we draw bisectors of length 1 и 2 см. This is for the top fold. For deflections of the lower roll: from the corner on the side of the front roll - a bisector 1 см, from the corner adjacent to the elbow cut - 0,3-0,8 see. After that, we will issue an okat.
The bottom line is also a curve. For its design, the front roll is shortened by 1 см and lengthen the elbow by the same amount. The base is ready.
Embossed sleeve
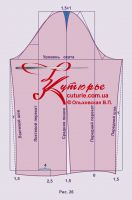
Build the base of the straight sleeve on paper without making a bottom line. Then, from the midline, build the bottom tuck (Fig. 26). To do this, horizontally from the bottom towards the front roll, set aside 1,5 - 2 cm. tuck length - 1/2 dr.
Along the okat, you should also draw a tuck with a width 2,5 см, turning into relief. Of these 2,5 см in the direction of the front half of the sleeve, set aside 1,5 см, 1 см towards the elbow. Dart length 9 - 11 cm.
The sleeve width at the bottom is equal to the desired width plus 1,5 or 2 смthat you used for the bottom tuck:
The difference between the desired and available sleeve width is divided in half and set aside horizontally at the bottom. The resulting points are connected to the side points according to the level of the circle with a deflection 1 см and lengthen to 1,5 см way down. The bottom line is drawn smoothly through the lowest point, which is shifted from the elbow roll to the middle by 4 см and lowered to 2,5 см, while leaving the front roll at "zero".
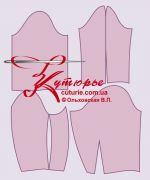
The template is cut into two parts through the tops of the tucks.
Note 19. This base can be used for figures with large arms without cutting it along the relief line. A dart along the collar in this case will help get rid of the excess fit and, therefore, the need to deepen the armhole. It is very important not to deepen the armhole too much, as a deep armhole will make it difficult to raise your arms.
Double seam sleeve
This type of sleeve consists of two parts, which are commonly called "halves". Basically, a two-seam sleeve is used in models of coats, jackets, cardigans and strict business dresses made of relatively heavy fabric. Cut out such a sleeve exclusively according to the pattern. This base is suitable for all sizes, if the fullness of the arms is not excessive.
Upper half (Fig. 27). Start with horizontal lines - the original, the level line of the eye and bottom. The height of the eye is calculated by the formula
1/4Cr + 3 cm,
a distance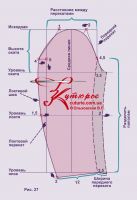 the value from the original to the bottom is equal to Dr..
Rolls - vertical lines and the distance between them
1/3Cr + 2,5 cm
For convenience, mark the middle line of the sleeve on the drawing and mark the points from which you will draw vertical rolls. But, before they are carried out, on an imaginary front roll line at a distance 4,5 см up from the level of the eye, put a dot. Label it «4,5»... (If a sg exceeds 52 см, the distance from the eye level to the desired point will be 5 см).
Now divide the distance from «4,5» to the bottom level in half and draw a horizontal line - the level of the elbow. At the level of the elbow along the line of the front roll, a deflection should be made. Deflection amount 1,5 - 2 cm. The width of the front roll from the front cut of the upper half of the sleeve to the concave line of the roll 3 - 3,5 cm at all levels. On fig. 27 the section of the front roll is darkened.
Elbow seam. To find the upper point of the elbow seam from the level of the roll up the elbow roll, you need to postpone 5 см and from the point "5" construct a perpendicular segment to the right. Cut length 4 см. “Four”, which is the desired upper point of the elbow seam, smoothly connect with a point at the level of the elbow, located to the left of the elbow roll on 1,5 см. The width of the upper half of the sleeve from the lower point of the elbow cut to the line of the front roll 12 - 13 cm (in Fig. 27 it is indicated by a curly bracket). Do not confuse it with the width of the top half along the bottom, which is from 15 to 17 cm. Finally, the elbow seam needs to be lengthened by 2 см and draw a bottom line.
Sleeves. Some auxiliary points already exist. Along the line of the elbow seam, this is the point «4», and along the front line - «4,5». The next two points will be on the original line. The first of these, marked «1», bisects the distance from the midline to the elbow roll. And the second, bisects the segment from the midline to the front roll. It is shifted from the original to 2 см to the front end. Designate "two" and use the already displaced point.
The resulting points "4", "1", "2" and "4,5" are connected by auxiliary segments. It turns out a broken circle. In the corner "1" construct a bisector of length 2 см, and in the corner "2" - 1,3 см. After that, the okat can be drawn with a smooth line.
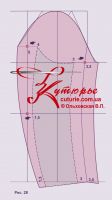
bottom half is built directly on the drawing of the upper half (Fig. 28). From the line of the front roll to the middle, set aside 3 см at the levels of the eye, elbow and bottom. From point "5" on the elbow roll, set aside to the right 4 см, and from the point of the elbow roll at the level of the elbow to the middle - 1,5 см. Distance from the lower point of the elbow seam of the lower half to the corresponding point of the upper half 1 - 1,5 cm. In conclusion, the lower rim must be drawn with a smooth concave line.
Ready-made patterns of sleeves in a set
Eight styles of ready-made sleeve patterns for sizes 42 to 52.

Drawing of a sleeve for products of the big sizes
If you built the base of the sleeve proposed for previous models, then you used the following formulas:
1/4Cr + 3 cm - eye height;
1/3Cr + 2,5 cm - distance between passes.
But for figures exceeding the volume of the 56th size, as well as for figures with disproportionately thick arms, sleeve patterns are made according to measurements.
First determine the sleeve width:
Op + 4 cm(or 6 см)
Distance between rolls:
1/2 total sleeve width
Eye height - from 17 см.
Note 20. The height of the collar can be checked on the bodice by measuring the height of the armholes of the shelf and the height of the back from the shoulder points to the level of the chest vertically. Then subtract 1,5-2 cm from the arithmetic mean of armhole heights, as is done for a straight sleeve (see 1.6.1).
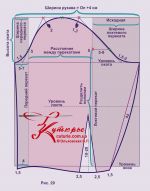
Start drawing from the horizontals: the original, the bottom and the level of the circle (Fig. 28).
Width of the front roll for a narrowed sleeve according to the level of the rim 5 см, for large tapered sleeves
1/2 distance between rolls minus 1 cm
To build an okat, as for a sleeve of ordinary sizes (chapter 4.6), the distance between the rolls is divided into four equal parts and, having built auxiliary lines, they draw up an okat.
Lower part of the sleeve. The width of the front roll at the level of the elbow and along the bottom is equal to 4 см.
Next, calculate the width of the sleeve along the bottom from the line of the front roll to the tuck:
1/2(brush coverage + 2cm) + 1cm
The bottom line should be extended along the tuck on 2,5 см. The width of the tuck between its lower points 8 см, and the height is 18-20 cm.
Now check yourself: the width of the sleeve at the bottom, excluding the tuck, will be approximately:
Wrist coverage + 2 cm
It remains to build the elbow seam, but first you need to find the level of the elbow. As in the previous case, set aside along the line of the front roll up from the level of the eye 5 см. And divide the distance from point “5” to the bottom level in half and draw a horizontal line of the elbow from the resulting point.
The elbow seam has a bulge at the level of the elbow 2-3 cm. Lastly, the front seam should be lengthened by 1,5 см, and then fold the sleeve in half and equalize the front and elbow sections.
To make the basis of a short sleeve from the basis of a long sleeve, draw a horizontal line at a distance from the top point of the collar dr desired + 2 cm and make a deflection in 2 см.



 Join my community on Viber...


