 The shawl collar can be found in many types of products, but it is most common in winter outerwear.
In this article, we will consider the principle of constructing a drawing of a shawl collar, applicable to all types of clothing, including a light dress.

The design of the collar is well "attached" to any ready-made patterns.
At the same time, it is the same in women's patterns and in men's.
Shawl collar cutting algorithm
So, we start by measuring the depth of the neck.

To do this, measure the desired depth of the neck along the figure down from the jugular cavity and mark the shelf on the vertical half-skid on the pattern point of convergence of shelves (figure 1a).
Then we outline the inflection line of the lapel (figure 1b).
To do this, extend the shoulder seam by 1 - 2 cm towards the original corner (the right angle from which the drawing begins) and connect the resulting point with the point of convergence of the shelves with a straight line.
This will be lapel fold line - one of the main constructive lines of the shawl collar.
 Do not forget to also draw a line on the edge of the bead (figure 1b), if the bodice of the dress will have a fastener in front (as on dress photo in the style of "new bow" with a sun flared skirt).
For a jacket and coat, the line of the edge of the board is obligatory.
If the "shawl" is on the bodice without a fastener, then the line of the edge of the board will not be needed.
Rule: the intersection of the inflection lines of the lapel and the edge of the side in products of an adjacent and semi-adjacent silhouette should be located above the waistline (figure 1b).
In products of free silhouettes (straight, “bell”, “oval”, “box”) this intersection can be located between the levels of the waist and hips.
In addition, to build a pattern for a shawl collar, we need the so-called initial horizontal of the shelf, which is already on the drawing if you built the shelf pattern yourself.
To find the original (figure 1 in), draw a perpendicular to the line of the edge of the bead, which would pass through the side point of the neck.
 It remains only to extend the half-skid up (figure 1 g) and you can start building a shawl.
 Point "1" is no longer needed for us - we used it only to draw the inflection line of the lapel.
To avoid confusion, extra inscriptions have been removed from the drawing.
From the side point of the neck, set aside the length of the sprout along the original left (figure 2a), previously measured according to the pattern of the back.
Measure along the curve.
From the resulting point, build a perpendicular to the original and measure along it 4-6 cm (figure 2b). More precisely:
- for stooped figures with high shoulders we measure 4 см.
- for figures with normal posture - 5 см.
- for kinky figures with low shoulders -6 см. This is the point the middle of the collar along the stitching line (green cross).
Next stage
connect the vertex of the original corner with the middle point of the collar - this side of the triangle, indicated in the figure in blue, will be auxiliary.
 We use it as the side of another corner, but with the vertex point at the middle point of the collar (green X).
The angle of this angle is also equal to 900, and its other side will serve middle line of the collar (figure 2 in).
 Further everything is very simple figure 3 a.
We remove the lines that are not useful to us and leave only the line of the edge of the side, the fold of the lapel, the middle line of the collar and the auxiliary, which was the hypotenuse of the blue triangle.
On the middle line of the collar, lay off its width. For a dress pattern - 7 - 8 cm, for a coat - 12 - 15 cm.
Collar stitching line (blue curve on figure 3 b) for the most part coincides with the neck and one of the sides of the triangle indicated in the drawings.
It is usually extended to departure lines.
departure line it can be arbitrary, but it is necessary to display the latter with some margin in order to be able to correct the shape of the collar during the fitting.
Collar ready (figure 3 b).
This drawing can be used to trim the selection on figure 3 in it is shown with a red dotted line.
Cut out collar with allowances 1 см from the midline and stitching line. Lobar - along the midline of the collar.
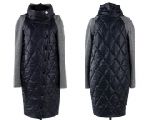
Ready-made patterns of clothes with a shawl collar
 Dress patterns - detachable dressing gown with a shawl collar and pockets
Sizes: 40-52 and 52-64. The entire specified range of sizes in one file.
 Pattern of a vest with a shawl collar
PDF pattern for printing on a home printer or plotter in full size for vest sizes from 40 to 52. All sizes are printed from one file.
 Stretch jumpsuit patterns with shawl collar
Sizes: 40-52 or 52-64 - the buyer receives all sizes of the selected gradation in one file.
Ready-made patterns for women's coats, jackets, fur coats, capes
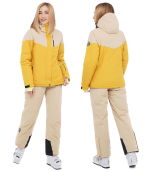


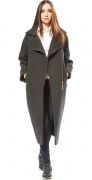


Women's coats Fur coats Jackets Capes


