
Size charts What is the height of the pattern Payment methods Ask a question Reviews
PDF pattern for printing on a printer or plotter in full size for dress sizes from 40 to 52.

How to sew this simple wrap dress for beginners
Read this guide:
- Characteristics and description of the pattern.
- How to download and print patterns for a simple wrap dress.
- Do-it-yourself pattern features of this dress for beginners.
- Cut the dress of the detachable kimono back with a wrap according to the pattern in full size with your own hands.
- A step-by-step description of how to sew a dress for beginners with a detachable kimono back with a wrap.
- How to try on for beginners
Download the pattern of this wrap dress
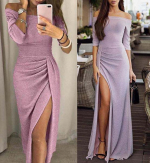
Characteristics and description of a straight dress pattern
Electronic pattern of the dress "cut-off kimono back with wrap".
 Sizes: 40-52 (buyer receives all sizes).
File format for download in order:
PDF in full size and without seam allowances.
After paying for the order, you will receive links to download two files dress patterns gradation sizes from 40 to 52:
- PDF file A4, adapted for printing patterns on sheets of A4 paper in any program on any device, including mobile phones.
- Multi-format PDF file for printing on sheets of any size from A0 to A4 on a printer or plotter using Adobe Reader.
The sewing level is easy. Pattern for beginners who have already sewn their first dress and are striving to master mastery of fitting.
 On this model, you can learn to sew and cut stretch yourself. To sew stretch, you will need an overlock knit stitch, a zigzag stitch and a twin needle.
The set of patterns for a detachable kimono dress includes
1. Patterns of the bodice of the back and shelves.
2. Patterns of PP and ZP skirts.
Turn patterns for processing the smell and the neck are not included in the kit, since the facings are cut out according to the patterns of the bodice.
For sewing, use tight knitwear (stretch) with low extensibility.
Consumption is about 150 cm, with a Du (skirt length) of 60 cm and a width of 140 cm.
How to download and print patterns for a simple wrap dress
How to buy and download an electronic dress pattern.
How to print a pattern life-size at home on A4 sheets.
How to choose the size of a pattern without taking measurements and using tables.
Full-size ready-made patterns download for free.
Download this pattern of this wrap dress
DIY pattern features of this dress for beginners
 To begin with, on the patterns of the back of the bodice and the skirt, there is a marking of a soft warehouse, which is not on the picture. Such an addition to the style will come in handy for girls with a large lumbar deflection.
When choosing a size, you can take the bodice of one size, and the skirt - another. You can join different sizes by increasing or decreasing the soft folds on the bodice and skirt.
We start cutting by cutting out the facings for the sprout (back neck) and for the neck (picture 2). For convenience, you can cut them out of dublerin without seam allowances, so that later you can stick them on the fabric and cut them out with the necessary allowances.
 This method is good when working with dublerin, which keeps its shape well, but is unlikely to be suitable for thin knitted dublerin. If you use a thin stretch dublerin, then the facings should be cut out of paper according to the patterns of the shelves and backs.
In any case, it is important that the width of the facing is at least 3,5 - 4 cm, and the departure line of the selection is formed by a smooth curve.
Please note that hem allowance has been added to the details of the bodice and the selection. The recommended allowance is 3 - 5 cm. Let's consider the issue of allowances in more detail.
In general, no seam allowances are required for sewing stretch on an overlock with a knitted seam.
See what stitches to use for sewing stretch at home
 Especially when it comes to such free styles as kimonos. But this dress is detachable at the waist and, for a perfect fit, on the bodice, you should very accurately outline the waist level, which is individual for each figure. Therefore, the exact marking of the waistline can only be done at the fitting. To carry out the fitting, you need an allowance of up to 5 cm at the waist.
It is better to try on when the bodice is completely ready, therefore, for the selection, you should take the maximum possible allowance for the waist.
Another allowance is on the bottom of the skirt, which is desirable to process "into a hem with an open cut", that is, overcast and bend once. Enough 2,5 - 3 cm.
If the zipper is planned in the middle seam of the skirt, then an allowance of 1 - 1,2 cm is also desirable along the middle seam.
And once again about allowances for turning. We add as much along the waist cut of the back facing as we do along the entire bodice. At the junctions with the facing of the neck, that is, along the shoulder seams, we add 1 cm each. No other allowances are needed.
Cut the dress of the detachable kimono back with a wrap according to the pattern in full size with your own hands
Having dealt with this issue, we proceed to cutting, which is best done in two stages to save fabric (picture 3).
First, folding the fabric in half face inward and aligning the edges, we lay out the details of the bodice and facing in the most economical way. It is desirable that the details of the facings are solid and do not contain additional turnings.
After cutting out the details of the bodice, fold the rest of the fabric along the width of the skirt. The edges are parallel. We lay out the patterns of the PP (front half) and ZP (back half) and cut them out with an allowance along the bottom.
In the process of cutting, it is necessary to put notches on the sections of the cut parts in order to facilitate the process of assembling the product. Notch length 0,3 - 0,5 cm.
Notches are placed along the midline of the back, at the points limiting the soft folds and one more at the junction of the edge of the back of the bodice with the RF - this point is marked on the drawing.
Finally, we lay a thread mark on the middle line of the back on both parts of the back with a slip stitch.
Sewing a dress with a detachable kimono back with a smell at home is somewhat different from the factory one.
A step-by-step description of how to sew a dress for beginners with a detachable kimono back with a wrap.
 We start by sewing soft warehouses with cross stitches, focusing on the notches. Having noticed all the soft folds, we iron them from the inside out.
- Now we assemble the skirt and bodice separately, but before you start sewing, you need to decide on the location of the zipper.
- There are two options - in the left side seam or in the middle seam of the skirt at the back. The most convenient and simple option is with a zipper in the middle seam of the skirt.
- Now everything is simple with a skirt - we grind the side seams on the overlock with a knitted seam and iron them; overcast the sections of the middle seam one at a time and grind the middle seam of the skirt with a narrow zigzag, not reaching the top 12 - 15 cm and the bottom 10 - 12 cm, if you need a spacing slot. We notice the unfinished areas. The seam is carefully ironed out. We sew a hidden zipper.

See video master class for sewing a hidden zipper without special tools.
We begin the assembly of the bodice by sewing the shoulder seams with a knitted seam and ironing the seams. Then, we grind the duplicated fragments of the facing with a straight line and iron the stitching seams.
We carry out turning of a mouth, a sprout, boards. We swept, ironed and fastened.
We grind the side seams with a knitted seam, slightly pull them off with an iron and iron the allowances.
Now we are ready to sample.
How to try on for beginners
- Putting a bodice on the figure, chop off the sides of the back so that the marked center lines coincide.
- Tie the figure at the waist with a linen elastic and mark the waist line on the bodice.
- Try on the skirt separately.
- Baste the bodice and skirt without trimming the bodice allowance and try it on again.
- After making adjustments, the excess allowance on the bodice can be cut off and the bodice can be connected to the skirt.
- A fragment of the waist section of the skirt between the sides can be processed by turning or simply overcast and fold 1 cm.
- Only the bottom of the skirt and the bottom of the sleeves remain.
- The easiest way to work the bottom of stretch products that are sewn at home is to use a double needle.
- The bottom of the product is folded and ironed.
- It remains to lay a fixing line on the front side.
Download this pattern pdf:
Pattern for beginners of a simple detachable kimono dress back with a wrap
$1.80 (72 hryvnia)
Bank cards of the Russian Federation are not accepted for payment!
Size charts What is the height of the pattern Payment methods Ask a question Reviews
Vera Olkhovskaya in social networks:

More patterns of models of a similar style or cut


See similar clothing patterns and how to sew on them


-
Any pattern for free for a review of a previously made order
More...
Lifetime promotion for buyers of patterns!

Leave a review about my store of patterns for an order that you made before, and you will receive any paid pattern of your choice Free!
Catalog:
New patterns on the site


Most readable articles
- How to print patterns in full size on sheets of any format? Category: F.A.Q.
- Pattern of a dress for a babydoll girl Category: Dress patterns for free
- How to take measurements for sewing Category: Sewing: general questions
- How to sew a skirt without darts and without a pattern: "Tatyanka" Category: How to sew...?
- How to learn to sew from scratch at home for free? Category: F.A.Q.
- Skirt with a belt - how to sew a belt to a skirt and processing the belt when sewing a skirt for beginners Category: Waist section processing with and without belt
- How to choose a pattern size? Do Olkhovskaya patterns require a fit? Category: F.A.Q.
- Do-it-yourself parsley, Cossack and Gnome according to free patterns by Vera Olkhovskaya Category: How to sew a New Year's costume and costumes for the holidays with your own hands
New lessons and reviews
-
I sewed a boho trapeze dress size 42 according to your pattern
Category: Patterns - photos and reviews from users

-
I made two dresses with this pattern.
Category: Patterns - photos and reviews from users

-
Thanks for the fast order processing.
Category: Patterns - photos and reviews from users

-
When sewing, I slightly deepened the front neck
Category: Patterns - photos and reviews from users
