Size charts What is the height of the pattern Payment methods Ask a question Reviews
PDF cutout for printing on a printer or plotter in full size for sizes 40 to 54.

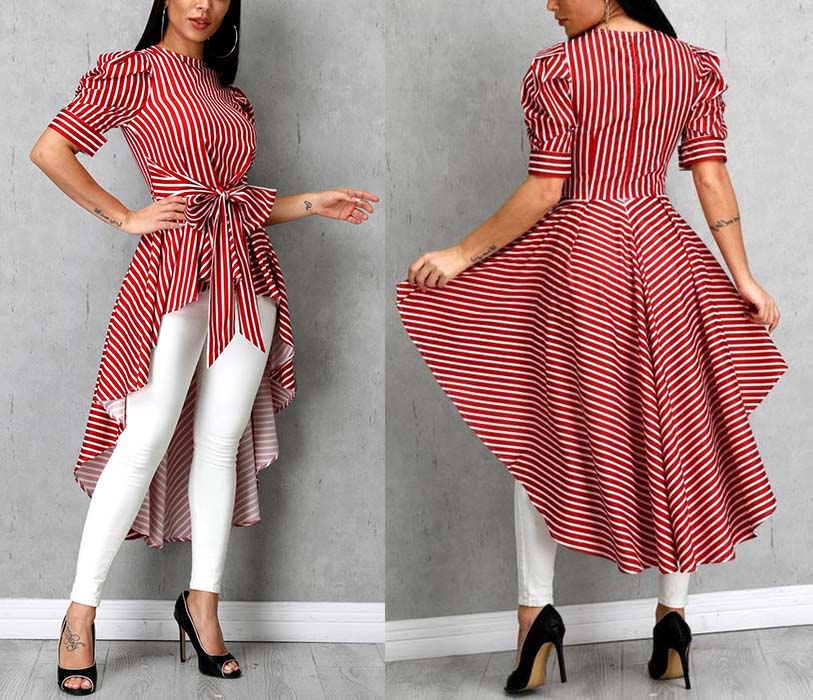
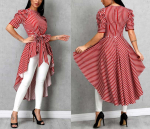
How to sew a blouse-tunic with sleeves and a peplum on a pattern with your own hands
Read this guide:
- Description of a set of patterns for a blouse-tunic.
- Description of the style of the tunic blouse.
- What to sew and what fabric consumption.
- How to download and print a pattern on a printer.
- How to cut this tunic blouse with your own hands according to the finished pattern.
- How to sew a tunic blouse with your own hands step by step.
Description of a set of patterns for a blouse-tunic
 Electronic pattern of a blouse-tunic
Sizes: 40-54 - the buyer receives all sizes.
File format for download in order:
PDF in full size and without seam allowances.
After paying for the order, you will receive links to download two files patterns of a blouse-tunic of the above gradation of sizes:
- PDF file A4, adapted for printing patterns on sheets of A4 paper in any program on any device, including mobile phones.
- Multi-format PDF file for printing on sheets of any size from A0 to A4 on a printer or plotter using Adobe Reader.
Sewing difficulty level: medium - you will need skills in working with thin fabrics.
The pattern is designed for sewing at home on household sewing machines.
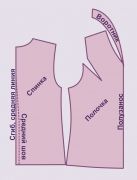
Set of patterns for a blouse / tunic with peplum (picture 1):

- Back bodice pattern.
- Pattern of the bodice of the shelf.
- Sleeve patterns:
- "large" with three soft warehouses along the edge
- “small” with one soft fold along the rim. - Peplum pattern with multiple cut and length options.
- Belt pattern.
The patterns of the facings of the neck are not included in the set of patterns - the facings are cut out according to the patterns of the front and back or directly along the bodice.
And the cuffs are rectangles, the calculation of the dimensions of which is described below.
Description of the style of the tunic blouse
 This model is hardly suitable for those who want to sew a simple dress quickly and easily.
The main difficulty, but also the advantage of this style, is the need to try on to clarify the length of the bodice according to height and, based on the features of the figure.
But, thanks to the ability to try on, a tunic with such a peplum is suitable for almost any type of figure of various fullness and height, including figures with different sizes of bodice and hips.
Growth adjustment should be carried out by standard methods - shortening or lengthening the bodice on fitting.
You can complete a tunic with a peplum, both with trousers and with a straight skirt.
Ready-made pattern of a pencil skirt with a one-piece belt can also be downloaded from my website.
Tunic / blouse with a peplum - can serve as a pattern for a summer product, as well as a pattern for a New Year's outfit. The style is suitable as an alternative to a cocktail dress or corporate party dress.
The design features of the style include a short shoulder. This will allow the “top” of the sleeve to fit on the shoulder and better retain its shape.
What to sew and what fabric consumption
For sewing a peplum tunic blouse, almost any fabric that is not too thin is well suited.
You can choose among silk fabrics and cotton fabrics, as well as among thin knitwear with little stretch.
It is worth excluding only very thin and soft fabrics such as cambric, staple or chiffon, as they will not hold such a sleeve shape.
Preference should be given to fabrics that do not wrinkle too much, since it can be difficult to iron such a sleeve after washing.
So, fabrics of mixed composition, in which both natural and synthetic fibers are present, can be considered an ideal option.
For example, cotton shirting with viscose or artificial fabrics of the silk assortment with a small addition of natural silk.
Consumption will be 230 - 260 cm with a width of 140 cm.
For a podkatnik, it is worth using a rigid mesh or soft regilin with a width of 4 to 10 cm. The mesh consumption is up to 20 cm.
Shoulder pads come in handy too.
You can use both regular foam pads and self-made hard shoulder pads from a quilted collar. In any case, the shoulder pad must be large enough to hold the liner and therefore protrude from the side of the armhole.
How to download and print a tunic blouse pattern on a printer
How to choose a size without using tables and taking measurements.
How to buy a ready-made electronic pattern.
How to print a pattern at home life-size on A4 sheets or on sheets of any other size.
How to assemble a pattern after printing.
Ready-made patterns of dresses in full size download for free.
Download this tunic blouse pattern
How to cut this tunic blouse with your own hands according to the finished pattern
Cutting is not very difficult, but choosing the size of the peplum can be confusing.
In order to avoid mistakes and confusion, it is better to cut the peplum after trying on the bodice.
 Thus, cutting is carried out in two stages (picture 2):

- We cut out the bodice and carry out the fitting.
- We cut out the peplum, based on the length of the waist cut of the bodice, and all other details - sleeves, belt, cuffs and facings.
The size of the cuffs is determined by the girth of the shoulder above the elbow. You can cut the cuffs in any shared direction. If the fabric is in a cage, then “oblique” cuffs will look good.
cuff length=shoulder girth+8cm
Cuff Width = Finished Cuff Width + 2 cm
The facings are cut out as standard - according to the patterns of the shelves and back or along the bodice. It makes sense to cut out the bodice if you made changes and adjusted the neck during the fitting.
But in any case, we cut out facings from dublerin or non-woven fabric without seam allowances, and then, after gluing them on the fabric, we cut them out again with 1 cm allowances along the seams of the connection (picture 2).
A few more words about cutting the peplum.
On the pattern you see the middle line, which can be used when cutting the peplum without seams. In this case, lay the peplum on the fold with the middle line. This method has a drawback - the peplum will have to be cut to attach the zipper.
If you want to make a peplum with a middle seam, it is better that it be “oblique”, that is, it does not coincide with the shared direction. Oblique seam and made on the drawing of the finished pattern.
What is the oblique middle seam for? It eliminates the sagging on the sides of the middle seam that we see on cheap factory products.
Why do we need additional arcs for notching the peplum? They are added in case you want to do an assembly, smell or add warehouses on the Basque.
In any case, the peplum should be cut only based on the length of the waist cut of the bodice after the fitting and already understanding what style variation (assembly, additional folds, smell or just a peplum) you need.
Seam allowances
Along the middle seam of the back and peplum, shoulder and side cuts of the bodice, front and back cuts of the sleeves, as well as along the bottom of the sleeve and along the cuts of the belt - allowances of 1 cm.
On the waist section of the back and shelves - add 3 cm for convenient fitting. This allowance can be trimmed later.
We do not add allowances along the cuts of the armholes, the sleeves, along the notch of the peplum and along the bottom of the peplum.
Over darts and soft warehouses allowances - "houses".
How to sew a tunic blouse with your own hands step by step
- Assemble the bodice for fitting. Be sure to completely sweep soft warehouses. The estimate of soft warehouses should remain until the product is ready. Iron seams and pleats.
- First sample. Put the bodice on the figure, perform the necessary adjustment and correction of the neckline, tie the bodice on the figure with a thin linen elastic, mark the waist. Please note that under the elastic band there may be a strip of fabric that is not the same on all sides - this depends on the characteristics of the figure.
- After trying on, measure the length of the waist cut of the bodice along the line marked on the fitting. Based on the length of the line and the style of the peplum (warehouse, assembly or just a peplum), choose a suitable notch on the pattern. And, based on the desired length of the bottom line.
- Cut the peplum and the remaining parts as described above.
- Next, turn the waistband and process the shoulder and side sections of the bodice, turn the neckline.
- Then, collect the sleeves, after sweeping the warehouses.
- Stitch the middle seam of the peplum in front and partially behind, iron them.
- Connect the peplum with the bodice and process the bottom.
- Make a podkatnik and sweep the sleeve. After that, you can perform a second fitting and complete the sewing of the tunic.
For the sleeve of this model, the podkatnik can be made wider up to 10 cm, you can make the podkatkik in several layers or use soft regiline of the appropriate width to make it.
When using soft regilin, pay attention to the processing of the ends of the tape. They can be melted or edged, but it is undesirable to leave them unprocessed.
Download this pattern pdf:
Pattern of a blouse-tunic with two types of sleeves and peplum
$2.00 (80 hryvnia)
Bank cards of the Russian Federation are not accepted for payment!
Size charts What is the height of the pattern Payment methods Ask a question Reviews
Vera Olkhovskaya in social networks:

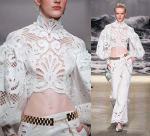
More patterns of models of a similar style or cut

Dress pattern "tunic-shirt" $2.00 |

Pattern "dresses-blouses-tunics with a frill" $1.50 |
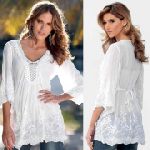
Boho pattern blouse with summer sleeves $2.00 |

Pattern of a tunic-trapeze with a drop $2.00 |
See similar clothing patterns and how to sew on them


-
Any pattern for free for a review of a previously made order
More...
Lifetime promotion for buyers of patterns!

Leave a review about my store of patterns for an order that you made before, and you will receive any paid pattern of your choice Free!
Catalog:
New patterns on the site


Most readable articles
- How to print patterns in full size on sheets of any format? Category: F.A.Q.
- Pattern of a dress for a babydoll girl Category: Dress patterns for free
- How to take measurements for sewing Category: Sewing: general questions
- How to sew a skirt without darts and without a pattern: "Tatyanka" Category: How to sew...?
- How to learn to sew from scratch at home for free? Category: F.A.Q.
- Skirt with a belt - how to sew a belt to a skirt and processing the belt when sewing a skirt for beginners Category: Waist section processing with and without belt
- How to choose a pattern size? Do Olkhovskaya patterns require a fit? Category: F.A.Q.
- Do-it-yourself parsley, Cossack and Gnome according to free patterns by Vera Olkhovskaya Category: How to sew a New Year's costume and costumes for the holidays with your own hands
New lessons and reviews
-
I sewed a boho trapeze dress size 42 according to your pattern
Category: Patterns - photos and reviews from users

-
I made two dresses with this pattern.
Category: Patterns - photos and reviews from users

-
Thanks for the fast order processing.
Category: Patterns - photos and reviews from users

-
When sewing, I slightly deepened the front neck
Category: Patterns - photos and reviews from users
