Size charts What is the height of the pattern Payment methods Ask a question Reviews

 An electronic dress pattern is printed on a home printer or large-format plotter. Can be printed on standard sheets of A4 to A0 paper. Paperless cutting through the projector is possible.
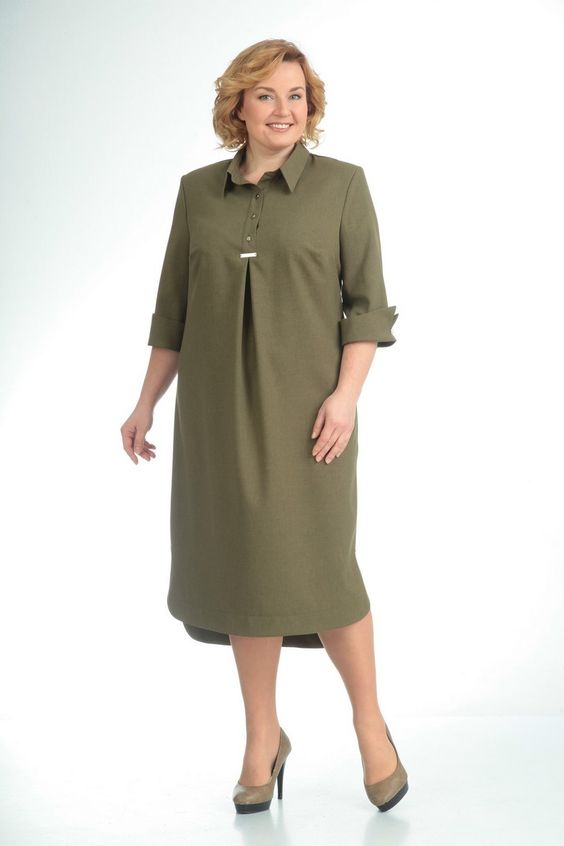
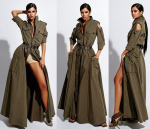
In the photo, look at the version of the dress sewn according to this pattern by the customer Natalia Smirnova.
 Free download Instructions on how to sew a dress according to this simple pattern...
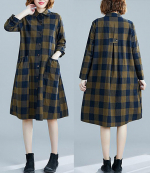
How to sew an oversized shirt dress with a fold according to a simple pattern with your own hands for beginners
Contents of the instruction:
- Description of patterns.
- The level of complexity of tailoring, the design of the style and the set of patterns.
- What to sew a dress from, how to buy and print a pattern.
- How to cut a dress - a shirt according to a simple finished pattern.
- How to sew a shirt dress at home - sequence.
Buy and download this dress pattern
1. Description of patterns

 All sizes from 40 to 52 or from 52 to 64 are downloaded in one file.
File format: PDF full size and without seam allowances
After paying for the order, you will receive links to download two files patterns of an oversized shirt dress with a pleat gradation of sizes from 40 to 52 or from 52 to 64:
- PDF file A4, adapted for printing patterns on sheets of A4 paper in any program on any device, including mobile phones.
- Multi-format PDF file for printing on sheets of any size from A0 to A4 on a printer or plotter using Adobe Reader.
Pattern assembly diagram when printing on A4 sheets of a home printer
 For sizes 40 to 52:
The pattern is assembled on two large pages of patterns from 37 sheets of A4 paper:
1 page of patterns: 25 A4 sheets, 5 rows of 5 sheets in a row.
2nd page of patterns: 12 A4 sheets, 3 rows of 4 sheets in a row.
For sizes 52 to 64:
The pattern is assembled on two large pages of patterns from 40 sheets of A4 paper:
1 page of patterns: 25 A4 sheets, 5 rows of 5 sheets in a row.
2nd page of patterns: 15 A4 sheets, 3 rows of 5 sheets in a row.
2. The level of complexity of tailoring, the design of the style and the set of patterns
The difficulty level of sewing is simple, but cutting and sewing skills are desirable.
The style is suitable for all types of figures of various fullness and height.
The pattern is designed for sewing at home on household sewing machines.
2.1. Complete set of dress patterns - oversized shirts with a pleat

- Back pattern.
- Shelf pattern.
- Sleeve pattern.
- collar pattern
- Cuff pattern.
- Pocket burlap pattern.
Plank patterns are not included, as the plank is a rectangle. See cutting explanations below.
2.2. Description of the design of the dress pattern - oversized shirts with a pleat
This is a loose dress with a side tuck for the bust, which is easy to adjust.
Sleeve shirt non-stop wide.
Classic shirt collar.
Pockets in the side seam.
3. What to sew a dress from, how to buy and print a pattern
3.1. What to sew and how to calculate fabric consumption
 Traditionally, shirts and dresses - shirts are sewn from shirt fabric.
The ideal option would be cotton shirting, thin linen or silk, as well as dress chintz.
Batiste and staple can be considered a good choice for summer.
Also suitable for thin denim.
For cold seasons - fine wool or a mixture of silk and wool.
Fabric consumption will be from 180 to 250 cm with a width of 140 cm, depending on the size. Consumption is calculated for a long sleeve.
3.2. Instructions on how to buy, how to print and others
How to choose a size without using tables and taking measurements
What height are the patterns for?
How to buy a ready-made electronic dress pattern
How to print a pattern at home in full size on A4 sheets or on sheets of any other size
How to assemble a pattern after printing
Simple patterns for dresses, sweatshirts, skirts and trousers in full size Free

 Buy and download this dress pattern
4. How to cut a dress - a shirt according to a simple finished pattern
Cutting this dress is quite simple, but for individual tailoring it will require following the sequence: first - a shelf, back, sleeve, burlap and placket, and after trying on - a collar and cuffs.
Such a division into stages will allow you to make individual changes to the product during the fitting. For example, narrow the sleeve or change the neckline to fit your posture.
 4.1. Separately, it is worth mentioning the cutting of the back

As you may have guessed, the back can be with or without a seam.
On the 2 drawing dress cutting is shown - shirts of small sizes and the back is cut out with an average seam. In this case, it is recommended to place the pattern “at an angle”, stepping back from the edges of 2–3 cm along the bottom.
Such an indentation will make the seam “oblique” and it will be easier to process it with high quality and avoid distortions and contractions.
On the example of cutting a dress - a shirt of large sizes, a cutting of the back without a seam is shown (picture 3). The back rests on the fold in the middle line.
In this case, you should pay attention to the fact that the fabric is folded for the back along the width of the backrest pattern, and for the shelf along the width of the shelf pattern. The rest of the details are cut out from the remnants.
As for the allowances for the seams, they are standard for the dress - shirt - 1 - 1,2 cm each to the side, shoulder seams, as well as to the seams of the sleeve, collar and bottom. Without allowances, cuts of the armholes, sprout (neck of the back), neck and sleeve hem remain.
4.2. About cutting shelves.
 As usual, lay the shelf pattern on the fold of the fabric and cut it out. At the top, in the area of the bar, we cut out along the line of the half-skid and make an additional cut to the bar. On the drawings 2 - 3 the point to which the incision (notch) is needed is indicated by a blue cross.
In addition to this cut, you will need notches at waist level (control for sewing) and notches at pocket level. Notch length 0,5 cm.
Immediately after cutting the shelves, mark the lines of the plank on the part.
Open the planks.
As mentioned above, the strap is a rectangle, a strip of fabric. In this case, the width of the finished plank is 3 cm.
Let's start by cutting out 4 strips of thin interlining or dublerin with a width of 2,8 cm and a length of 18 - 28 cm, depending on the size of the dress. Measure the length of the dublerin blanks for the slats according to your pattern and add a couple more centimeters. Cut off excess during processing.
We stick the strips on the fabric at the place where the plank is cut at a distance of 0,2 cm from each other, as shown in the pictures. 2 - 3. After that, add allowances of 1,5 cm on all sides. Thus, we will get 2 plank blanks.
We cut out the burlap without seam allowances.
4.3. Now about the features of cutting the collar and cuffs in individual tailoring.
The length of the collar detail and the length of the cuff detail must correspond to the length of the neck of the product and  therefore, it is more rational to cut out the collar and cuffs when the shoulder seams and the sleeve are already processed.
In other words, we choose the size of the collar based on the length of the neck, the size of the cuffs - based on the length of the bottom of the sleeve.
First, we cut out the collar and cuffs from dublerin or non-woven fabric without seam allowances.
Then, glue the dubbing onto the fabric and cut out the lower collar and lower cuffs with seam allowances.
On the lower collar and lower cuff (according to blanks, and not according to patterns), we cut out the upper collar and upper cuffs. Thus, the seam allowances for the upper collar and upper cuff will increase by 0,1 - 0,2 cm, which will provide the fit we need.
5. How to sew a shirt dress at home - sequence
- If there is a middle seam, sew it with a double seam or zaposhivochny (linen) seam.
Iron on. - Baste darts, side and shoulder seams by hand or machine. Baste the crease on the shelf and iron it on top. We leave the sour cream fold until the product is ready.
- Try it on. On the fitting, you can “turn” the tuck if it is not in place, and also shorten it if necessary. You can also cut the neck to fit or to your liking.
- Plank processing. Iron the plank blanks along the middle, along the “separation” of the doubler (non-woven) and, bending the allowance on one long side, iron again.
- With the side where the allowance was not bent, lay the workpiece on the shelf face to face, aligning the edge of the doubler with the line of the bar. If the cutting was accurate, then the cuts will also match. Stitch the strips to the shelf to the notch (cut) and iron. Further processing depends on your intention. The bar can be processed with a corner (allowances for this are sufficient). The corner will close the upper cut of the fold - one corner on the "face", the other on the wrong side. Or you can "cover" the junction of the bar with a folded strip or braid. While the bar is “open”, do not forget to lay the finishing stitches, if any, and fasten the bar from the inside out.
- After processing the strap, stitch the shoulder seams with a backstitch or double seam and iron; process the tuck along the shaping line so that it is well ironed; overcast the side seams and burlap pockets in a straight line.
- Stitch the burlap of the pockets, focusing on the corresponding notches - they should be visible under the overedging. Iron the seams of the pockets.
- Stitch the sleeve, evenly distributing it along the armhole. Overcast and iron the stitching seam.
- Overcast the side seams, starting at the sleeve and along the edge of the burlap pockets and moving to the bottom, all in one line. Stitch and iron the side seams. Please note that the lower part of the side seams will have to be ironed in order to process the rounded bottom of the dress.
- Finish the hem into an open hem (single hem). Iron on. Sew along the bottom of the side seams. Bartacks can serve as shared strips of fabric, folded in three, like belt loops. From it should be stitched from the inside out.
- Now you can measure the neck and bottom of the sleeve. After measuring, choose the size of the collar and cuff. Next - a blank from dublerin or non-woven fabric according to the description of the cutting, etc. (see above).
- Finish the collar and cuffs.
- Sew on the collar and sew on the cuffs.
- Loops and buttons or buttons. Finishing ironing.
Download this pattern pdf:
A simple pattern of an oversized shirt dress with a pleat
$2.00 (80 hryvnia)
Bank cards of the Russian Federation are not accepted for payment!
Size charts What is the height of the pattern Payment methods Ask a question Reviews
Vera Olkhovskaya in social networks:

See similar clothing patterns and how to sew on them


-
Any pattern for free for a review of a previously made order
More...
Lifetime promotion for buyers of patterns!

Leave a review about my store of patterns for an order that you made before, and you will receive any paid pattern of your choice Free!
Catalog:
New patterns on the site


Most readable articles
- How to print patterns in full size on sheets of any format? Category: F.A.Q.
- Pattern of a dress for a babydoll girl Category: Dress patterns for free
- How to take measurements for sewing Category: Sewing: general questions
- How to sew a skirt without darts and without a pattern: "Tatyanka" Category: How to sew...?
- How to learn to sew from scratch at home for free? Category: F.A.Q.
- Skirt with a belt - how to sew a belt to a skirt and processing the belt when sewing a skirt for beginners Category: Waist section processing with and without belt
- How to choose a pattern size? Do Olkhovskaya patterns require a fit? Category: F.A.Q.
- Do-it-yourself parsley, Cossack and Gnome according to free patterns by Vera Olkhovskaya Category: How to sew a New Year's costume and costumes for the holidays with your own hands
New lessons and reviews
-
I sewed a boho trapeze dress size 42 according to your pattern
Category: Patterns - photos and reviews from users

-
I made two dresses with this pattern.
Category: Patterns - photos and reviews from users

-
Thanks for the fast order processing.
Category: Patterns - photos and reviews from users

-
When sewing, I slightly deepened the front neck
Category: Patterns - photos and reviews from users
