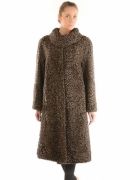
In this video lesson on the cutting technique, I will show a patternless cutting of a women's coat with a one-piece sleeve and an open neck.
In the future, an English type collar is planned, but I will talk about it after the lessons about fitting.
So, the fabric is folded in half face to face, but the fold of the fabric is made across, not along ...
View the layout, sewing technology and the finished coat pattern

When cutting a coat, pile fabric will require special attention, since in this case all the details shown in the video tutorial must be cut so that the pile lies in one direction on them.
I start with the priming of the fabric: I draw the first vertical - this is an auxiliary line corresponding to the shared thread and limiting the edge area; then, having attached an angle to the vertical, I draw a perpendicular line to it, along which I establish a horizontal cut of the fabric. From him, I will begin the construction of the drawing.
Otst I fall from the basic cut to the hem and draw the horizontal of the bottom, then the horizontals of the waist, hips, the original and the barrel.
I build a sprout and a middle seam, and behind it - a side seam, limiting the back along the hips and at the level of the barrel.
To complete the construction of the "grid" I mark the width of the back.
 The shoulder section is lined up, taking into account the shoulder pad and tuck, and the finished one is shifted upwards, as is done in all designs with one-piece sleeves and raglan sleeves.
I turn to the undercut of the back and from its upper point I mark the width of the sleeve along the arc. Through the shoulder point and the arc I draw the line of the upper seam of the sleeve. Then I mark the lines of the bottom and elbow perpendicular to this seam.
Then everything is simple - I mark the width of the sleeve at the elbow and bottom, smoothly draw out the remaining sections of the sleeve and perform a shoulder tuck.
The back is ready! But I don’t cut it out yet, since my fabric is piled.
I build a shelf at other edges, limiting them with a line so as not to go into a marriage of fabric, and I also set up the cuts from which I start the drawing.
The vertical line drawn near the edges will serve me as the edge line of the one-piece selection. I will retreat from it 10 centimeters on the edge and 5 cm on the clasp, I will draw the lines of the edge of the side and the half-skid.
 Then the horizontal waist, hips, barrel. Please note: I put the cut back next to it and just extend the horizontal lines.
I find the starting line by measuring the length of the shelf and mark the center of the chest.
I complete the grid of the front with a side seam and a mark for the width of the chest at the level of the barrel.
I immediately draw up the bottom, move on to the neckline and chest tuck.
 I lower the shoulder seam by the same amount that I raised the shoulder seam of the back.
The further construction of the drawing of the shelf is very similar to the construction of the drawing of the back: an undercut, an arc along the width of the sleeve and a seam line through the arc and shoulder point.
Please note that the dimensions of the sleeve of the shelf are literally "tied" to the dimensions of the sleeve of the back.
In conclusion, I stand a lapel for an English collar.
 As you can see, the cut is very uneconomical and impractical - large lunges and the product hardly passes into the transverse width of the fabric. For a double-breasted coat or an oversized coat, the sleeve will be short or you will have to increase the expense. But, it is precisely this inconvenience of the cut that we owe the birth of sleeves of incomplete length - 3/4 and 7/8, it is this inconvenience that revived the fashion for long gloves.
For a more detailed description of this model, you can read in "The Big Book of Cutting and Sewing" by Vera Olkhovskaya
Other video master classes on cutting clothes
Patterns of women's coats