Size charts What is the height of the pattern Payment methods Ask a question Reviews
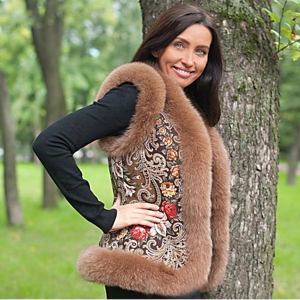
 Electronic pattern "waistcoat with trim"
Sizes: 42-52 and 52-62 (the buyer receives one of the gradations of sizes to choose from)
File format for download in order:
PDF in full size and without seam allowances.
After paying for the order, you will receive links to download two files patterns of a vest of the gradation of the sizes chosen by you:
- PDF file A4, adapted for printing patterns on sheets of A4 paper in any program on any device, including mobile phones.
- Multi-format PDF file for printing on sheets of any size from A0 to A4 on a printer or plotter using Adobe Reader.
Sewing difficulty level: medium.
This model is perfect for all types of figures and builds, looks good on women of all ages. A vest with an edge can be sewn both from Pavloposad shawls and stoles, and from leather, jacquard, tight jeans, drape and other fabrics.
The set of patterns includes patterns for the back and shelves (Fig. 1).
How to buy a vest pattern with an edge
Ready-made patterns of clothes for children in full size free download
How to choose a pattern size (video)
How to cut a vest with an edge
 The cutting process is very simple.
Allowances of 1 - 1,5 cm are added along all sections of the patterns, except for the armhole and neck (Fig. 1 - 2).
Patterns are laid on the fabric in the most economical way.
The consumption of fabrics for small sizes will be one length (Fig. 2), and for large sizes - about two lengths (Fig. 3) with a fabric width of 140 cm.
 In order to accurately calculate the consumption, it is necessary to carry out a preliminary layout of the patterns before purchasing the fabric, taking into account the width of the fabric and allowances.
In addition to the fabric of the "top", for a vest with an edge, you will need a lining and batting or other warming material.
Since the width of the lining is also in many cases 140 cm, its consumption will be the same as that of the fabric.
The width of the insulation is 150 cm or more, so one length is enough.
 As a heater, you can use batting, shersekron, vatelin, shershpon, wools, slimtex, tinsulate, synthetic winterizer, etc.
The main thing is to choose a heater of the thickness you need.
In order not to be mistaken with allowances, you can follow the old tailor's trick: we cut the "top" according to the patterns, the lining - according to the details of the "top", without adding allowances, and the insulation - according to the details of the lining.
The cutting of a vest made of Pavlo-Pasad shawls deserves a separate story (Fig. 4-5).
In this case, it is important that the middle seam and half-slip are located on both sides of the line of symmetry of the rapport of the scarf, and the mirror details should be “attached” to the mirror points of the rapport.
On fig. 4 I drew a line of symmetry along the diagonal of the scarf, and in fig. 5 - vertically.
An important point is the size of the scarf used for cutting.
Of course, it would be ideal to choose a scarf with patterns on the hands, but this method is not suitable for a few.
Therefore, in order not to be mistaken, I recommend choosing scarves that are close to the usual width of the fabric - 146 by 146 cm and 148 by 148 cm. Or stoles 70 by 200 cm.
Verne Let's go to Fig. 5: patterns extend beyond the edges of the printed pattern.
This is done intentionally, as the plain dyed area of the vest will be covered with a fringe.
Opushka
The edge can be stitched and undercut.
Stitched edge - a narrow strip of fur, which is superimposed on top of the finished vest and stitched or sewn on by hand.
To make your task easier, you can purchase ready-made fur strips on a braid (see photo).
If you make fur strips yourself, then cut the skin so that the direction of the pile is across the strip (see photo)
A vest with an undercut edge made of faux or natural fur looks more complex.
Podk the swarm edge should be cut according to the same patterns as the vest.
To do this, the front and back patterns are joined end-to-end with adhesive tape along the reliefs near the armholes and along the shoulder sections (Fig. 6).
The width of the edge is arbitrary, but optimal from 3 to 5 cm.
To trim the edge along the bottom, we combine the patterns at the bottom along the reliefs.
Width from 3 to 7 cm.
When cutting out the edge, remember: the direction of the fur in all details should be the same.
How to sew a vest with an edge
 Consider the easiest sewing method available to novice couturiers.
We collect the "top" and carefully iron, ironing the seams.
We baste the lining on the insulation with large oblique stitches, we stitch each part separately.
We establish and grind the quilted parts.
We connect the “top” and “lining” inside out to the wrong side - we lay along the armhole and along the sprout-neck-sides-bottom of the line by 0,5 - 0,7 from the edge.
We trim (establish) slices.
edging I eat slices with an oblique trim in the color of the "top".
It is desirable to make a baize for such a case yourself.
Watch the video tutorial on how to make bias binding and how to trim a cut without a tool.
And also video master class on making an oblique inlay with a fixture и video master class on edging slices with a fixture.
Work on another device for edging slices is shown in video clip "What can replace the overlock."
Finally, the edge is sewn by machine or by hand.
Download this pattern pdf:
Pattern "vest with edging"
$1.80 (72 hryvnia)
Bank cards of the Russian Federation are not accepted for payment!
Size charts What is the height of the pattern Payment methods Ask a question Reviews
Vera Olkhovskaya in social networks:

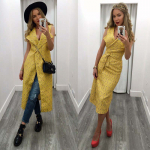
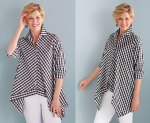
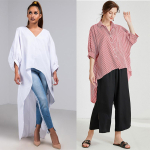
See similar clothing patterns and how to sew on them


-
Any pattern for free for a review of a previously made order
More...
Lifetime promotion for buyers of patterns!

Leave a review about my store of patterns for an order that you made before, and you will receive any paid pattern of your choice Free!
Catalog:
New patterns on the site


Most readable articles
- How to print patterns in full size on sheets of any format? Category: F.A.Q.
- Pattern of a dress for a babydoll girl Category: Dress patterns for free
- How to take measurements for sewing Category: Sewing: general questions
- How to sew a skirt without darts and without a pattern: "Tatyanka" Category: How to sew...?
- How to learn to sew from scratch at home for free? Category: F.A.Q.
- Skirt with a belt - how to sew a belt to a skirt and processing the belt when sewing a skirt for beginners Category: Waist section processing with and without belt
- How to choose a pattern size? Do Olkhovskaya patterns require a fit? Category: F.A.Q.
- Do-it-yourself parsley, Cossack and Gnome according to free patterns by Vera Olkhovskaya Category: How to sew a New Year's costume and costumes for the holidays with your own hands
New lessons and reviews
-
I sewed a boho trapeze dress size 42 according to your pattern
Category: Patterns - photos and reviews from users

-
I made two dresses with this pattern.
Category: Patterns - photos and reviews from users

-
Thanks for the fast order processing.
Category: Patterns - photos and reviews from users

-
When sewing, I slightly deepened the front neck
Category: Patterns - photos and reviews from users
