Size charts What is the height of the pattern Payment methods Ask a question Reviews
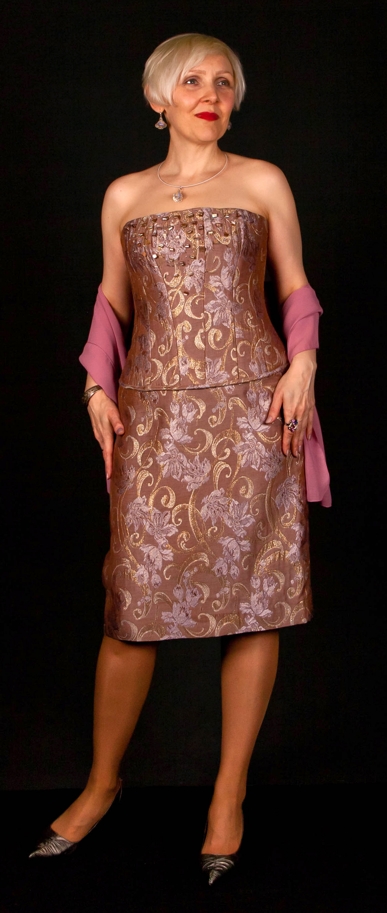
 Electronic corset pattern for small breasts
The file format of the electronic corset pattern for small breasts:
PDF in full size and without seam allowances.
After paying for the order, you will receive links to download two files patterns of a corset of the gradation of the sizes chosen by you:
- PDF file A4, adapted for printing patterns on sheets of A4 paper in any program on any device, including mobile phones.
- Multi-format PDF file for printing on sheets of any size from A0 to A4 on a printer or plotter using Adobe Reader.
 Sewing difficulty level: professional, that is, the pattern is not suitable for beginner tailors. Sewing a corset requires specific sewing skills and experience.
The model is suitable only for slender girls and ladies with small and medium-sized breasts.
Consumption: one length of the product in finished form plus 10 cm for fitting and processing.
The sample is sewn on jacquard reguiline. Lining - coarse calico. Doublerin was used as dubbing. The product was duplicated in 4 layers.
How to print patterns life-size on A4 sheets
How to choose size without measuring
Description of cutting and sewing
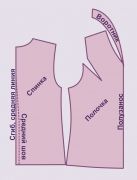
As in tailoring к orset belt, the first and very important step (Fig. 1): after making the patterns according to the pattern, you will make notches along the waist line. They are needed to avoid distortions when assembling the product.
We start cutting the corset from dublerin.
This is important: not from fabric, but from oaklerina!
Note. Choose dublerin that does not stretch.
You can also use collar fabric (dubbing for collars of men's shirts) or glued collar.
 Each detail of the "top" and "lining" is duplicated twice.
Therefore, we cut out 2 sets of dubbing: one without seam allowances (from collar fabric or beading), the other with seam allowances of 1 - 1,5 cm (from ordinary dublerin).
Allowances, of course, are not needed only on a semi-skid, since the middle part of the shelf is cut out in a turn and along the center line of the back.
What is the dubbing layer with allowances for?
So that the thin fabric of the corset does not come apart near the seams when you tighten the corset.
Why do you need dubbing without allowances?
The exact contour of dubbing parts without allowances will allow you to very accurately assemble the product and reduce the time for marking and cutting.
 Attention! some types of dublerin shrink! Take this into account when cutting the product!
It's good if you use a denser stock for dubbing details without allowances.
It is very important to sign each dubbing detail and each cut, and then put waist level marks on the notches on the patterns.
Pay attention to the signatures of the details (Fig. 1) and to the numbering of the slices: The slices are numbered only at the bottom to avoid confusion and not to make unnecessary inscriptions.
So, we paste the dubbing, which is with allowances for the fabric, and only after gluing we cut out the details of the “top” and “lining”.
Of course, when gluing dubbing parts, they must be arranged in the most economical way, for example, “jack”.
Compliance with the share direction along the part of the middle line of the part is important only for "Back 1" and "Shelves 1".
Once again, pay attention to the cutting and dubbing of the middle parts, which are signed as “Shelf 1” and “Back 1”: “Shelf 1” (1 piece from the fabric of the “top” and 1 piece from the “lining”) is cut out in a spread, and “Back 1” (two parts from the “top” fabric) have a fold along the midline (Fig. 2).
As for dubbing, in "Back 1" it is glued with an interval of 0,3 cm - 0,5 cm along the middle line of the back.
 In this model of the corset, there should not be lacing in front, so “Shelf 1” is duplicated completely without gaps.
The most important thing: do not get confused in such an abundance of details, so sign them.
Glue the second dubbing layer (parts without allowances) over the first layer (parts with allowances) and then cut out the blanks without additional seam allowances.
Assembly is not difficult.
We start by ironing, folding the duplicated blanks of “Back 1” along the middle line.
We grind the upper corners of the parts "Back 1".
We stuff blocks for lacing or make loops in other, convenient ways.
Then we grind the details of the “top” and stitch them to the “Backs 1”.
Ironing or ironing stitched seams on big pillow.
We lace up and do the fitting.
If necessary, we substitute cups of the desired shape, outline their location.
The fitting of the corset is performed on the "top" of the product.
We correct, if necessary, along the seam "2".
The rest is regulated by lacing.
We collect the “lining”, taking into account the changes made on the fitting of the “top”.
We adjust regelin at the seams and in other necessary places, having previously melted its sections.
You can adjust regilin both on the “lining” and on the “top”, the main thing is that it is inside the product.
On a printed sample regilin tuned in to the sub.
Please also note that the segments of the regelin tape do not reach the edge of the dubbing, which without allowances is 0,1 - 0,2 cm.
After we have finished stitching the regilin, we connect the “top” and “lining” along the seam “2” and grind the seam of the upper cut.
Between the layers of the "top" and "lining" we attach the cups, if they are provided.
We turn the product inside out on the “face”, baste the upper cut with 1,5 cm oblique stitches, weave the corset along each detail vertically with the same oblique stitches and sweep the lower cut.
You can try again to make sure everything is done correctly.
Then, we connect the "top" and "lining", laying the lines along the "top" exactly at the seams.
Bartacks at the beginning and end of these lines are required.
Carefully iron the product and lay the lines in the seams connecting the parts along the “face” of the product.
We edging the bottom with an oblique trim in the color of the "top" or finishing color.
We remove the notch and iron to remove traces of temporary lines.
Done!
Download this pattern pdf:
Corset pattern for small breasts
$2.50 (100 hryvnia)
Bank cards of the Russian Federation are not accepted for payment!
Size charts What is the height of the pattern Payment methods Ask a question Reviews
Vera Olkhovskaya in social networks:

See similar clothing patterns and how to sew on them


-
Any pattern for free for a review of a previously made order
More...
Lifetime promotion for buyers of patterns!

Leave a review about my store of patterns for an order that you made before, and you will receive any paid pattern of your choice Free!
Catalog:
New patterns on the site


Most readable articles
- How to print patterns in full size on sheets of any format? Category: F.A.Q.
- Pattern of a dress for a babydoll girl Category: Dress patterns for free
- How to take measurements for sewing Category: Sewing: general questions
- How to sew a skirt without darts and without a pattern: "Tatyanka" Category: How to sew...?
- How to learn to sew from scratch at home for free? Category: F.A.Q.
- Skirt with a belt - how to sew a belt to a skirt and processing the belt when sewing a skirt for beginners Category: Waist section processing with and without belt
- How to choose a pattern size? Do Olkhovskaya patterns require a fit? Category: F.A.Q.
- Do-it-yourself parsley, Cossack and Gnome according to free patterns by Vera Olkhovskaya Category: How to sew a New Year's costume and costumes for the holidays with your own hands
New lessons and reviews
-
I sewed a boho trapeze dress size 42 according to your pattern
Category: Patterns - photos and reviews from users

-
I made two dresses with this pattern.
Category: Patterns - photos and reviews from users

-
Thanks for the fast order processing.
Category: Patterns - photos and reviews from users

-
When sewing, I slightly deepened the front neck
Category: Patterns - photos and reviews from users
