
Size charts What is the height of the pattern Payment methods Ask a question Reviews
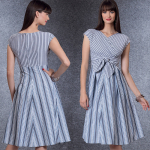
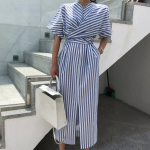
 How to sew a detachable kimono dress with ties with your own hands using a simple pattern for beginners

Contents of the instruction:
- Description of patterns.
- The design of the style of the dress, from which to sew and a set of PDF patterns.
- How to buy, download and print ready-made patterns.
- Features of patterns of large sizes and cutting of small, medium sizes.
- How to sew a dress with a kimono sleeve step by step for beginners.
1. Description of patterns
 Simple dress patterns with a one-piece cut-off sleeve with ties
Sizes: 40-52 and 52-64. The entire range of sizes in one file.
File format: PDF full size and without seam allowances
After paying for the order, you will receive links to download two files dress patterns from 40 to 52 or from 52 to 64 size:
- PDF file A4, adapted for printing patterns on sheets of A4 paper in any program on any device, including mobile phones.
- Multi-format PDF file for printing on sheets of any size from A0 to A4 on a printer or plotter using Adobe Reader.
 1.1. Dress pattern assembly scheme on A4 sheets for sizes from 40 to 52

The pattern is going on two large pages of patterns:
- The first page of patterns is assembled from 20 sheets of A4 format - 5 rows of 4 sheets in a row.
- The second page of the sundress patterns is assembled from 15 sheets of A4 format - 5 rows of 3 sheets in a row.
- Total 35 sheets of A4 paper
on a full-size dress pattern.

1.2. Dress pattern assembly scheme on A4 sheets for sizes from 52 to 64
The pattern for the range of sizes is assembled on two large pages of patterns:
- The first page of patterns is assembled from 30 sheets of A4 format - 6 rows of 5 sheets in a row.
- The second page of the sundress patterns is assembled from 15 sheets of A4 format - 5 rows of 3 sheets in a row.
- Total 45 sheets A4 size paper for a dress pattern real size.
Sewing difficulty level: medium.
Style suitable for all types of figures of various fullness.
The pattern is intended for home use only and for sewing on household sewing equipment.
For tailoring, you need an overlocker, a household machine and a household iron.

2. The design of the style of the dress, what to sew and a set of PDF patterns
2.1. A set of patterns for a simple cut-off kimono dress (picture 1)
- A back with a marking of a facing of a sprout.
- Shelf bodice.
- Shelf PP skirts with facing.
- Pocket burlap details - facing burlap and valance burlap.
2.2. Description of the dress pattern design
 The pattern of a straight dress is made on the base with a one-piece kimono sleeve.
Or you can say that this is a pattern of a sheath dress with a kimono sleeve.
The tuck for the bust, which is the basis of the bodice of the shelf, allows you to improve the fit of the dress for full ones and allows you to choose the most convenient tailoring option.
The upper section of the PP skirt is raised above the waist, which allows you to securely cover the upper section of the skirt with a bodice.
The pocket patterns of the cut-off barrel type are made taking into account the raised upper cut of the PP skirt without complicating the design.
 The facing of the front is congruent to the middle part of the front, which allows you to avoid unwanted deformation of the dress when moving.
2.3. What is this dress made of?
This dress can be sewn from almost any thin stable fabric.
For example, from chintz, shirting fabric, thin linen or dress jeans.
Suitable silk, cambric and staple.
Preference should be given to double-sided fabrics.
Consumption will be from 250 to 280 cm with a width of 140 - 150 cm.
You will also need a zipper for fastening.
3. How to buy, download and print ready-made patterns
How to choose a size without using tables and taking measurements
What height are the patterns for?
How to buy a ready-made electronic pattern
How to print a pattern at home life-size on A4 sheets or on sheets of any other size
How to assemble a pattern after printing
Simple patterns for dresses, skirts, T-shirts and trousers in full size Free

4. Features of patterns of large sizes and cutting of small, medium sizes
 Before opening, as usual, we check and, if necessary, adjust the length of the skirt and the length of the sleeve. At the same time, we measure the length of the skirt along the side from the waist down, and the length of the sleeve - from the side point of the neck through the shoulder point to the desired length.
Consider cutting options (picture 2) for single-sided and double-sided fabrics.
Pay attention to the pattern "Shelf PP skirt". The “stitch for the shelf” fragment can be cut out as a whole if the fabric is double-sided (on the left), and separately (on the right) if the fabric is one-sided.
The facing for the sprout (the neck of the back) is cut out according to the pattern of the back. First from dublerin without allowances for seams. Allowances will be added after gluing dubbing blanks to the fabric.
The facing of the neck of the shelf is partially duplicated. We cut the dubbing with large teeth (picture 2).
Burlap can be cut as two pieces (left) or as one piece (right).
Most seam allowances are 1 cm. Now for the exceptions.
We do not add allowances (we cut out with a stroke line, in fact it is 0,3 cm) along the sections: the sprout, the neck, the detachable section of the facing of the shelf, along the cut of the entrance to the pocket of the burlap-turning and the PP skirt.
On the bottom for a hem with a closed cut (double hem), add 2 - 6 cm.
For the “lower” half-skid tie, we add a large arbitrary allowance.
And about the allowance for slots. In this dress, the vent can be done in front, at the back along the middle seam and along the side seams. This is according to your desire. Slot type "spreader". It is desirable to duplicate it in dense fabrics, but not in thin ones. Allowance width 2 - 4 cm (see picture 2).
Now for the middle seam. Home couturiers often ask why the middle seam is needed. It is needed for the convenience of adjusting the fit, for the fastening at the back and for the slots. But, if you are sewing this dress from staple, cambric or thin silk, then it is better to make the back without a seam in order to avoid separation along the seam. In these cases, cut should be along the midline of the back, that is, lay the back with the middle line on the fold of the fabric.
Let's look again picture 2. On the left, the PP of the skirt is cut out completely, on the right - along the cut of the entrance to the pocket. How to cut correctly?
According to the rules, it is necessary to cut the PP with a pocket completely and then cut off a fragment of the field of view in order to use it when cutting the burlap-valve to select the exact share direction. In other words, the cut piece will help to accurately match the pattern of the fabric.
 The layouts are shown in 3 drawing. Left is small, right is large.
The bodice of the shelf with ties is cut out arbitrarily, the half-skid falls on the "oblique thread". If the fabric is striped, before cutting, check that the strips overlap exactly.
After cutting, while the parts are folded in pairs, notches should be made.
The most important notch, without which processing is impossible, went to the bodice of the shelf - it is in the corner between the string and the half-skid.
In addition to it, we will need notches along the upper cut of the PP skirt above the fold, as well as notches at the level of the hips and waist along the side seams.
5. How to sew a dress with a kimono sleeve step by step for beginners
- We start with the processing of pockets. We always start with pockets. We grind the entrance, give the fixing and finishing lines. We iron. We grind the burlap, overcast it or turn it over. We perform the bartack along the side seam as usual, and make the bartack on top of the pocket longer - from above to the waist and lower by 1,5 - 2 cm. It turns out a rather long bartack. We iron.
- We process a soft fold - we grind to the waist, we sweep the rest and iron it. We process the tuck, if you decide to process it. The tuck can be processed like a soft fold - stitched in the lower part, and swept up and ironed the top.
- We grind the tie, perform the finishing line and iron it.
- Stitch, overcast and iron the shoulder seams.
- We grind the middle seam of the PP skirt. If a slot is provided, we duplicate it first. In thin fabrics, we do not duplicate, but we perform a bartack, hemming a small piece of fabric from the inside.
- If a zipper is provided in the middle seam of the back, we sew the zipper. If the middle seam of the back is not provided, we perform the “drop” fastener, edging. We iron.
- We glue the doubler of the facings. We grind the facings of the sprout and the neck (turning the shelf) along the shoulder seams. We overcast the departure cut of the facing and the upper cut of the PP skirt.
- We bend the upper cut of the PP skirt or process it with a strip of fabric.
- We grind, weave and iron the side seams.
- Process the bottom of the sleeve with an open cut (overcast and bend once) or edging.
- Process the bottom of the dress with a closed (double hem) or open cut.
- Finishing ironing.
Download this pattern pdf:
Simple patterns for a cut-off kimono dress with ties
$2.00 (80 hryvnia)
Bank cards of the Russian Federation are not accepted for payment!
Size charts What is the height of the pattern Payment methods Ask a question Reviews
Vera Olkhovskaya in social networks:

See similar clothing patterns and how to sew on them


-
Any pattern for free for a review of a previously made order
More...
Lifetime promotion for buyers of patterns!

Leave a review about my store of patterns for an order that you made before, and you will receive any paid pattern of your choice Free!
Catalog:
New patterns on the site


Most readable articles
- How to print patterns in full size on sheets of any format? Category: F.A.Q.
- Pattern of a dress for a babydoll girl Category: Dress patterns for free
- How to take measurements for sewing Category: Sewing: general questions
- How to sew a skirt without darts and without a pattern: "Tatyanka" Category: How to sew...?
- How to learn to sew from scratch at home for free? Category: F.A.Q.
- Skirt with a belt - how to sew a belt to a skirt and processing the belt when sewing a skirt for beginners Category: Waist section processing with and without belt
- How to choose a pattern size? Do Olkhovskaya patterns require a fit? Category: F.A.Q.
- Do-it-yourself parsley, Cossack and Gnome according to free patterns by Vera Olkhovskaya Category: How to sew a New Year's costume and costumes for the holidays with your own hands
New lessons and reviews
-
I sewed a boho trapeze dress size 42 according to your pattern
Category: Patterns - photos and reviews from users

-
I made two dresses with this pattern.
Category: Patterns - photos and reviews from users

-
Thanks for the fast order processing.
Category: Patterns - photos and reviews from users

-
When sewing, I slightly deepened the front neck
Category: Patterns - photos and reviews from users
