The bodice base pattern with reliefs is often used in New Look dresses. The latest trend is the appearance of an adjacent bodice in ethnic style clothes.
This tutorial on cutting techniques for beginners will seem too complicated. It is advisable to proceed to the construction of a pattern of a bodice with reliefs after you have already mastered taking measurements well and remember all their designations.
The bodice is adjacent with reliefs from the armhole - building the base
Watch the video master class and read how to take measurements
Enter the measurements and calculations taken in the table of measurements.
 We begin the construction of this foundation, as usual, with horizontal lines: the waist, the height of the barrel, the level of the armhole, the height of the chest, and the initial (upper) lines of the back and front (Fig. 1).
Now in order and in more detail.
We retreat from the lower horizontal cut of the sheet 3 см and draw a horizontal waist common for patterns of the back and shelves. Up from it - Dboch - the level of the barrel, also through the entire sheet. Again from the waist up Ds и dpt - initial for the back and shelves. Now down from the original shelf Wg and armhole height.
The height of the armhole is calculated by measuring a segment of the back drawing, but for measurement we need a ready-made sprout (the neck of the back). Therefore, we build a sprout: we measure to the original width of the sprout
1/3Ssh + 0,5cm
And along the left vertical cut, which we have the middle line of the back, down
1/3 sprout width
We connect the obtained points with a smooth curve and proceed to the measurement necessary to calculate the horizontal armhole of the shelf - we measure according to the drawing of the back from the sprout to the level of the barrel along the midline. In the drawing, the desired segment is indicated by a curly bracket (Fig. 1).
Having measured, subtract the value by armhole height table
and set aside from the original shelf down. This is the horizontal height of the armhole for the shelf.
Before proceeding to the construction of the pattern, please note that for a tight-fitting bodice Pg distributed in a certain way: to the width of the shelf and back - along 0,5-0,7 cm, the rest of the increase will go to the expansion of the armhole.
The armhole in a fitted bodice should be as high as possible, the length of the shoulder can be reduced by 1 см, and sleeve sleeves - expand and make on 1 см above. But all these nuances should be taken into account only with a sufficiently high degree of fit.
Drawing of the back of the bodice
 Now we continue drawing backrests (Fig. 2).
The width of the bodice to the side seam is set aside along the line of the height of the barrel:
1/2 (Cr + Pg) minus 1 cm - for an adjacent bodice, in which Pg less than 3 см
1/2 (Cr + Pg) minus 2 cm - for a bodice with an increase from 4 cm.
Back width - along the same horizontal:
ws + 0,5 cm or ws + 1 cm, depending on the value Pg.
The shoulder cut of the back in this base pattern does not have a tuck, so add to Dp 0,5-1 cm for landing.
As in other basics, the shoulder seam depends on the point located at the intersection of two arcs made with radii
Dp + 0,5 cm from the lateral point of the germ and VPK from midpoint at waist level.
 If you do not provide even a small shoulder pad, adjust the shoulder seam at the lateral point of the neck (blue line).
Armhole points.
Perpendicular to armhole level - 7-8 cm. Armhole angle bisector 3 cm.
Dart solution from the armhole, turning into a relief, for tight-fitting bodices 1,5-2 cm, for bodices with Pg from 4 cm tuck solution - 1 - 1,5 cm.
Side seam
1/4 (Cr minus St) minus 0,5 cm.
The barrel is decorated with a concave line.
Solution of thallium tuck:
Side bevel + 1 cm.
Design the relief (Fig. 3), taking into account the solutions of the tucks.
Equalize the relief lines - lengthen the one that is shorter and smoothly shape the new armhole.
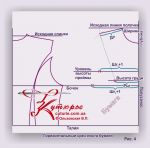 Building a shelf pattern (Fig. 4).
Let's start with the neck:
Neck width = sprout width
Neck height = neck width + 1cm
Then, we move on to the shoulder cut, which, like on the back pattern, depends on the point at the intersection of two radii: Dp и Npp, of course, before that, you should find the center of the bulge of the chest by measuring rcg from a half-drift.
 We measure the width of the smaller chest according to the level of the armhole:
Shg1 + 0,5 cm
And the width of the chest is large in terms of the level of the barrel:
Shg2 + 0,5 cm
From the obtained points up along the perpendiculars, measure 4 - 8 cm optional, but the number must be the same (Fig. 5). Let's say we measure 6 см.
And again, at the level of the barrel, we measure the width of the shelf from the half-skid to the side seam:
1/2(Sg + Pg) +1 cm or 2 см
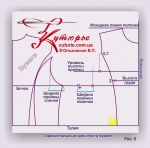 Now you can proceed to the construction of the armhole section from the shoulder point and the first line of the relief:
from the point «6» to the half-drift line - 0,7 см, and from the center of the bulge of the chest towards the side - 1,5-2 cm. We connect the shoulder point, «0,7» и «2» smoothly and continue to the waist (Fig. 6).
Next:
Armhole Total Width = 1/4Cr
From the resulting value, subtract the width of the back armhole. Set aside the difference from the point of the side seam (blue cross).
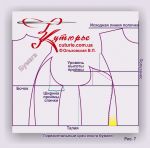 Waist tuck solution 3,5-4 cm – it is possible to build a second relief line (Fig. 7).
Bevel of the side seam of the shelf:
back bevel minus 0,5 cm
To check the width of the shelf at the waist: the sum of the lengths of the segments at the waist of the shelf and back should be equal to St + 2
Completing the drawing, equalize both relief lines of the shelf along the first line and draw an armhole with a smooth curve.
You can also lower the shelf, as in other basics, but in individual tailoring you can do this on the fitting, adding a waist allowance when cutting 3 - 4 cm.
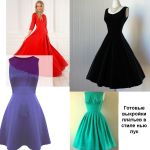
Download ready-made PDF patterns of dresses in the style of a new bow
Ready-made patterns in full size dresses with bodices of different styles









 Join my community on Viber...


