 In the article, download a free pattern of the base of a dress with a chest tuck for a girl in size 28-36 and read how to build such a base with your own hands for other sizes according to your measurements. See ready-made electronic patterns of women's clothing on this basis.
This same pattern is the basis with which they usually begin learning the cutting technique.
The word “breast” in the name means “for the chest”, and the clarification “from the shoulder section” indicates that the tuck for the chest in other basic patterns can come out of the armhole, from the side seam, from the waist section or from the neck.
All the bases I have listed can be obtained both by modeling the base with a tuck from the shoulder seam, and by constructing them on the so-called "grid" of horizontal and vertical lines.
Of course, any base pattern can be used with minor changes to sew a sheath dress or a dress cut off at the waist with a Tatyanka skirt, a sun skirt and others.
For a better understanding of how to build it with your own hands, you can download my ready-made free pattern for the basis of a dress for a girl in PDF file in full size for sizes 28-36:
Free download A4 file of a dress pattern with a chest tuck for a girl
Download for free a multi-format file (plotter) of the same basic pattern
Watch and download ready-made patterns for women on this basis
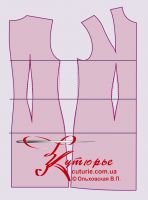 How to build such a pattern base with your own hands
The width of the sheet for building the base must be at least
Sat + Pb + 10 cm,
where 10 is the possible expansion of the details of the front and back, as well as the bulge of the middle seam, if the figure has architectural luxury in the form of bulging buttocks.
Features of a cut such as a middle seam, taking into account the features of the figure, tucks at the waist and allowances for a free fit must be laid directly when building the base, based on the expected result.
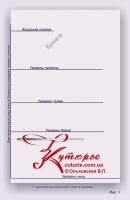 So, if you already know how to take measurements from a figure, we begin to build a pattern drawing.
If you can't - watch the video master class and read how to take measurements
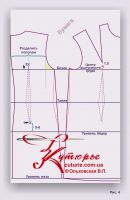
Back (Fig. 1). The vertical cut of the paper sheet on the left - the middle line of the back, the lower horizontal - should not coincide with the bottom line by 2 - 3 cm, since the shelf will go down.
To rationally place the drawing on paper, we start the construction from the level (line) of the bottom - up Di or du (from the waist to the bottom, if such a measurement was taken) and draw, respectively, the original horizontal of the back or the line (level) of the waist. If you didn’t take Du’s measurement, measure down from the original Ds.
From the waist down 18 см - the level of the hips, and up from the waist Dboch - barrel level.
Please note that for some designs the barrel level may be lowered by 1 - 2 cm, and in sleeveless dresses it is better to use a “clean” measurement Dboch. In any case, the armhole can be trimmed at the fitting.
See how to cut the armhole on the fitting
Done with horizontal lines.
Construction of the middle seam
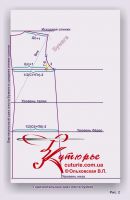 We turn to the construction of the middle seam, which is necessary for the vast majority of figures. Middle seam measurements, or rather, you can look at the measurement of the shape of the lumbar deflection in the same article and then write it down in a table.
After the middle seam - to limit the backrest pattern in width at different levels.
At the level of the barrel, set aside the width of the back:
ws + 1 cm
In the same place, measure the width of the back to the side seam when Pg = 2 cm, Pb = 4 cm. According to the level of the barrel, it will be
1/2(Cr+ Pg) minus 2cm,
and according to the level of the hips
1/2(Sat+Pb) minus 2cm
Sprout width: from the top of the original corner to the right, set aside
1/3Ssh + 0,5cm
Sprout height: down from the original corner:
1/3 sprout width
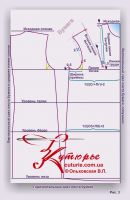 The shoulder section is built using arc serifs with radii Dp + tuckif any и Vpk.
To design an armhole, set aside from the top of the corresponding corner (it is marked with a red cross) along the bisector 3 см.
The shoulder tuck of the back is located at a distance 4-5 cm from a sprout. Solution 1-2 cm, length 6 - 8 cm. But in dresses, it should be done only for stooped figures with a convex back. You should start building it when the chest tuck is ready, but you need to lay the tuck solution in the length of the shoulder cut in advance.
Shelves (Fig. 3). You can start by extending the horizontal lines of the barrel, waist, hips and bottom and “dancing” from the right vertical cut of a sheet of paper and consider this cut a half-slide - the middle line of the shelf.
From the waist extended to the right, set aside dpt and draw the original horizontal for the shelf.
Then, find the center of the chest: down from the original horizontal, set aside the measurement Wg and from a half-skid at the level of chest height - measurement rcg.
Neck: from the original corner (it is colored blue) horizontally width:
1/3Ssh minus 0,5cm,
and from there along the vertical half-skid down the depth
1/3Ssh + 0,5cm
Chest tuck. On the original horizontal from the side point of the neck, set aside 4-5 cm. Connect the resulting point to the center of the bulge of the chest. This segment is the first line of the chest tuck. It must be shortened at the top 1 см, down on 1,5 см. Connect point "1" with the side point of the neck.
Next you need a compass. From the center of the bulge of the chest, set aside
Rcg + 2cm
Place the leg of the compass in the center of the bulge of the chest, and put the pencil at the point “Rtsg + 2” and draw an arc. Set aside in an arc from the first line of the tuck
difference between measurements1 and Shg2
Through the obtained point from the top of the tuck (and not from the center of the chest), draw the second line of the tuck, equalize its length with the first line.
How to build a shoulder cut at the base
From the highest point of the second tuck line, make a notch with a radius
Dp minus 4 cm
(or 5 см - this is the length of the already constructed segment of the shoulder seam). Make the second notch to determine the shoulder tuck from the center of the bulge of the chest with a radius Npp.
To design the armhole, we need at least 3 main points. This is the shoulder point (it already exists), the highest point of the side seam and the highest point of the perpendicular that limits the armhole of the shelf in width.
So, the highest point of the side seam: from the intersection of the half-skid and the level of the barrel, set aside the width of the shelf to the side seam. it
1/2(Sg + Pg) + 2cm,
where Pg from 5 to 6 см. Move the resulting point to 0,5 см up.
To build a perpendicular from the same intersection of the half-skid and the level of the barrel, set aside a greater width of the chest with an increase
Shg2 + 0,5 or 1 см
 For kinky figures, net measurement is deferred Shg2. From the obtained point, restore a perpendicular segment of length 4-5 cm. Its top is one of the armhole points.
Now, to make it easier for ourselves, we note two auxiliary points - midpoints. The first is by dividing the segment that determines the width of the armhole. The second - dividing the segment connecting the point "5", the shoulder and stepping back inside the construction 1 - 2 cm.
It remains only to determine the width of the shelf along the hips
1/2(Sat + Pb) + 2 cm,
connect the side points and lower the shelf by 1 - 2,5 cm. Of course, for the protruding buttocks, the lowering is done along the back. And, if you have doubts about this, “beat off” the length from the floor during the fitting.
Darts and deflections - the final stage of building a pattern of the base - should also correspond to the figure and each cutter has his own opinion on this matter.
But one rule when calculating tucks on a pattern remains immutable:
waist darts and deflections of the side cuts are calculated from the difference in the amounts (Sat+Fri) и (St+Fri).
The following formulas are given, which you may change over time, guided by your own sewing experience.
We start with the deflection of the side cut of the back (Fig. 4). It is calculated according to the formula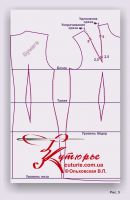
1/4(Sat - St) minus 0,5cm
Set aside the value according to the level of the waist of the back from the side line towards the construction.
The solution of the waist tuck of the back is equal to:
Back bevel + 0,5 or 1sm,
and its top should be above the level of the armhole by 3 см, the lowest point is 5 - 8 cm above the hip line.
The deflection of the shelf cut along the side cut is equal to:
Deflection of the side cut of the back minus 0,5 or 1sm
The solution of the thallium tuck of the shelf is equal to:
(Sat minus (St minus back darts and deflections)
In this case, the tuck solution is distributed unevenly: 1 см in the direction of the half-skid from the axis of the tuck, the rest - to the side seam. The axis of the tuck goes vertically from the center of the bulge of the chest, and the top is below the center by 3 - 3,5 cm.
The very position of the center lines of the tucks can also be different. In this drawing, the middle line of the tuck of the back runs literally along the middle of the back, if measured from the vertical of the corner of the armhole, and the middle line of the tuck of the shelf runs down from the center of the bulge of the chest.
Pay attention also to the deviation of the lower top towards the side seam.
On this drawing of the pattern of the basis for modeling can be considered ready.
If you need a pattern for sewing a sheath dress, then all lines should be drawn smoothly (Fig. 5).
Separately, we should talk about the design of the chest tuck.
Divide the lines of the chest dart into three segments. Segments at the shoulder seam 5 см. In these areas, the first line of the tuck is curved in such a way that it extends the shoulder seam by 1 см, and the second tuck line shortens it on its side. Thus, the length of the shoulder cut remains unchanged, but the slight curvature of the tuck improves its fit. The middle segments have bulges along 0,5 - 0,7 cm, and the segments at the top (of length 2,5 см) slightly (on 0,2 см) are concave inside the tuck.
Ready-made patterns of dresses and outerwear built on this basis
View my ready-made electronic patterns PDF files for printing in full size for dresses and women's coats. When constructing all these patterns, a base pattern with a chest tuck from the side cut was used, the lesson on which we reviewed above.
1. Coat pattern with a large stand for sizes from 42 to 62
Do-it-yourself coat - instructions on how to sew and a finished pattern of a beautiful women's coat. PDF files for printing on sheets of any format in a printer or plotter of coat patterns. The style is suitable for most types of figures - the additional relief on the shelf facilitates the fit. This coat will look good on girls and women of any age, height and fullness.
Download ready-made coat pattern with a large rack
2. Finished dress cutting pattern: skirt with pleats, bodice with reliefs for sizes from 40 to 52
This model is designed for young girls and women with a wide shoulder girdle, for a height of 160 - 170 cm. When sewing according to this pattern for taller girls, the bodice should be lengthened, for smaller ones, shortened.
Download the pattern of this detachable dress
3. Ready-made pattern of a summer dress with a short sleeve and two half-reliefs for sizes from 40 to 52
PDF file for printing and assembling a finished pattern with your own hands for a beautiful summer dress with a short sleeve. Sewing difficulty level: medium - the pattern is designed for couturiers with cutting and sewing skills.
Download summer dress with instructions on how to sew
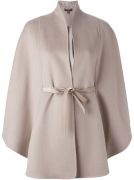
4. Ready-made pattern of a cape coat with a stand and a hood for sizes from 40 to 64
PDF file for printing a pattern of a stylish cape coat with a stand and a hood for sizes from 40 to 64 with instructions on how to sew such a coat with your own hands. According to this ready-made pattern, you can sew: ⠀ a short coat, a cape separately, an option without using sleeves is also possible. ⠀
Download women's cape coat pattern
5. Pattern of the dress "a-line boho with relief" in sizes from 40 to 64
PDF file for downloading patterns of a boho style dress for full (sizes 52 - 64) and a file with patterns for sizes from 40 to 52. Sewing Difficulty Level: Easy, but this model will require some sewing experience. The silhouette is free, suitable for all types of figures of any height and any fullness.
Download pattern boho dress trapezoid
6. Pattern of a women's coat with soft folds, size 42 - 52
Sewing difficulty level: professional, that is, the tailor must have skills in cutting and sewing outerwear. Before buying a pattern, carefully read the instructions for the pattern to the end ...
Download pattern of a women's coat with soft folds
7. Cape cape pattern with one-piece stand for sizes 40 to 62
PDF, ready-made pattern in full size and without seam allowances Sewing difficulty level: medium - the product will require skills in working with overcoat fabrics.



 Join my community on Viber...


