Vera Olkhovskaya
1.1. Vertical proportions of the figure. Six or eight?
Without going into the details of the debate about beauty, let's turn to the vertical proportions of the figures that are offered by artists.
A conditionally proportional human figure, if we take the height of the head from the chin to the crown as a unit of measurement, consists of 6 - 8 heads.
For example, Greek sculptures depicting goddesses are about 7 heads tall...
And Michelangelo (Fig. 1) gives the proportions of a figure of 8 parts, which is most consistent with the modern ideal of beauty.
But more often the height of a woman is 6 - 7 heads.
At the same time, the proportions of the height of growth change in this way: the lower the height, the fewer heads are invested in its length and the shorter the legs.
A six head tall man would not be too tall and would most likely be of the brachymorphic type.
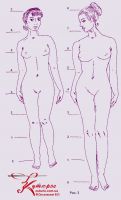
1. The brachymorphic type has relatively short limbs and a relatively long, wide body. The figure may look stocky. The buttocks are located quite low. The head is somewhat larger than in representatives of other types (Fig. 2).
 Of the well-known historical characters of this type - Jeanne Antoinette Poisson, Marquise de Pompadour (1721 - 1764) - favorite of the French king Louis XV.
This lady is credited with inventing heels out of a desire to increase the length of her legs.
Definition 2. Dolichomorphic type (Fig. 3 figure on the right) - has relatively long limbs, a short narrow body and a relatively small head. In most cases, people of high or medium height belong to this type.
Many fashion models can serve as an example. From historical figures - Peter I (1672 - 1725).
Let me remind you that it was he who radically influenced the Russian fashion of his time.
Definition 3. The most proportional is the mesomorphic type (Fig. 3 figure on the left).
Most Greek sculptures depict people of this type.
It is worth noting that it is the majority of mesomorphic people.
Model girls are of the dolichomorphic type.
Therefore, it is for these two types of people that the fashion industry works.
1.2. Reasoning about the middle seam. Specific measurements of bends.
Building a basic drawing of the back
 Before you start building a drawing, master taking measurements (Pay attention to the video master class in the middle of the article at the link)
Rule 1. We start building any foundation with horizontal lines. If the drawing is made directly on the fabric, then the width of the shelf and back is pre-calculated in order to correctly fold the cut.
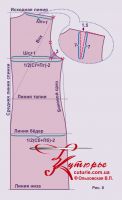
So, we start with horizontal lines: the initial one - from which the construction begins, the horizontals of the armhole level, the waist, hips and bottom lines (Fig. 5 a).
From the original line down, set aside the measurement Ds - back length - draw a waist line.
Measure up from it Dboch. This is the height of the barrel.
Then from the waist down, set aside 18 см for the level of the hips and again from the waist down du for the horizontal bottom.
Note 1. You can find the horizontal of the bottom by setting aside the measurement of Diz, but this is not very convenient, since your drawing does not yet have a point corresponding to the point of the seventh cervical vertebra. To find the latter, you have to build a sprout. It is also inconvenient to use the Diz measurement in the case of strongly protruding buttocks and a large lumbar deflection. So measure Du down from the waist.
Definition 4. Rostock - the curve of the neck of the back.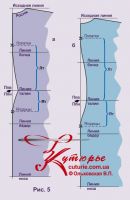
Definition 5. Starting angle - the angle from which the construction of the base of the shelf or backrest begins. Its value is 900, the horizontal side of the corner is the original horizontal, the vertical side of the corner is the original vertical or the middle line of the back.
To build a sprout from the top of the initial corner, set aside the width of the sprout along the initial horizontal
1/3Ssh+0,5 cm
Measure the height of the sprout down from the top of the original corner. She is equal
1/3 sprout width
When you have drawn all the horizontal lines of the base and the sprout, the question arises before you - do you need a middle seam.
If “yes”, then which one? The standard measurements recorded in our measurements table cannot give an answer.
Therefore, you will have to measure the lumbar deflection.
Let's start with t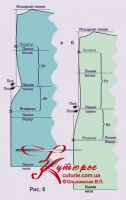 wow, that in some figures the deflection in the lumbar region does not exist at all.
And sometimes, instead of it - a bulge in the lumbar region or in the region of the ribs.
Owners of such forms should not sew tight-fitting dresses.
Fortunately, such features of posture are quite rare, even at a very respectable age.
In most cases, there is a deflection.
To measure the lumbar curve take a ruler and a regular square (Fig. 4).
Attach the ruler with zero to the lace encircling the waist, in the region of the spine in such a way that its plane is horizontal, that is, only the edge of the ruler would be visible from the side, and the numbers were on top.
Place a square on the ruler with a short leg (shortest side).
Its long leg (middle side) should touch the most protruding part of the shoulder blades.
 On fig. 5-7 the most protruding points are marked with crosses. Write the value as "lumbar deflection upper" (PPV).
After that, it is worth measuring "lumbar deflection lower" (Ppn).
The ruler is also attached with a zero to the lace in the spine.
Position its plane horizontally, but so that the numbers are at the bottom.
Lean the square against the most protruding part of the buttocks with a long leg, lean the short leg against the ruler.
Write down the value.
After this value PPV и Ppn need to be compared.
If they are the same, then the protruding points of the shoulder blades and hips will be located on the midline of the back (Fig. 5 a, b).
The distance to the most protruding points of the shoulder blades and buttocks can be measured along with taking measurements PPV и Ppn.
 Measurements should be made strictly along a vertical line, and can be written as "shoulder-waist" - Lt.
Accordingly, the distance from the waist to the most protruding point of the buttocks can be written as "buttocks-waist" - Yat.
If Ppn more than PPV, that is, the buttocks protrude more than the shoulder blades (Fig. 6 a, b), then the middle seam will combine two verticals - for the bodice and for the skirt.
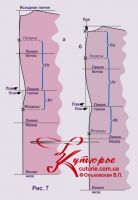
The variant, when Ppv is greater than Ppn, is also possible (Fig. 7 a, b).
If necessary, you can also measure the distance from the sprout to the bulge of the shoulder blades - "sprout-blades" (RL) and the value of the deflection to the sprout - "sprout-blade deflection" (Prl).
This option in Fig. 7 b.
The difficulty lies in the fact that the abundance of measurements is confusing, and it is simply impossible for mere mortals to remember their abbreviation.
Therefore, if you are not a professional, you should use all additional measurements only in exceptional cases.
I would like dear readers and readers to carefully consider the drawings of the middle seam shown in this chapter.
The distances between the horizontals are unchanged, but with a change in the outlines of the deflections and bulges of the middle seam, there is a visual sensation of a change in proportions.
It is worth considering what length can be optimal, based on the contour of the middle seam.
Having finished with such a “boring and uninteresting thing” as the middle seam, we will continue to build the base of the back (Fig. 8).
At the level of the barrel from the finished middle seam of the back, set aside the width of the back:
ws + 1 cm, for a kinky figure - plus 1,5cm
Note 2. If you are drawing a back without a middle seam, for example, for a loose blouse, then all widths should be set aside from the original vertical.
Definition 6: a figure is considered conditionally inflexible if Dpt is equal to or greater than Ds.
The visually inflexed figure does not have a pronounced bulge in the area of the shoulder blades, and the chest is strongly raised.
The opposite of kinky is a stooped figure with a rounded back and a flat or concave chest.
In the same place, measure the width of the back to the side seam. At Pg = 2 cm, Pb = 4 cm this width at the level of the barrel will be
1/2 (Cr + Pg) minus 2 cm,
and according to the level of the hips
1/2 (Sat + Pb) minus 2 cm
Council 1. in order to save time when cutting or making patterns, it is better to calculate the width of the back and shelves according to the levels of the chest and hips in advance and enter them in the table of measurements.
The shoulder section is built using an imaginary compass, which performs serifs from the midpoint of the waist with a radius VPK and from the lateral point of the neck with a radius Dp + tuck or landing.
The point obtained as a result of the intersection of the serifs is called the shoulder point and is connected to the lateral point of the sprout.
Separately, we dwell on the shoulder tuck.
Rule 2. The shoulder tuck is located at a distance 4 - 5 cm from the lateral point of the sprout.
Solution from 1 to 2 cm, length - 6 - 8 cm.
The greater the roundness of the back and / or stoop, the greater the opening and the length of the tuck.
In extreme cases, with a large stoop, the solution can even reach 3 cm.
You must choose the right size for your figure.
Note 3. For sizes from 52-th (SG = 52 cm), the roundness of the back increases, therefore, even for dignified ladies, a tuck with a solution can be recommended 2 см.
The same can be said about the male basics: shoulder tuck - from 2 to 3,5 cm.
So, back to the drawing. Step back from the side point of the sprout along the shoulder cut 4 or 5 см and draw a vertical segment with a length, say, 7 см.
From the intersection of the first line of the tuck with the shoulder cut, set aside the solution, for example, 1,5 см.
Connect the resulting point to the lower end of the vertical segment and extend the resulting line slightly upward.
After, from the top of the tuck along the second line, measure 7 см and connect the highest point of this segment with the shoulder point.
To design the curve of the armhole, set aside along the bisector from the corner of the same name (in Figure 8 it is highlighted) 3 см.
1.2.1. Waist darts and bevels
We start with the side bevel of the back (Fig. 8). It is calculated according to the formula
1/4 (Sg - St) minus 0,5 cm
Set aside the value along the cut of the waist of the back from the side line towards the construction.
The solution of the waist tuck of the back is equal to:
Back bevel + 0,5 or 1sm
The axis of symmetry of this tuck is a continuation of the shoulder tuck, and its top is located in most cases below the level of the armhole on 1 – 3 cm. The bevel of the shelf along the side cut is equal to:
Back bevel minus 0,5 or 1sm
The solution of the thallium tuck of the shelf is equal to:
(Cr minus (St minus back darts and bevels)
In this case, the tuck solution is distributed unevenly: 1 см in the direction of the half-skid from the axis of the tuck, the rest - to the side seam.
The axis of the tuck goes vertically from the center of the bulge of the chest, and the top is below the center by 3 - 3,5 cm.
All lines of tucks and bevels are made in smooth concave lines.
Council 2. If you are going to use patterns for modeling, then the forming concave lines should be applied to the drawing after the modeling stage is completed.
Note 4. The formulas for tucks and bevels proposed in this chapter are only suitable for conditionally proportional figures.
For figures with a large lumbar deflection, you will have to increase the gap of the back tucks by tucking the shelf.
And owners of lush hips may have to increase the curves of the side cuts. In any case, the necessary adjustments can be made on the fitting.
Council 3. If you use patterns when cutting and intend to keep the base, change it, taking into account the amendments that were made during the fitting to the product.




 Join my community on Viber...


