Vera Olkhovskaya
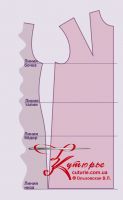
In addition to those horizontal lines that we encountered when building the base of the back (height of the barrel, waist, hips and bottom), two more will be added to the shelf: the height of the chest and the level of the armhole for the shelf.
See also free article about how to build a pattern-free basis for full
How to build drawing of a pattern-base for stretch
Note. The level of the armhole of the shelf is needed for all the bases except for the base with a breast tuck from the shoulder.
1.3.1. small bust
So, let's start with patterns bases of a shelf with a breast tuck from a shoulder. It is suitable for all ladies with a slight difference in measurements. Shg1 и Shg2in other words with small breasts.
Note for beginners. Let me remind you that the measurements Shg1 и Shg2 are recorded in half the size and the difference is taken into account based on this rule. That is, after taking measurements, the values are divided in half, then they are written down (to the table) and only after that do further calculations. This also applies to other formulas.
 This base will not work, perhaps, only if the centers of the bulge of the chest are too low (10 - 12 cm from waist level).
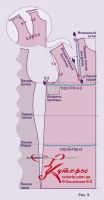
Extend the horizontal lines of the back, except for the original one, in the direction of the future construction by the width of the shelf or to the right vertical edge of the paper (Fig. 9).
The width of the shelf at the level of the barrel will be
1/2 (Sg + Pg) + 2 cm,
and according to the level of the hips
1/2 (Sat + Pb) + 2 cm
Having decided on the width, draw a vertical line, which will be the middle line of the shelf or, as they say, the half-skid line.
Definition Half skid or half skid line is present in the drawing of any shoulder product. In fact, this is the axis of symmetry of the shelf. All horizontal lines of the base should intersect with it at right angles. On the figure, the half-skid will correspond to the vertical passing through the jugular cavity and the navel. If you cut using patterns, the half-skid line must be transferred to the shelves of the product and stored until it is fully ready.
Take your measurement from waist level dpt and draw the original horizontal line. From the original down - Wg and draw a horizontal level of the bulges of the chest. On this horizontal line from the half-skid, set aside the measurement rcg.
Neck: from the original corner horizontally measure its width:
1/3Ssh + 0,5cm,
and from there along the vertical half-skid down the depth
Neck width + 1 cm
Breast tuck
On the original horizontal from the side point of the neck, set aside 4 см. This is the distance to the tuck, which should be less than 1 смthan the distance along the shoulder cut of the back from the lateral point of the sprout to the tuck, otherwise the tucks will not match when the shoulder seam is joined. It will become clear why later. Point "4" connect with the center of the bulge of the chest. This segment is the first line of the chest tuck. It must be shortened at the top 1 см, down on 1,5 см. Connect point "1" with the side point of the neck, which will give the section of the shoulder seam.
Place the leg of the compass in the center of the bulge of the chest and with a radius
Rcg + 2 cm,
draw an arc. In an arc from its intersection with the first line of the tuck, set aside
difference between measurements1 and Shg2
Through the obtained point from the top of the tuck, indicated by the point "1,5" (and not from the center of the chest), draw the second line of the tuck, equalize its length with the first line.
shoulder cut - cut after tuck. From the highest point of the second line of the tuck, make a notch with a compass with a radius equal to the difference between the measure Dp and the already existing segment of the shoulder seam
R = Dp minus 4 cm or 5 см
Make the second notch to determine the shoulder tuck from the center of the bulge of the chest with a radius equal to the measure Npp.
To design the armhole, we need at least 3 main points. This is the shoulder point (it already exists), the highest point of the side seam and the highest point of the perpendicular that limits the armhole of the shelf in width.
So, the highest point of the side seam: from the intersection of the half-skid and the level of the barrel, set aside the width of the shelf to the side seam. it
1/2(Sg + Pg) + 2cm,
where Pg from 4 to 6 см. Move the resulting point to 0,5 см up.
To build a perpendicular from the same intersection of the half-skid and the level of the barrel, set aside the greater width of the chest by adding
Shg2 + 0,5 or 1 см
For kinky figures, net measurement is deferred Shg2. From the obtained point, draw a perpendicular segment with a length 4-5 cm. Its top is another armhole point.
So, the curve of the armhole will begin at the shoulder point, which, with a deflection in 1 - 1,5 cm will connect with the point "5" and, touching the horizontal barrel with the point "0,5".
Details about chest tuck (fragment in the "bubble"). Note that her lines are divided into three segments. Segments at the shoulder seam - by 5 см. In these areas, the first line of the tuck is curved in such a way that it extends the part of the shoulder seam that adjoins the neckline on 1 см, and the second tuck line shortens the part adjacent to the armhole. Thus, the length of the shoulder cut remains unchanged, but the slight curvature of the tuck improves its fit. The middle segments have bulges along 0,5 - 0,7 cm, and the segments at the top (of length 2,5 см) slightly (on 0,2 см) are concave inside the tuck.
But, if you are going to use this template for modeling, then you do not need to apply concave lines on the drawing.


 Join my community on Viber...


