Cutting and sewing lessons from Vera Olkhovskaya
This video uses professional embroidery design by Natalia Vladimirova “Hardanger. Border". As the name implies, the design imitates hand embroidery using the hardanger technique.
It was difficult for me to choose a name, but I still settled on “cutwork”, since the process of machine embroidery itself resembles this particular technique.
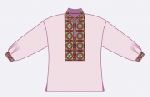
This video master class on machine embroidery for beginners examines in detail the entire process of embroidering a blouse. A wide border with slotted holes runs along the top of the bodice and along the bottom of the peplum.
Particular attention is paid to the operation of joining parts of a repeating border pattern.
The process of cutting and sewing in this video tutorial is omitted ...
 Let me remind you that “hardanger” is an old Scandinavian hand embroidery technique. And, although this technique originated in the Middle East, and by the XNUMXth century it had already conquered Europe, it is called by the name of a city on the southwestern coast of Norway.
Initially, hand embroidery using the hardangen technique was used to decorate clothes. She met both in everyday and in national wedding dress.
But back to the cutwork, as the machine perceives this brilliant imitation of the "hardanger" as a cutwork.
I confess that I learned how to embroider cutwork only towards the end of the shooting of this video and everything that I shot, I did for the first time.
I started, as usual, with preparing the fabric for hooping for embroidering a sample. Since I don’t have enough fabric, I had to save money, so I placed the sample in a corner.
In order for the embroidery to be as close to the edge as possible, I sewed a strip of fabric to the cut with an overlay seam.
Then, hooped the fabric together with a water-soluble interlining. Interlining at the bottom, fabric at the top. My interlining is thin, so I took two layers.
 I embroider according to the instructions that came with the embroidery, that is, before cutting out the holes, then I remove the hoop from the machine and, trying not to damage the interlining, I cut holes on the fabric.
 It turned out that this is very easy to do if you have good scissors.
Once I'm done with the holes, I finish the pattern and after evaluating the color scheme, I decide to replace one color.
The next step is marking the fabric for the product.
I mark the fabric by overlaying ready-made patterns of the bodice of the blouse, after which I repeat the embroidery of the design, fitting into the outline of the outline of the future cut details.
The most important point is the joining of identical fragments of embroidery to each other.
 Of course, before docking, I hoop the fabric with water-soluble interlining again, install the hoop and turn on background recognition with the video camera built into the machine.
 When the recognition is completed, you can move a fragment of the pattern, which I will embroider with the positioning tool.
In fact, the hoop is displaced and I have to combine two docking "figures" consisting of one vertical and two horizontal lines.
First I combine the vertical lines, then the horizontal ones.
And I check how accurately the combination is done. First I look at the screen, and then, I embroider a docking figure. It doesn't work the first time.
When the desired result in docking is achieved, I cut out the auxiliary lines of the docking "figures" and continue the embroidery.
Embroidery patterns